
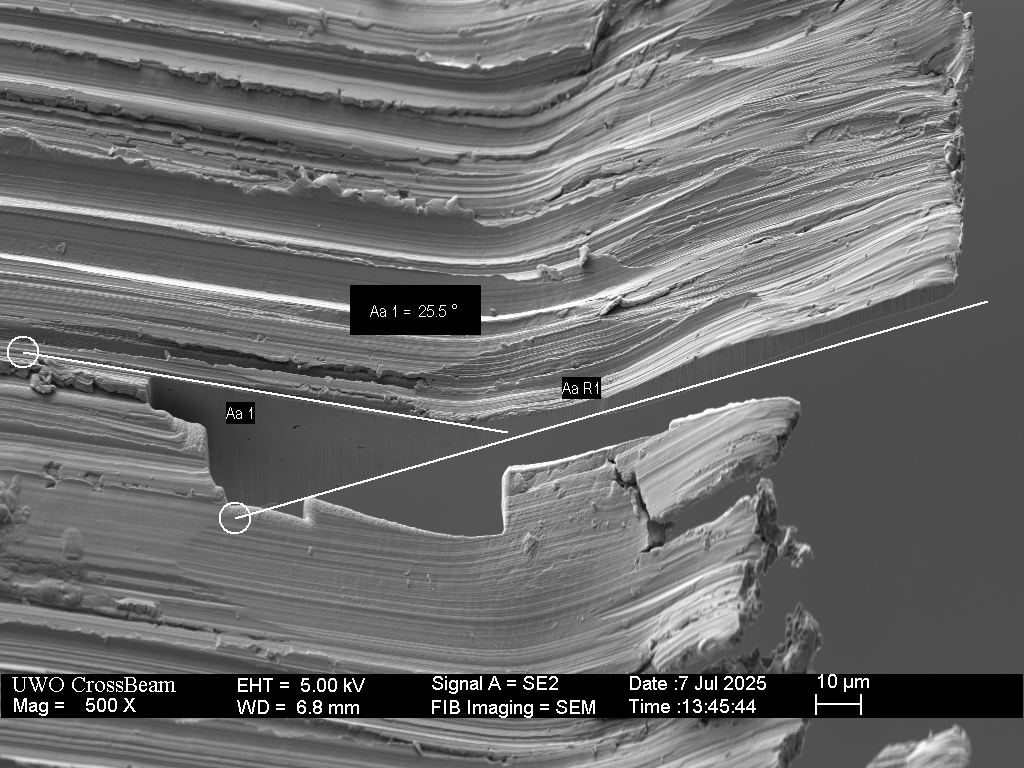
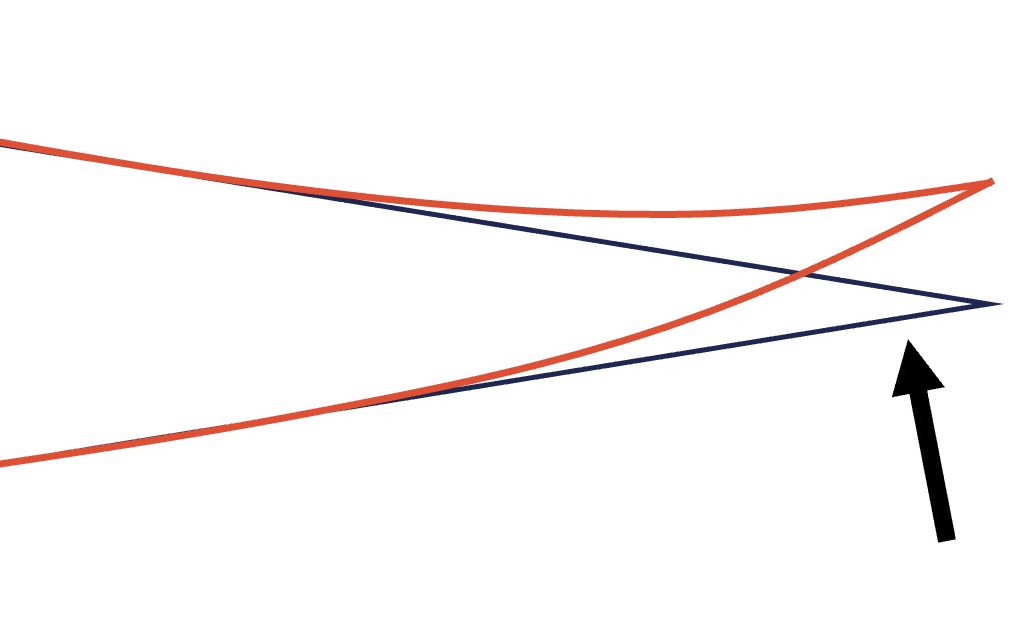
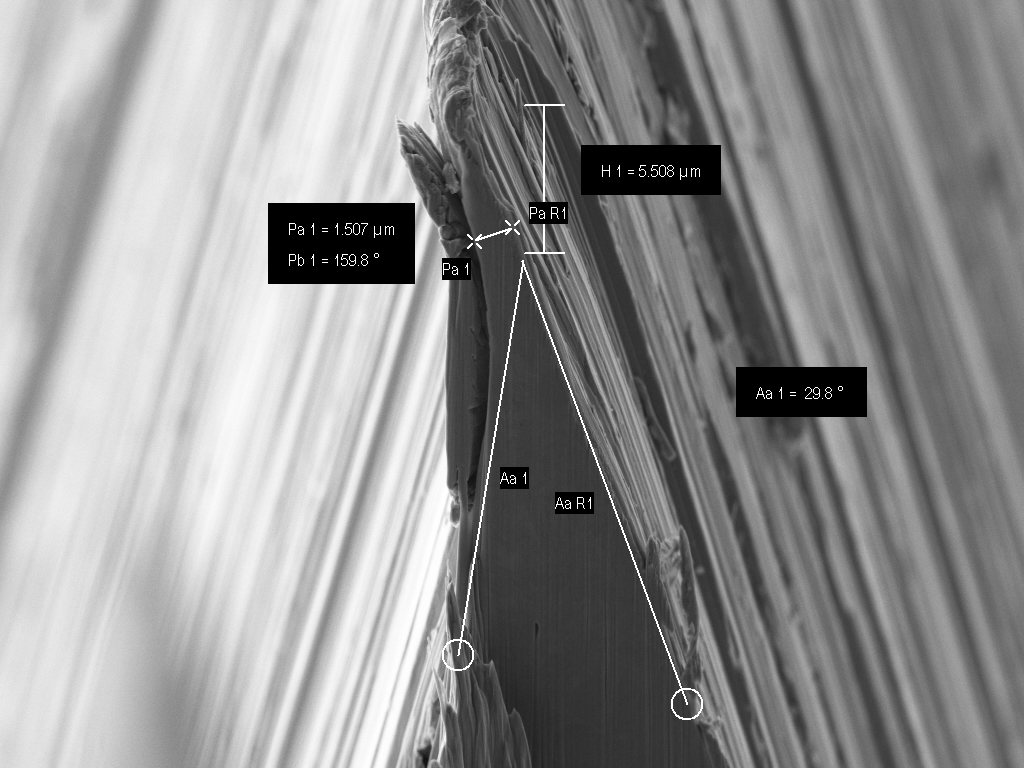
10 years ago, I wrote a pair of articles – What is a burr? part 1 and part 2. These were based on results from straight razor honing experiments, where the sharpening angle is typically 8 degrees per side. More recently, I have been studying burr formation, refinement and removal on knives, where the optimal sharpening angle is typically between 13 and 17 degrees per side. In those early articles, I defined the burr as the metal outside the sharpening triangle. I still believe this is the best way to characterize burr geometry. Sharpening burrs typically have a triangular cross-section with an apex angle lower (more acute) than the sharpening angle. As burrs grow, this angle can trend to zero as the burr becomes a foil or plate with parallel sides.
In the article 7 Misconceptions About Knife Burrs I showed that knife burrs are more easily created than removed. Here, I will show that burr thickness is reduced by proceeding higher/finer grit abrasive while burr “length” can actually be greater at intermediate grits.
In principle, sharpening a knife is not difficult. Given suitable tools and sufficient hand-eye coordination, I believe any motivated person can learn to satisfactorily sharpen a knife. To sharpen a knife that is in good condition, other than being dull with normal use, the greatest challenge is executing a strategy to deal with the ubiquitous burr that inevitably forms at the apex during the process. Dealing with the burr does not necessarily mean removing it, but can include refining it to achieve optimal performance.
The conditions for burr formation and the difference between burr removal and refinement are poorly understood. The dimension that primarily determines blade performance is typically a few microns from the apex and apex dimensions are usually a small fraction of a micron – this scale cannot be resolved with a USB microscope or macro lens. This scale is at the resolution limit of a research quality optical microscope. Even SEM imaging alone (without cross-sectioning) cannot sufficiently characterize the typical knife burr. A burr that appears “tiny” or not visible at all with an optical microscope may still be substantial at the scale that determines performance.
Knife burr formation is initiated with the deformation of the region near the apex after sufficient grinding has occurred to produce a roughly triangular apex. This triangular section is bent away from the abrasive during glancing collisions with grit particles. The process occurs point-by-point along the edge as multiple individual grit particles collide with the apex. I will use the term “burr root” to describe this effect, after the late Dr. Vadim Kraichuk.
With ongoing grinding of the bevel from one side, the burr root will constantly reform and deflect as material is removed. The burr itself will avoid abrasion and continue to grow.

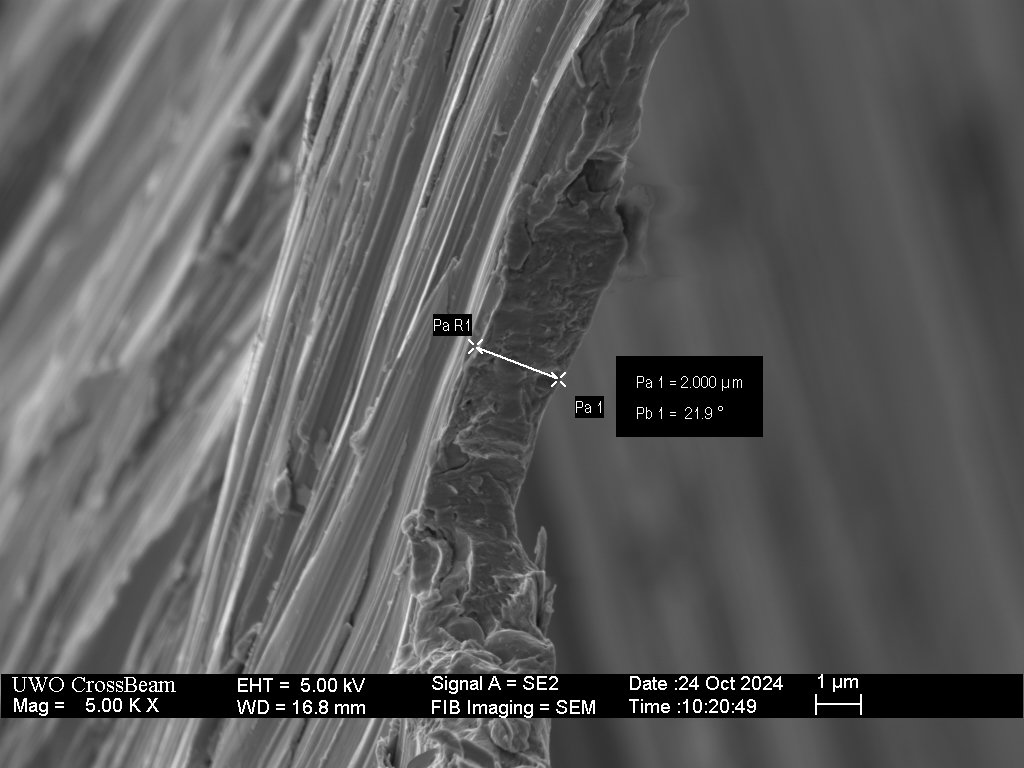
Depending on the type of abrasive and the direction of grinding, when changing sides the burr may be damaged, partially removed or flipped. In this this example, 120 grit belt with edge trailing grinding was used to form a substantial burr. The burr shown in the SEM image below was barely detectable by brushing my finger tip off the edge because it is nearly aligned. I could however tell that the apex was not centered by feeling and comparing the bite angle from both sides. This burr was easily visible as a bright line at the edge when held under a task light.


Before we can have a meaningful discussion on burr removal or refinement, we need to better understand burr formation. With the following images, I will demonstrate the typical relationship between abrasive grit size and burr character.
With hand sharpening on a friable ceramic stone (Naniwa, Shapton, Suehiro, etc), the combination of edge leading passes, frequently alternating sides and the presence of loose grit particles allows burr formation to be minimized, particularly at finer grits. In the article The Honing Progression I showed that beyond 1000 grit, progressing to finer grits has minimal effect on (burr-free) cross-section geometry. That article shows results from a straight razor with a relatively acute sharpening angle of 16-17 degrees inclusive. In retrospect, it is apparent that a small burr was present in those edges evidenced by the non-linearity of the edge.
Compared with hand sharpening, power sharpening will remove more material between switching sides. For this reason, it is generally not possible to avoid the formation of relatively large burrs. Additionally, when the sharpening is performed edge trailing on both sides the burr should be expected to flip when changing sides and grow longer. In this demonstration, the use of edge trailing power sharpening allows the formation and growth of burrs with different abrasive grits while maintaining all other conditions constant.
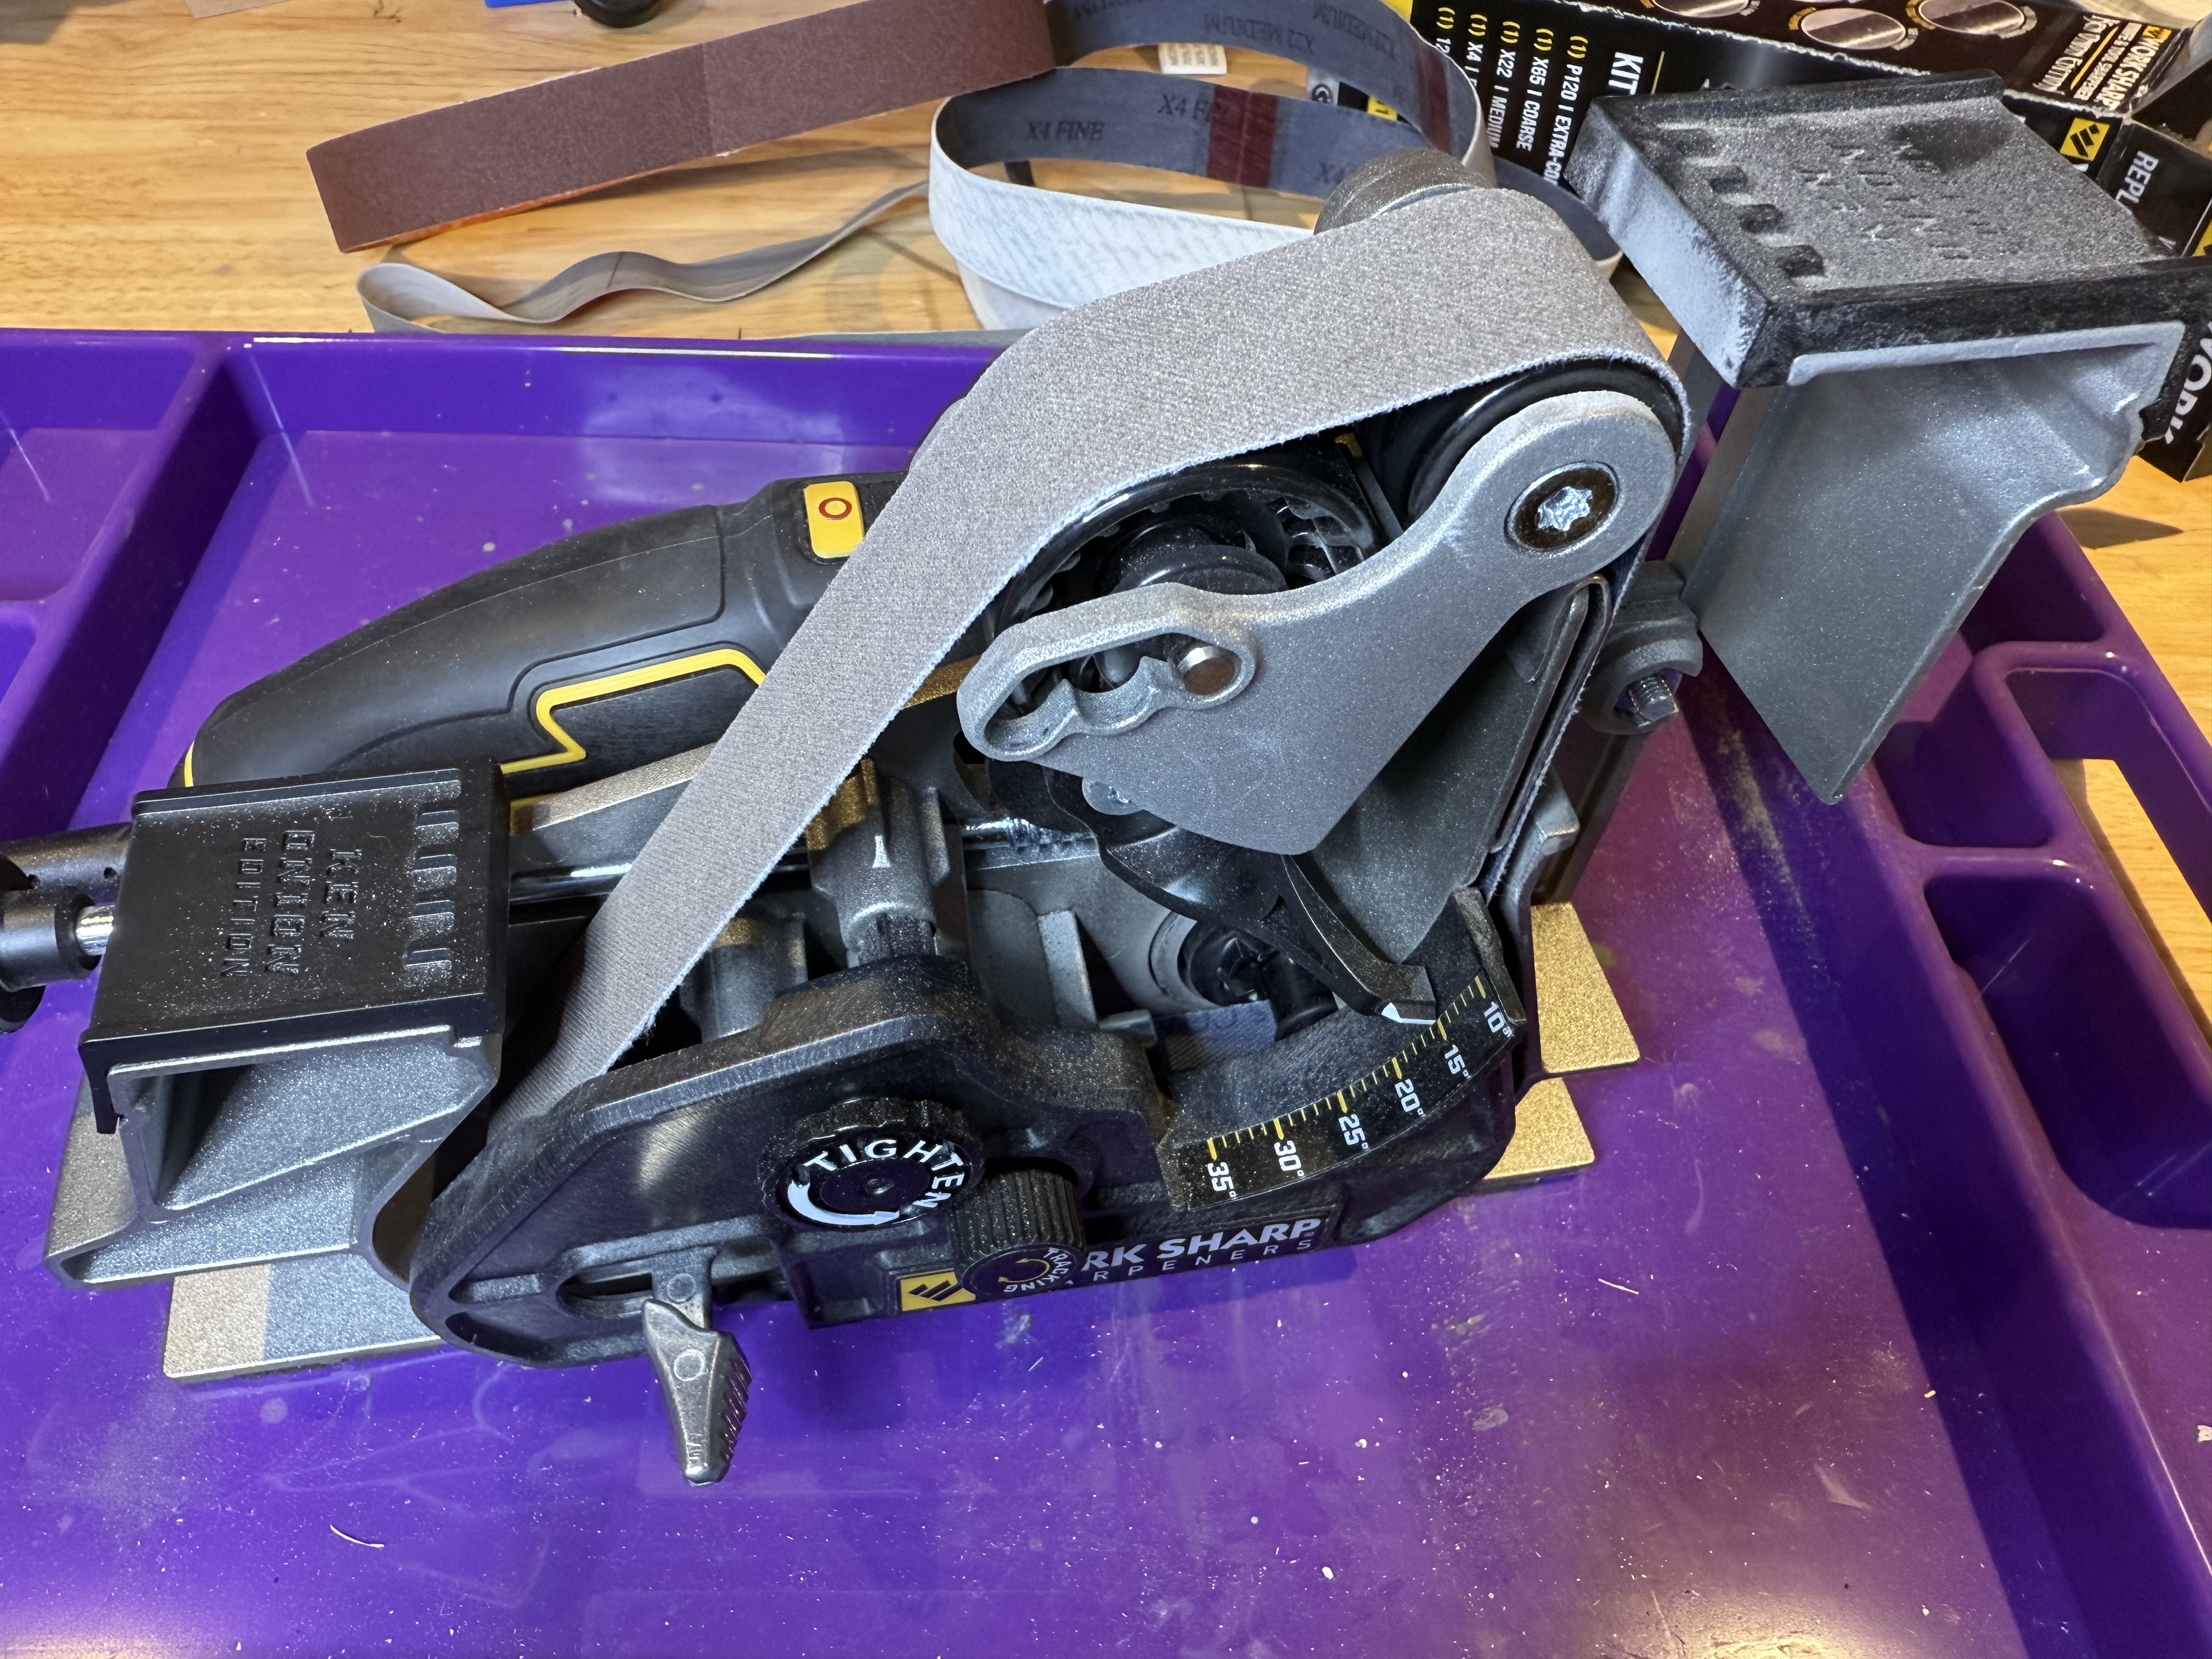
I sharpened six NT cutter utility blades using a Work Sharp Ken Onion Edition – Mk.2™ ELITE (WSKTS-KO2-ELT-C). The sharpener was set up for a 15 degree per side angle and minimum belt flex. Each blade was sharpened edge trailing with 3 back-and-forth passes on each side, alternating sides with every pass. The motor was set at a speed 3 (nominally 1460 sfm) with the blade moving perpendicularly to the belt at approximately 1.5 inches per second. A new 5-piece set of 1″ x 18″ belts was used: P120 (extra coarse), X65(coarse), X22(medium), X4(fine), and 12000.
Note that the base-model Ken Onion Edition Knife & Tool Sharpener Mk.2™ (WSKTS-KO2) sharpens edge leading on one side and edge trailing on the other, while the “Elite” blade grinding attachment (used here) sharpens edge trailing on both sides.
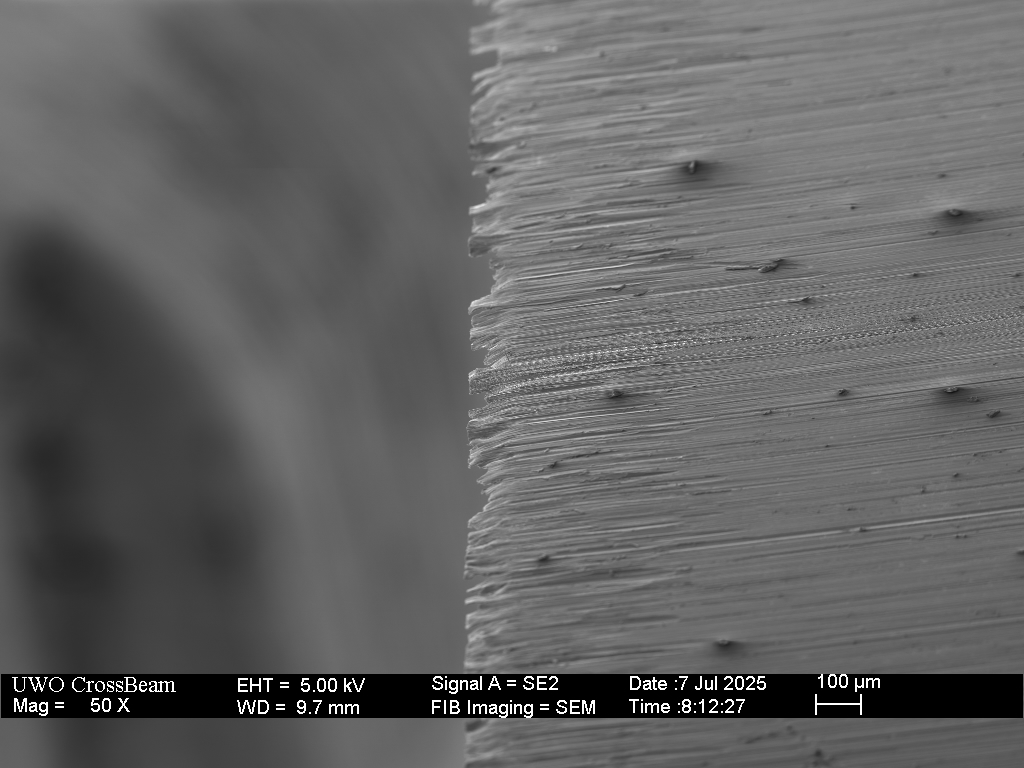
The procedure was as follows: sharpen all 6 blades at 15 degrees per side on the 120 grit, then 5 of those on the Coarse, 4 of those on the Medium, 3 of those on the Fine, 2 of those on the 12000 and finally one of those two at 20 degrees per side on the 12000. The overview image below shows a low magnification overview of all 6 blades and the burrs that formed.

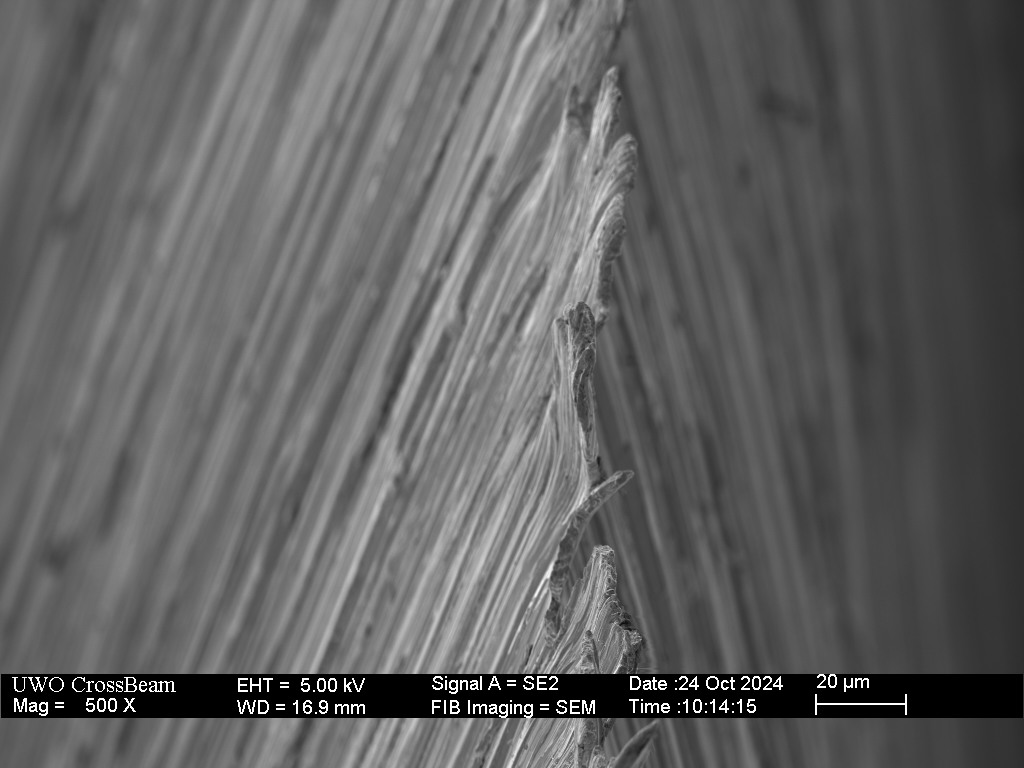
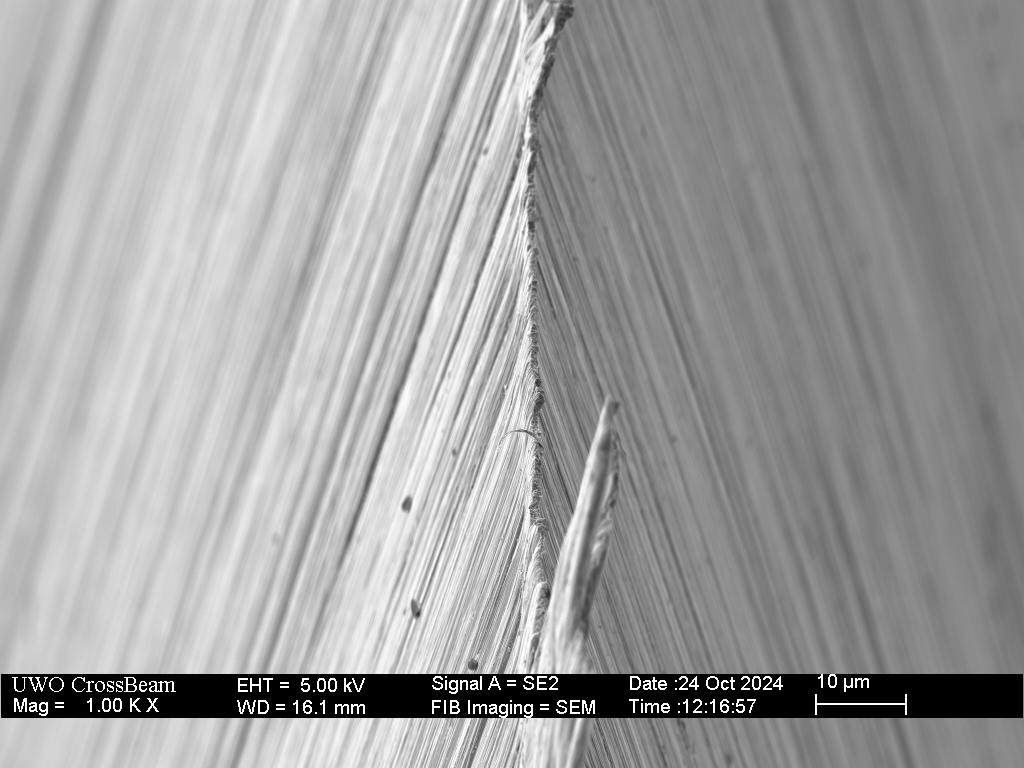
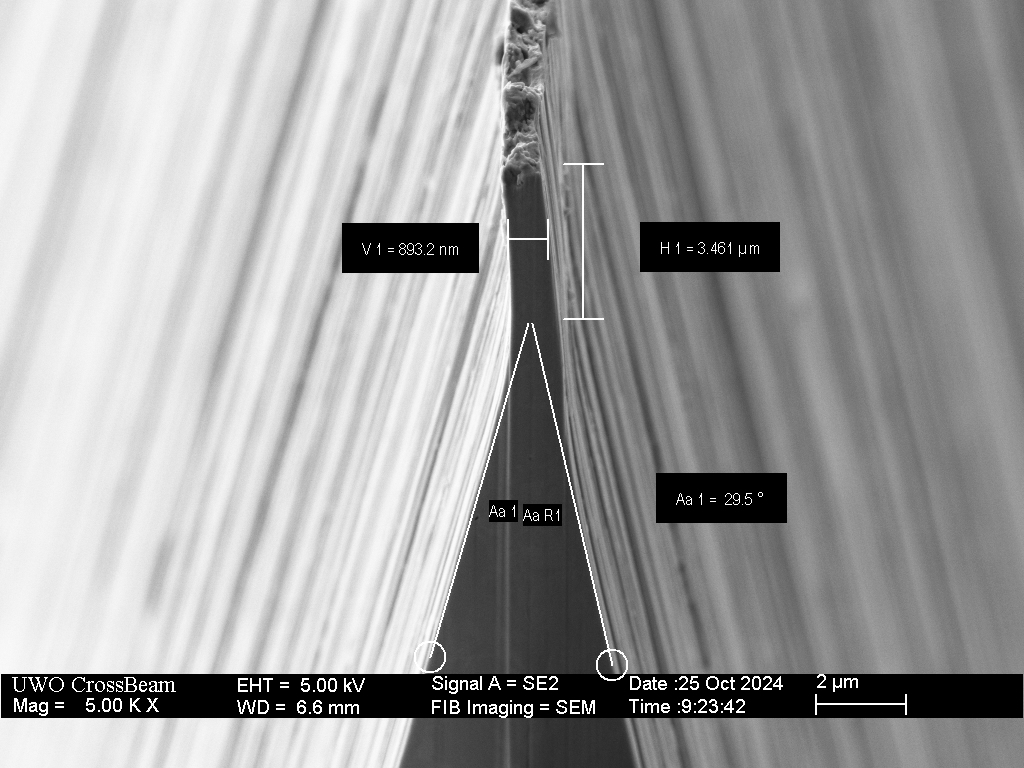
120 Grit – Extra Coarse
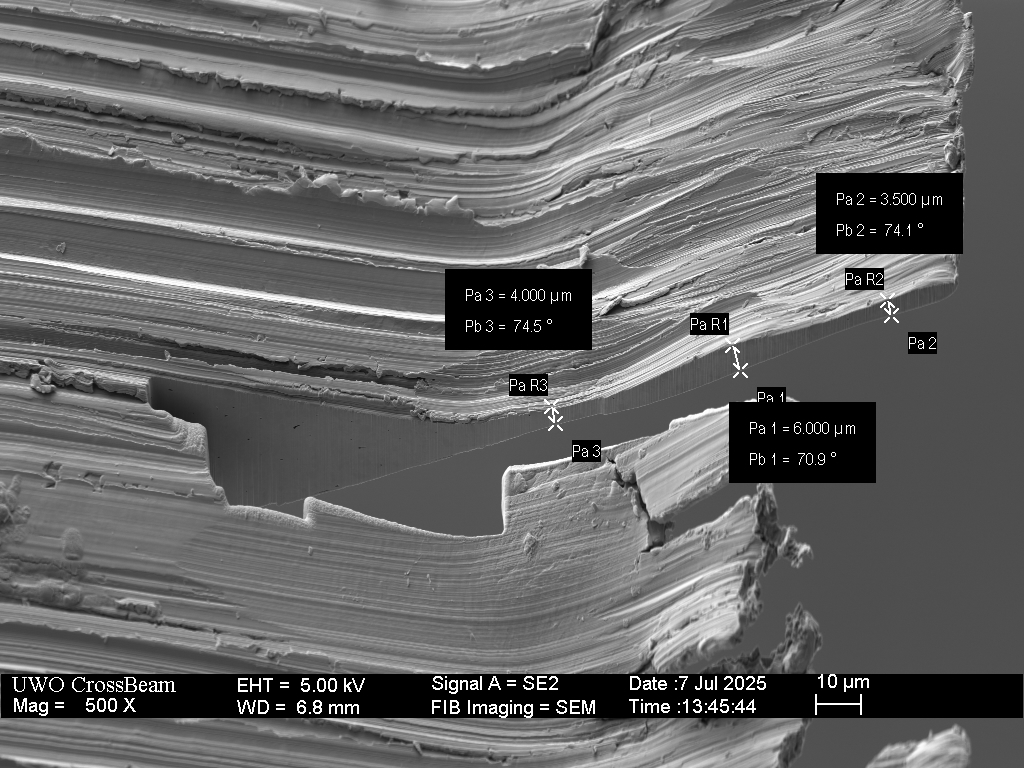
Following the extra coarse (120) grit sharpening, a large burr is present. This burr is sufficiently large to be visible to the naked eye under bright light and easily detected by brushing finger tips off the edge.


SEM image of a broken burr created during the extra-coarse grit (120) sharpening. The burr at this point is at least three microns thick.
X65 – 240 Grit – Coarse
The burr formed during the 240 grit process was hundreds of microns long in some areas, large enough to be visible even without magnification under bright light.
X22 – 1000 Grit – Medium
The burr formed during medium grit grinding was also hundreds of microns long, although thinner and more flexible. In places where the burr wasn’t broken off, it was visible without magnification under bright light.


X4 – 3000 Grit – Fine
The burr formed during fine grit grinding was mostly broken off and difficult to detect.


12000 Grit – Extra Fine
The burr formed during extra fine grit grinding was around ten microns long, but weakly attached and foil-like. The burr is so flexible that it has folded in both directions.


Summary
The plate (or foil or wire) burr that forms during sharpening can have varying thicknesses and lengths. In general, a burr forms when the apex bends or deflects away from the abrasive surface and is not abraded. This deflection occur at scales as large as tens of microns down to a lengths scale of one tenth of a micron (100 nanometers). Burrs of more than one scale are often created simultaneously – a burr at the end of a larger burr.
The takeaway from the above images is that thickness of the burr decreases with increasing grit. Following a grit progression is a straight forward approach to minimizing the burr. Larger abrasives subject the burr root to larger impacts and produce greater deformation. This result is consistent with those shown in Grit, Scratches and Sub-Surface Damage. The length of the burr does not follow this trend. The longest burrs typically form at intermediate thicknesses where the metal is both flexible but somewhat robust. With continued grinding, the burr will grow in length, while maintaining relatively constant thickness until the (aspect) ratio of length to thickness grows so great that the burr folds and breaks off.
The breaking point is observed be typically above the apex, leaving some residual length of burr. There is no way to know where the burr has actually separated (at the apex or above) since the same scale of burr will continue to grow after the burr has broken off. At coarser grits, the burr root can itself be a significant triangular burr and so breaking off the plate burr is not sufficient to fully remove the burr and return the apex to a triangle at the sharpening angle.
When the burr is more than about 2 microns thick it is quite sturdy and can satisfactorily perform as a cutting edge. These thick burrs allow us to produce a cutting edge with an included angle nearer to the optimal 20 degree inclusive angle while maintaining a more robust 30-40 degree inclusive angle a few tens of microns back from the apex.
(Foil) Burrs can be just one tenth of one micron thick and at that scale are flimsy and often inconsequential for tasks other than shaving. Burrs of this scale can be usually be broken off by cutting into wood or plastic or by stropping.
Most troublesome, are burrs with dimensions between these extremes. A burr in the vicinity of one micron thick can fleetingly provide exceptional cutting performance but will roll to one side with use, effectively dulling the edge.
The primary effect of progressing to higher grit is not polishing the bevel or removing “teeth”, but rather to produce a thinner and more manageable burr. The length of the burr does not generally follow this trend, but is determined by grinding direction and frequency of changing sides.

46 responses to “What is a burr? – part 3”
Many thanks for new perfect article.
It would great to see how suspensions (natural stones or aluminum oxide) work with burr. There is a strong opinion, that suspensions prevent creating any kind of burr.
LikeLike
Yes, the loose abrasive increases the rate of damage to the plate burr.
LikeLike
Hi Todd, could you test is the stropping angle does anything different?
So blade not perpendicular to stropping direction but a high angle of 70-80 degrees?
LikeLike
Thank you for the wonderful update!
LikeLike
This makes me want to review the honing steel results!
LikeLike
My thoughts exactly, see my comment from 2018 about honing knrives with edge trailing:
https://scienceofsharp.com/2018/08/22/what-does-steeling-do-part-1/comment-page-1/#comment-2566
LikeLike
Wonderful, as always! There is a lot here to “chew on”.
I am wondering, have you done any studies to investigate:
1. How honing pressure effects burr formation.
2. How hardness, and increasing yield strength effect burr formation?
You may have mentioned both of these things in previous studies. I’ll go back and look, to be sure.
Thank you for your excellent work.
LikeLike
Pressure is important in that there is a minimum threshold required for abrasion for coarse grits. At the same time the deflection of the burr root will increase with pressure. I know that many people will use light strokes at the sharpening angle to finish. This will allow the abrasion of the tip of the burr that extends into the sharpening triangle because the pressure is extremely high with the small contact area but mostly just re-aligns the burr so that it is difficult to detect.
Hardness does affect the deflection of the burr root, which in turn affects the growth of the plate/wire/foil burr. I have some unpublished results on chisel sharpening that will show this when I do publish that work.
LikeLiked by 1 person
Thank you for your reply. I recently gained access to a SEM. I will be looking at burr formation variables, specifically using very hard, low alloy (only iron and carbon) steel.
Thank you for your insight and motivation.
LikeLike
If you get to the point where you want to characterize the burr dimensions by FIB cross sectioning, let me know.
LikeLike
Thank you! We do not have FIB cross sectioning ability. I will definitely keep you in mind! 🙂
LikeLike
Fascinating, informative and useful. Thank you for sharing your experience/knowledge.
Saludos, Dana
LikeLike
As always, an amazing post—keep up the great work! I’d be really curious to see results from the edge-leading-on-belts method under SEM magnification.
I recently started my own sharpening business, using a method similar to what Cliff Curry advocates:
120 Cubitron > Trizact A30 (600 grit) > 3 micron diamond on a felt strop.
This setup gives pretty solid results, but I’m still wondering whether the edge-leading approach truly minimizes or eliminates the burr—or if adding a finer grit step after the A30 would make a noticeable difference.
I’m constantly experimenting with different belts and strops (with various compounds and substrates), but it’s tough to know exactly what’s happening right at the apex. Like many professional sharpeners, I’m always chasing that sweet spot: a method that balances speed, efficiency, and effectiveness across a wide range of steels, edge angles, and use cases.
If you ever decide to do more posts featuring SEM images from powered sharpening systems, I think a lot of us would find that incredibly valuable.
LikeLike
I think the main advantage of edge leading on a belt is that when you switch sides the burr (that is now facing into the belt) will be more likely ripped off than flipped.
LikeLiked by 1 person
Thanks for the great article. It appears that a burr remains all the way to the 12000 grit belt, but it is reduced. Assuming you sharpen a knife to 12000 grit as you describe, how do you recommend removing the small burr that remains? Stropping? Perhaps with sub micron diamonds?
LikeLike
Stropping with a sub-micron abrasive on leather or any metal polish on cardboard or wood will remove this size of burr.
LikeLiked by 1 person
Todd, another very good article, as usual. Tim asks some very good questions, I would love to see one of these comparing steel of several differing hardnesses and the effect on burr formation. Pretty please! 😁
Also, FYI, while looking for your site link recently, I searched your site name and the AI result proclaimed that your articles were written by Vadim! Might want to look into getting that straightened out…
LikeLike
AI trains on internet forums and youtube videos, so of course it gives the wrong answer.
LikeLike
Indeed. It’s a great shame that so many people believe everything it says!
LikeLike
I am confused, i get sharper blades by strooping on fine art cardboard only, as on strooping with compound after 320 grit emery paper. both on a hand drill sanding pad. Could it be that the fine art cardboard simply ripped of the burr and burnishes the edge? Material science is so interessting! Thank you Mr Todd that your share your hobby with us.
LikeLike
hank you for doing this work. It is informative. I love evidence rather than expert conjecture which is quite variable, at times.
I am left with the question of how this is changed, or not by steel archetype. As a chefs knife enthusiast, I would love to see this done with coupons of white, blue, AS, R2, VG10, SLD,14c28, etc. – of course the list could be very long indeed.
Whether or not this other question follows or precedes comparing steels is comparing same steel of known HRC. Perhaps this could be a collaboration with Dr. Thomas.
Thank you, MB
LikeLike
I can’t look at every steel, but based on the range I have looked at I believe this result is typical. What changes is the magnitude of the burr root deflection. The plate burr may be more brittle/fragile in some cases.
LikeLiked by 1 person
This is well done. I’m curious as to why you chose a trailing belt? I know in the past you stated that leading edge sharpening can eliminate or at least greatly reduce a burr and I’m sure free hand on wet stones would show better results.
LikeLike
My goal in this quick experiment is to explain and demonstrate how burrs form and grow, so what could be better than the WorkSharp burr-making machine?
LikeLiked by 2 people
Outstanding images and interpretation. Wow. Thank you. Also nice homage to Dr. Vadim Kraichuk, experiments and his book on this topic have proven very valuable in explaining my sometimes inexplicable sharpening results. In a nutshell, he proposes the notion of a negative burr. Techniques differed most noticeably according to steel hardness.
So, I’m wondering if this experiment were to take place using, say, S110V, would the outcome change measurably?
One of these days, I would love to see a video of you doing what you do, from a behind-the-scenes vantage point. I have no idea how you manage to capture these amazing images that enable us all to learn better “why” and understand actual reality vs myth and conjecture.
It’s funny that I was imagining Murray Carter doing what he does using his sidewalk, rocks, wood, and newsprint. Then, I wondered what his edges look like at his “stages” of progression. Talk about full disclosure! LOL
As I look at that SEM photo of that “nasty” edge after your coarse grit (<300) abrasives, I’m questioning my assertion that my edges are indeed sharp after coarse grit sharpening on “Main Street” steel kitchen knives.
I’ve always contended that my kitchen knife edge bevels and apex were “set” at the Coarse stage of the abrasive. Yes, they are ragged at 320 Grit, but that includes a key deburring sequence after setting the bevel/apex. So, I still believe the premise that a good apex, set and deburred on a course abrasive can be sharp. However, I’m now unsure if I’m working too hard (unnecessarily) with the deburring step after each finer grit in my typical progression. I think, based on this article, clearly I am.
Thanks again.
LikeLike
You can absolutely create these giant burrs in S110V.
LikeLike
Addition to my previous comment. It would be interesting to see how work with burr not only suspensions of nat stones/aluminum oxide, but also – suspensions with diamonds, so, diamond past+oil on any hard basis – glass, ceramic, copper, cast iron, steel… Free diamonds, which have movement on hard surface. It is extremely quick and easy way of finishing, but I am not sure about thin moments in edge.
LikeLike
Burrs can definitely be avoided or at least minimized with a muddy stone, but also leave a damaged layer of steel and prevent the formation of a keen edge. OK for sharpening, but you need a clean step for the final honing.
LikeLiked by 1 person
What do you mean – damaged layer of steel? As I imagined – suspension remove all not strong part of steel and leave the strongest part. So after it – we should have only “true” steel – result of any deformations is removed. Or it is wrong idea?
About sharpness – yes, some finish with around 0.2-1 diamond paste looks good.
Thanks for answer
LikeLike
I would love to see the effect that burr removal has on the apex at each grit interval. How uniform is a coarse grit apex after it has been completely deburred? How significant is the difference in uniformity between extremely coarse grit and extremely fine grit edges? How is the apex width affected by the burr removal process at each grit interval? How much of an impact does a coarse grit stropping compound (5+ micron) have on apex uniformity versus a fine grit (sub micron) compound? In general, I’m extremely interested in the “toothy” edge debate. How it’s formed, what it is, how burrs contribute, and the impact of stropping. Anecdotally, I’ve noticed that forming a burr like the coarse grit belt in the above article and refining/straightening that burr is the only way to truly feel toothiness in an edge. Others have sworn they’ve produced toothy edges with an extremely coarse grit strop, which I’ve been unable to replicate. What are your thoughts and observations?
LikeLike
Removal is challenging to characterize with individual images as it mostly occurs ‘stochastically’ with individual collisions point-by-point along the edge. I am working on an article explaining ‘toothy’ edges – these are burrs or form from burrs. One of the ideas I tried to convey in the 7 Myths article is that burrs are not removed easily with stropping. Stropping is an slow method of metal removal and abrading a multi-micron thick burr with a strop requires substantial effort.
LikeLike
I am working on a post that will answer many of these questions.
LikeLiked by 1 person
Another outstanding video on how stubborn burrs are, with scientific data to back up the provided information.
Thank you very much!
>
LikeLike
Great stuff. Appreciate your effort, presentation and willingness to share.
LikeLike
it is impossible to sharpen a knife. If you remove the burr, the cutting edge will smooth and not cut. If you leave the burr, it will bend. Conclusion: sharpening is impossible and there is no method
LikeLike
As usual, a pleasure to read and to learn new things. Thanks!
LikeLike
For nearly a year now, I have been sharpening my kitchen knives (e.g. Victorinox, Mercer) using Atoma 140, 400, 1200, and ultimately a 6 micron strop. The 140 gives a great burr (“great” meaning the burr is easy to feel), but by the time I finish with the strop, when I attempt to cut a ripe tomato, I am invariably disappointed. After all that work, it just not really that sharp. I’d also like to shave some arm hair, as when I see guys do it on YouTube, I am impressed by their knives’ sharpness. I have no idea what I am doing wrong. Even though I work on feeling a clear, discernible burr with the Atoma 120 on both sides of the knife, I think it is after this point that, frankly, I get confused. I use the 400, 1200, and strop, but while I would like to THINK that I am removing (or reducing) the burr), whatever I doing is just not working very well.
I guess like any other amateur knife sharpener, I wish I could SEE what my knives looked like, so I could figure out where I am going wrong (which is why I love your SEM images), but I wonder whether you will have some future posts that address what to do AFTER you’ve gotten a burr and what we should be “feeling” for as we sharpen with progressively finer grits.
LikeLike
Could be many things, maybe you stropped too hard? A loaded strop can be quite aggressive and easy to overdo, leaving a less keen, “rounded” edge. Sharp but not keen enough for tomato skin or arm hair.
Diamond is great on difficult steels, but on “soft” stainless it easily digs deep and creates a thick burr which is a pain to remove.
Since Victorinoxes are easy to sharpen, may I suggest another approach? Unless the edge is damaged, start with 1200 grit. Do a couple edge leading strokes per side, with light pressure (just enough to grab) on both sides AVOIDING a burr. Feel the edge/test on paper and repeat if necessary. Then half a dozen or so strokes with progressively lighter pressure, alternating sides. It should now cut through a ripe tomato like nothing. For arm hair you may need to refine the edge further. With diamond, there most likely still is a small burr, even if it can’t be felt. A loaded strop or finer stone can remove it.
As an example, a worn Vic paring knife only took 3 basic strokes per side + 3-4 very light strokes on a cheap 1K diamond to cut a soft tomato cleanly. To emphasize: a diamond plate will cut into the “soft” steel deeper, with less pressure and cause more burr than a water stone (which requires more strokes).
About burr; it is a fool proof indicator of reaching (beyond) the apex when having to do serious grinding, e.g. fixing a damaged edge. For an undamaged edge it is unnecessary overkill. Like driving your car into to the back wall to ensure you are inside the garage. You then have to clean the mess. Youtube mechanincs will insist it is easy to change the bumper… Maybe, but still time consuming. As this blog illustrates, removing a burr is the trickiest part. Why create one, when often it is not necessary? Everyone will have a (strong) opinion on that :-).
LikeLiked by 1 person
You bring up a very good point, especially about Victorinox knives (or softer steel, in general). I bought a new whetstone the other day (King 300). I got a full burr on both sides, then, I moved directly to the 1200 (as you indicated). I decided to do edge-trailing strokes only, as perhaps the problem I grind too “hard”, or perhaps the steel is “buttery soft” once the burr is developed in softer steel (or both). I applied light pressure — only enough to make basic contact (ok, slightly more than that).
Ultimately, it worked. I got a very sharp edge. So, thanks for your recommendation.
LikeLike
Nice to hear that you found a working solution. My suggestion was mostly based on info from this blog. Looked for it again, and it happens to be the next article in the index “Burr removal part 1”. It even has pictures from an edge after 3 light strokes on a DMT 1200. In my experience this is by far the fastest and easiest way for knives that needs to cut tomatoes. It is worth reading.
These articles are pure gold, eagerly waiting for the next one!
LikeLiked by 1 person
Regarding “teeth” in the edge, have you looked into scissors/shears? German style barber shears and scissors in general have been said to have serrations at the edge to hold hair (or other material to be sheared) in place. There’s certainly distinctive grinding pattern at the flat side of the scissors I’ve come across and I’ve seen some recommendations from abrasive manufacturers on what type of grinding wheel to use to get serrations.
LikeLike
From what I have observed, scissors require a burr to function unless there is a serration ground into the edge. Any edge that is ground from one side will develop a burr that is difficult to remove.
LikeLike
Hello sir, I saw a description on zknives.com that M390 steel doesn’t form a burr. Any chance you can confirm it ?
LikeLike
I’ve not worked with M390, but even Maxamet can form a burr.
LikeLike
Hi Todd! Long time reader here, love your scientific approach.
I learned sharpening with the long YouTube video by Murray Carter and I still use that technique.
Based on this article and the 7 misconceptions, I stopped cutting into wood for deburring purposes. Also, based on your findings, I don’t feel for a burr on the second side anymore. Instead, I roughly count how many strokes I need to feel a significant burr on the first side, and then I repeat the same number of strokes on the second side.
The rest of the Carter technique looks to me like the perfect recipe for burr refinement.
But now I’m wondering, what is your exact technique/recipe for sharpening knives? Do you do something like a 10-5-3-1 progression for stropping? And how does your stropping look like? You’re talking about edge-trailing, light pressure strokes. My strokes are just slightly edge-trailing, but almost tangential to the edge (like Carter does it).
LikeLike
I do not recommend a stropping “progression” – the strop material determines the effect, not the grit. I have shown in the past that stropping with grit larger than one micron and smaller than 1/4 micron has no measurable effect on keenness.
Stropping usually requires a draw to make contact with the entire edge.
LikeLike