

The title is provocative, but these 7 statements are too often made without reservation. As with most things, the reality is nuanced and depends on multiple factors. My intent with this article to demonstrate that knife burrs can take a variety of forms and explain why the 7 statements are at best only sometimes true. Hopefully, this article will provoke the reader into re-evaluating their understanding of knife burrs.
A sharpening burr is the metal that remains outside of the sharpening triangle. The burr forms from incomplete grinding of the bevel near the apex when the last few microns of the edge flex away from the abrasive surface. With sufficient grinding of one side of the bevel, the burr will grow and curl enough to be detected by lightly brushing your fingers off the edge of the opposite side. What we sense is the compression of skin at the fingertips as it catches the curled burr.
To avoid duplication and making this article unreasonably long, I won’t provide individual evidence for each of the “7 myths” but instead I will give a few examples that demonstrate the phenomenon of burr formation and attempted removal. I do plan to discuss these further in future articles.
When sharpening (or thinning) a dull knife, we will initially be grinding the shoulder of the bevel (away from the apex) and as we progressively remove material, the new bevel will eventually extend to the apex. It can be difficult to determine when this has occurred. Deliberately continuing past the point of reaching the apex and raising a burr is a simple and largely effective technique for determining when a new bevel has been ground all the way to the apex. In principle, repeating this procedure on the opposite side should indicate that sharpening is complete and we can move on to a burr removal step. Unfortunately, the burr is often just bent to the other side rather than having been removed and a new burr formed. Detecting a burr on the second side does not necessarily indicate the bevel setting step is complete.
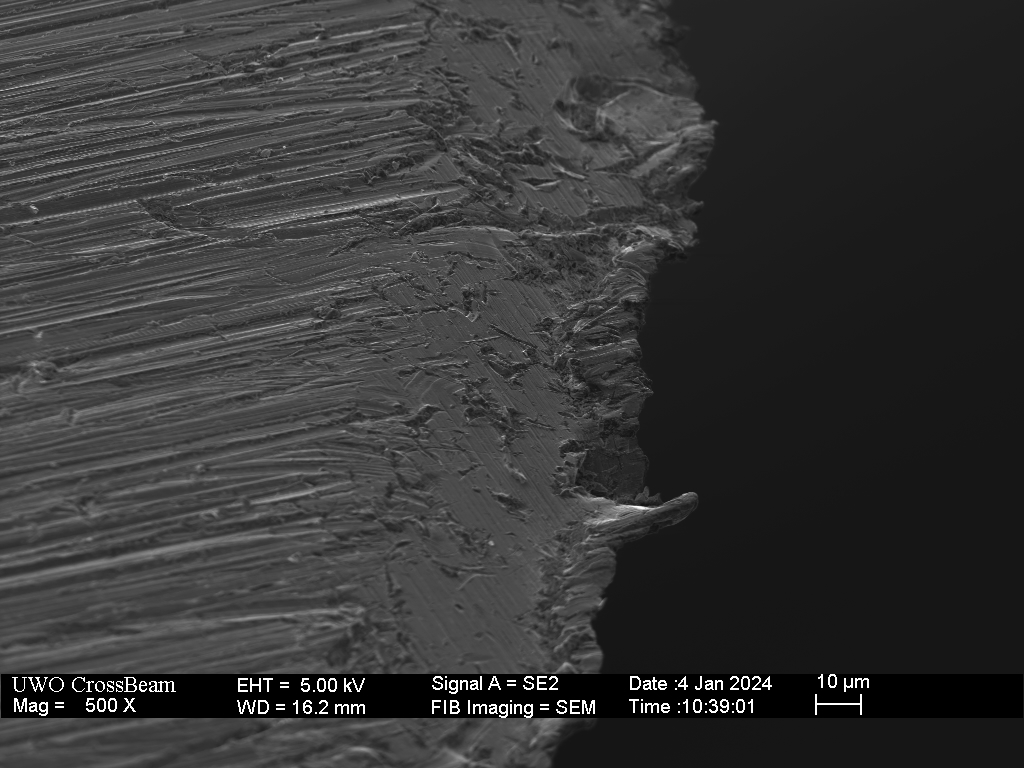
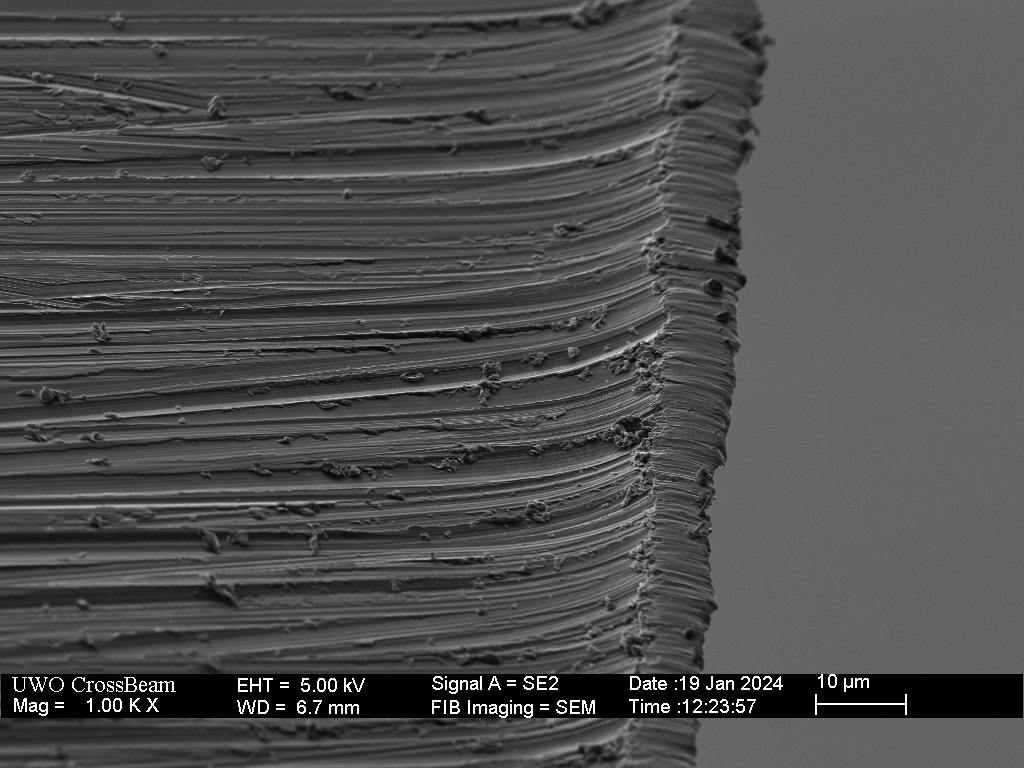
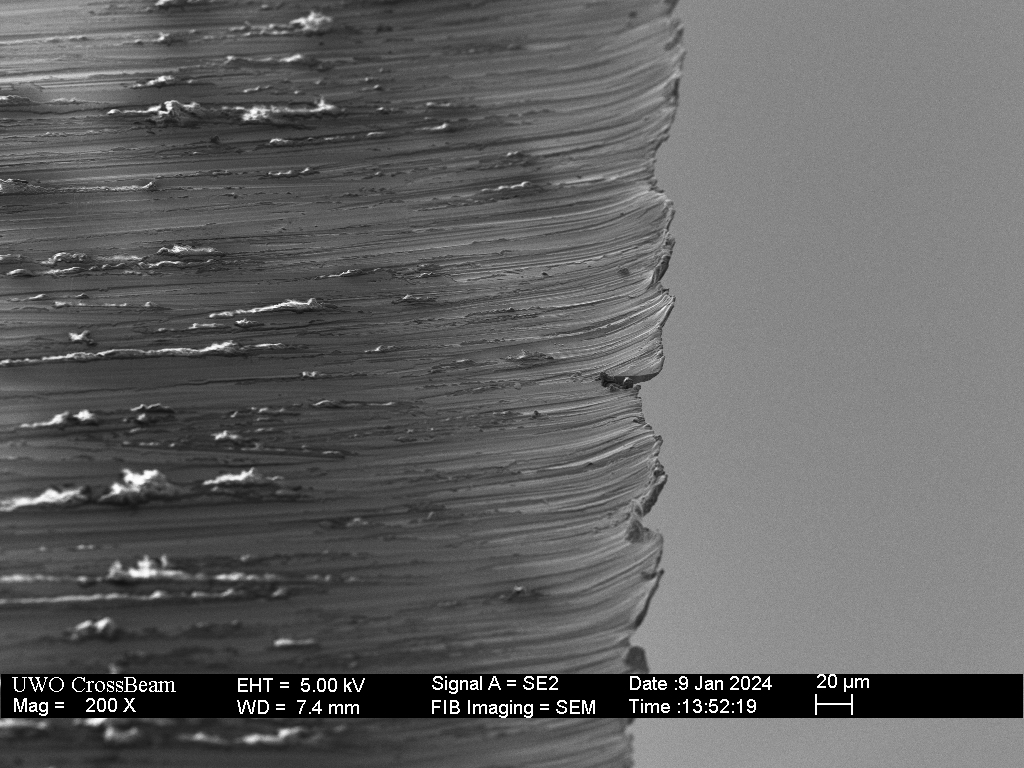
An example is shown below where a Victorinox paring knife is sharpened with a Shapton Pro 320 stone. While sharpening, I alternated sides occasionally and felt for a burr frequently. The first pair of images show the condition of the blade when I first detected a burr.


The knife was then sharpened on the second side until a burr could be detected by feel on the first side. As the images below show, the burr was only flipped, the bevel does not yet reach the apex on the second side. It can also be observed that 320 grit grinding lines are visible on the last 10 microns of the burr in the lower part of the image.
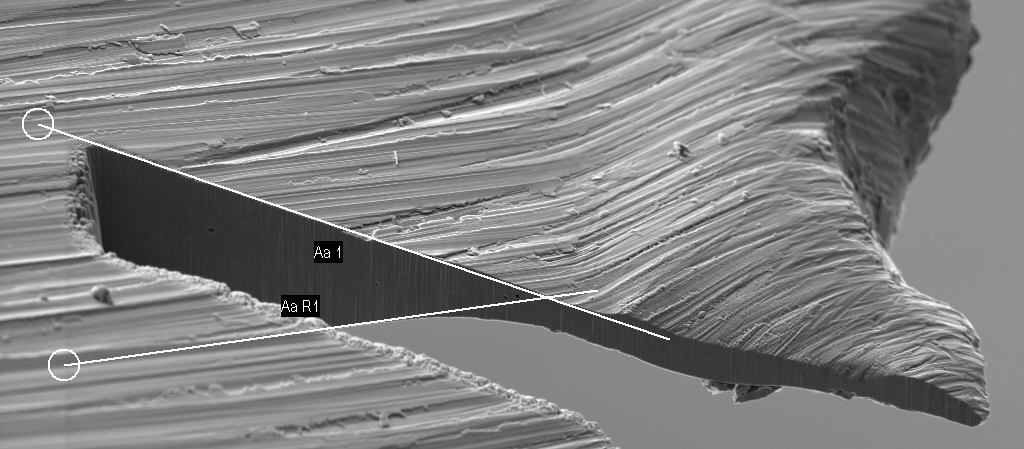
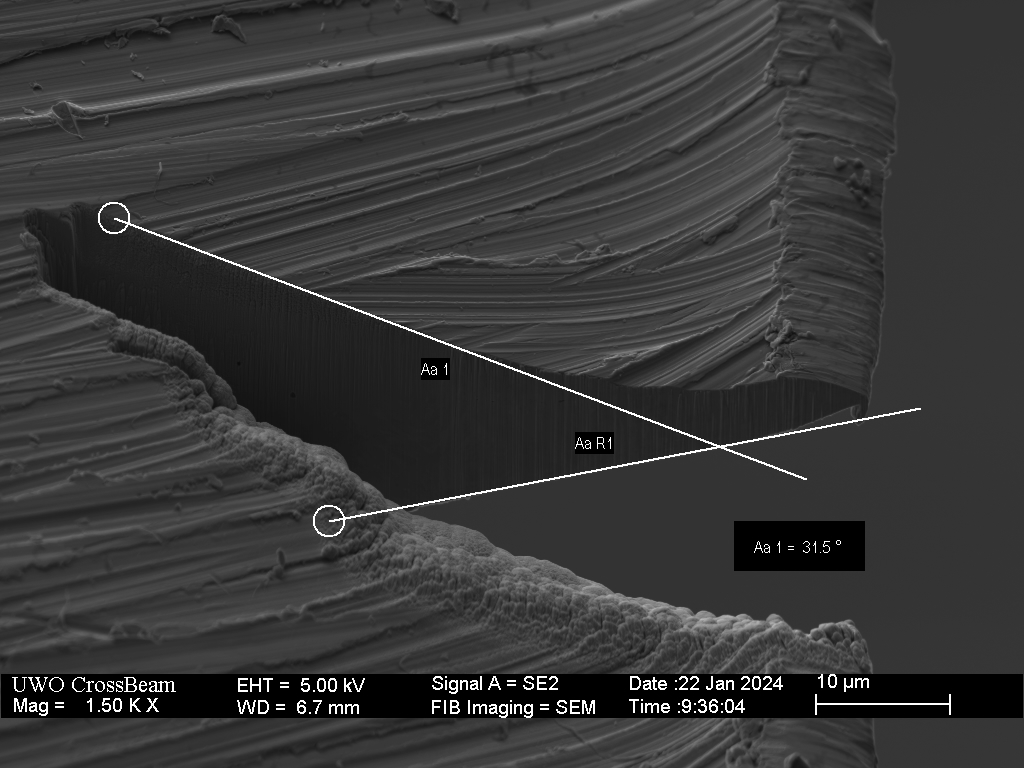
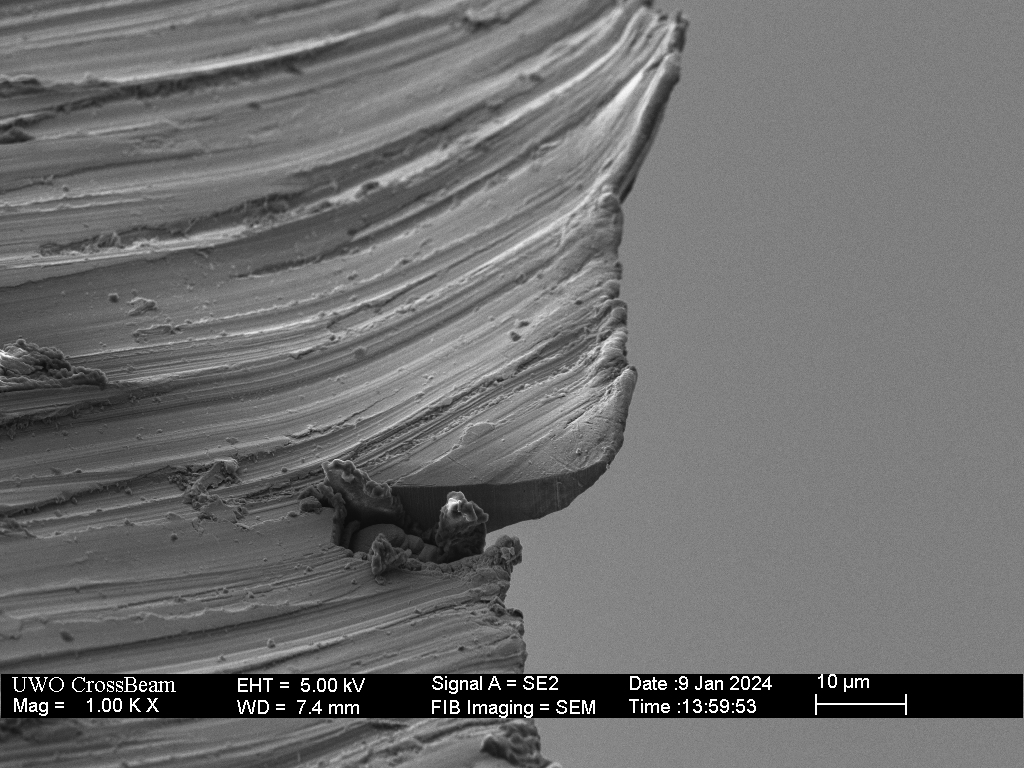
A cross-section through the burr from the first side, reveals a significant burr that was only flipped or bent back, not removed and new one formed. Even though I was trying to minimize the size of the burr, a relatively large and sturdy burr has been resulted.


From the SEM image of the above burr cross-section I would estimate that more than 10 microns of steel need to be removed from this second side to apex the knife and and as much again to raise a new burr. In the Abrasion Rate vs Grit article, I reported a removal rate with heavy pressure on the Shapton Pro 320 corresponding to a removal rate of 15 microns per 100 strokes from the testing coupon. This gives a rough idea of how many strokes should have been required to make a new burr on the second side. In the example shown above, I used “normal” not heavy pressure and I already felt the (flipped) burr within about 25 strokes. This problem could be avoided by performing a burr removal process prior to raising a burr on the second side.
A common approach to sharpening is to raise a burr on each side of the blade and then use light pressure at the same angle, alternating sides until no burr can be detected. This issue with this approach is that coarse hones require a minimum threshold of pressure to abrade steel and the light pressure will rarely remove the burr, but rather align and refine it. If we successfully hold the sharpening angle, only the burr will contact the stone and we will initially produce enormous pressure on the burr even with the lightest touch and abrasion can occur. However, this large lateral force will also bend the burr away until it aligns with the sharpening angle, preventing full removal of the burr at that sharpening angle.
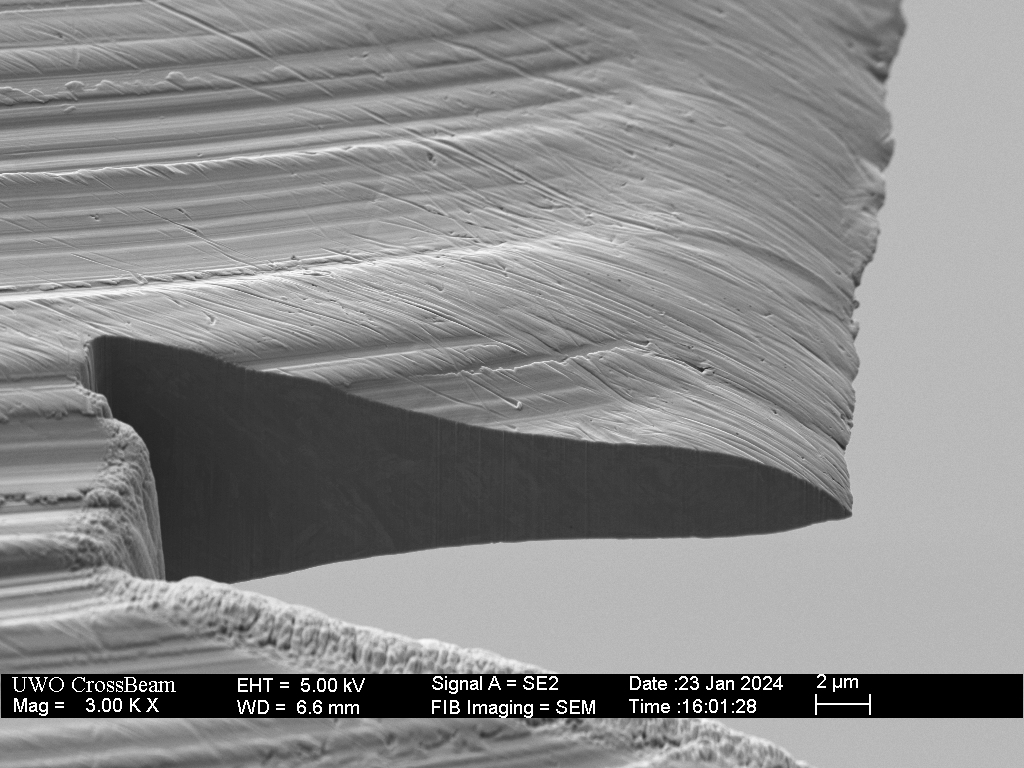
In the example below, I sharpened the Victorinox with a DMT Fine diamond plate, changing sides frequently and stopping when a burr could just be felt. SEM imaging reveals a significant burr, tens of microns long, was formed.

Following the formation of the burr (and the above imaging) the knife was “lightly deburred” with gentle, edge-leading strokes on the second side (with the burr). After 20 strokes, no burr could be felt on either side.
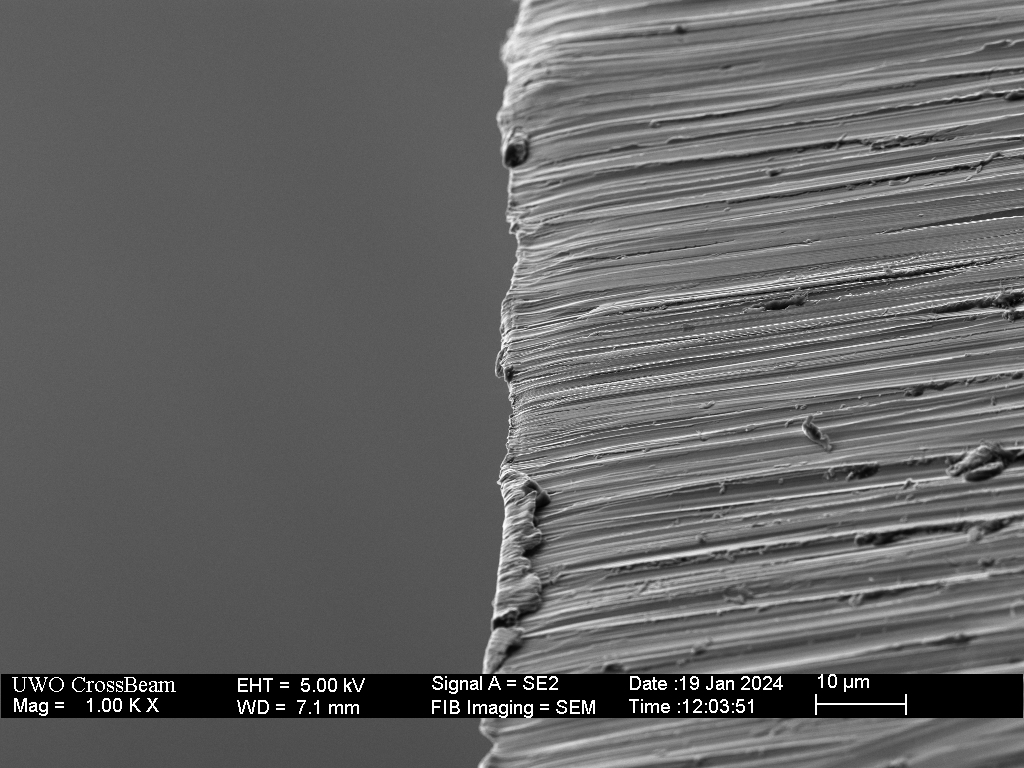
SEM imaging of the second/deburred side shows that the burr has not been fully removed. A burr of this size and deflection cannot be felt with the fingertips.
The knife was then stropped, 10 laps on 1 micron diamond kangaroo tail strop, resulting in a highly refined and aligned burr.

The sharpening procedure shown above produced a blade which was “sticky” to the touch due to the exception ability of the thin burr to penetrate skin with minimal force. The blade was able to cut through zip ties almost effortlessly.
(sometimes) You can feel a burr with your fingers
There is no doubt that a stiff burr that is folded to one side can be detected by brushing your fingertips off the edge. You can feel a burr as small as 1 micron if it is rolled sufficiently to one side. However, a large burr 10+ microns long and 1-2 microns thick cannot be felt if is standing up (or aligned). In my experience, I can feel the burr if it is deflected or curled about 10 degrees or more from normal. Additionally, a foil-burr that is significantly longer than it is thick may be difficult to feel as it is too flexible to give any resistance to our fingerprints. Yes, you can feel some burrs, but others are not tactilely detectible.
(sometimes) A burr can be removed by cutting into felt/wood or stropping on clean leather or fabric
I would classify sharpening burrs into 4 types:
- Imaginary burrs – loose steel particles often magnetized by grinding that stick to the edge and are visible at low magnification or in bright light. These can be “wiped” away with a fabric strop or felt, or by cutting into wood or cork. Stropping on clean leather alone should remove this swarf.
- Flexible/foil burrs that can be folded or rolled by cutting into wood or hard plastic, and sometimes torn away by stropping. These burrs may be so flexible that they can’t easily be felt by brushing your fingers off the edge. This type of burr can be observed to fold, bend, or tear off (when viewed with magnification) during cutting into hard plastic or the edge of a finger nail. Stropping on clean, smooth leather alone, without first rolling it, will not typically remove these burrs. Smooth leather at high angle or rough leather at the sharpening angle should remove them. Another option is to remove these by slightly increasing the sharpening angle – a large burr will often release as a long strip, or wire visible to the naked eye.
- Thicker (1-2 micron or more) burrs of fatigued or brittle metal that can be partially broken away and partially rolled by cutting into wood and partially removed and partially stood-up by stropping. The resulting edge should have slicing aggression and catch fibres when cutting paper towel. Stropping on clean leather alone likely removes only the weakest regions of the burr. This type of burr will produce a non-liner edge, and is often mis-described as micro-serrated.
- Thicker (1-2 micron or more) burrs of relatively undamaged and aligned metal that are unaffected by these procedures. The DMT-Fine images shown above and the dual-grit sharpening article are good examples.
The example below shows a foil-type burr and its conversion to a wire-burr. A foil burr can be identified by the aspect ratio of length to thickness being higher than about 10:1.
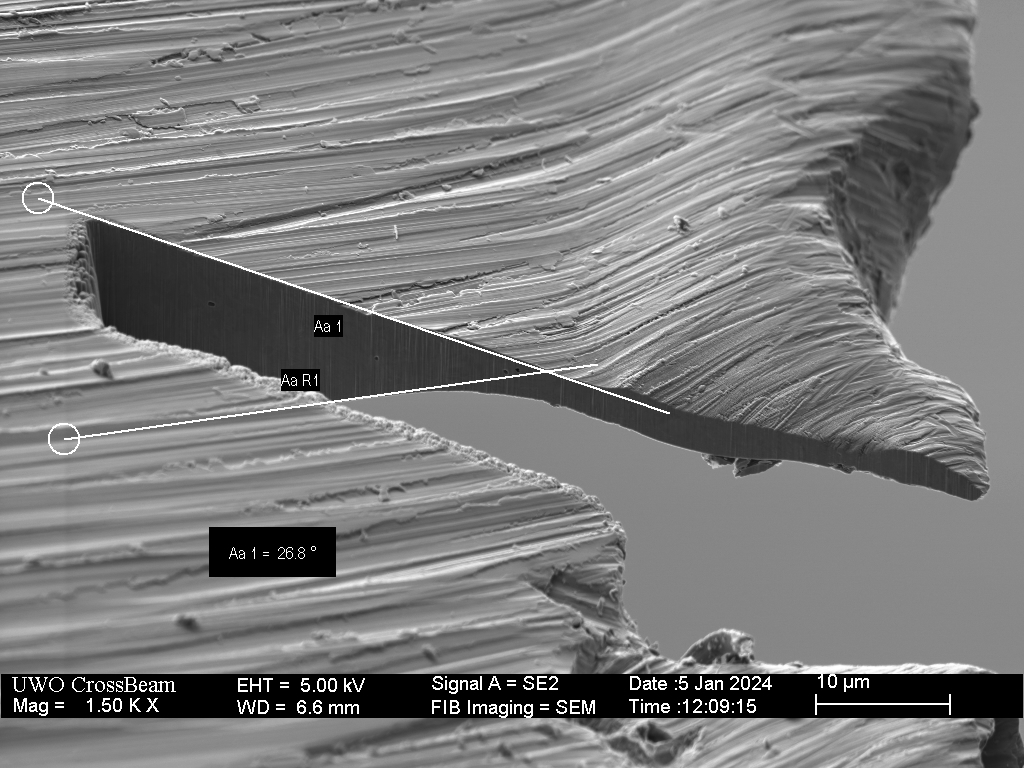

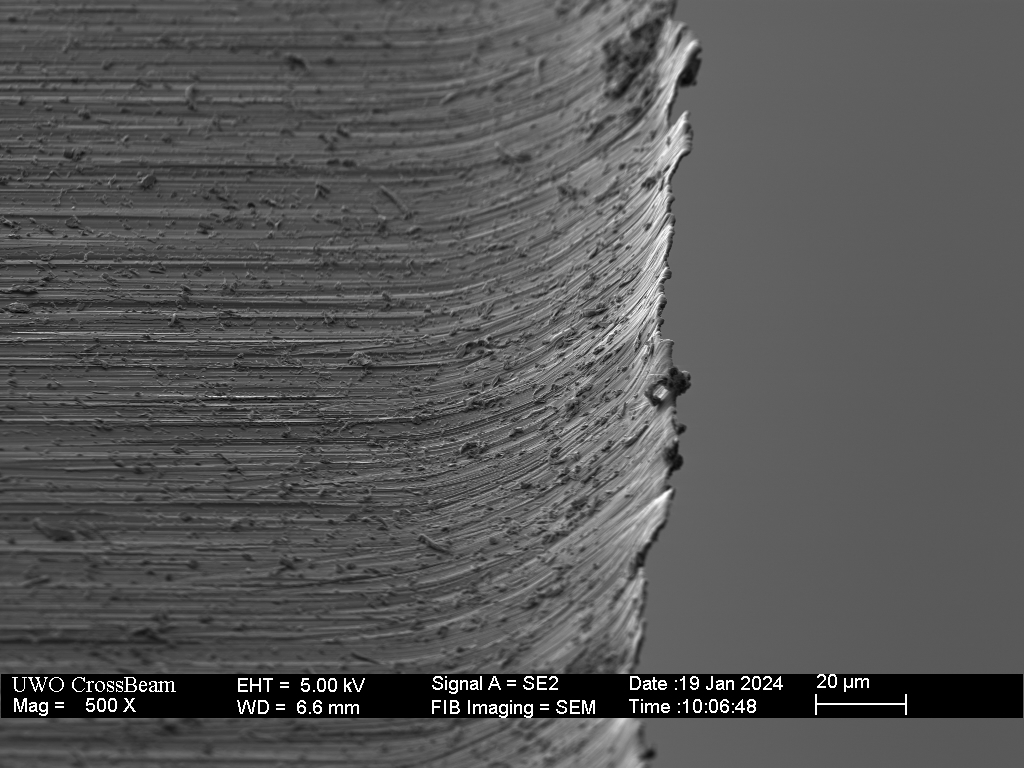
The next example shows a burr on a Victorinox paring knife sharpened with an Atoma 400 diamond plate. Sharpening was performed by frequently alternating sides until a burr could just be detected by my fingertips. Evan though I tried to minimize the size of the burr and stop when I could just detect it, the burr is more than 20 microns long. This burr has dimensions and length:width ratio somewhere between that of a foil (greater than 10:10) and a “sturdy” burr (around 3:1). It can perform well unless or until subjected to lateral force in which case it will roll.
A burr of this dimension is difficult to remove and certainly will not be removed by stropping or cutting into felt or a cork. I show that even cutting into the cross-grain of a maple block has little effect.


In the example above, 10 slices into the cross-grain of the maple block slightly defected the burr but did not remove any of it.
Some burrs can be removed easily, most cannot.
(sometimes) You can remove a burr with light (pressure) alternating strokes on the stone.
This depends on the type of stone and the angle of sharpening. If the angle is higher than the (sharpening) angle, the burr can be abraded and a micro-bevel formed. Nearer to the sharpening angle, a finer stone that releases abrasive (slurry or mud) could remove the burr. However, on a stone/hone that typically requires some pressure both to release grit and to grind, low pressure at the sharpening angle will not typically remove the burr. The effect of low pressure, alternating strokes depends on the thickness/sturdiness of the burr. It is often possible to refine the burr without fully removing it. When performed well, this approach can refine the burr to produce a keen edge with a sharper angle than would be achieved if the burr were removed (for example, as the dual grit technique does).
An aligned burr is typically undetectable – being no longer able to feel the burr does not mean it was removed.
(sometimes) Edge-leading, alternating strokes will avoid a burr.
In general, as we sharpen a blade, at different points along the edge there is a competition between burr formation (incomplete grinding across the edge as the apex flexes away) and burr breaking (micro-chipping). Looking at the non-linearity of the edge, the high points are usually burrs and the low points are usually micro-chips. We can often identify a burr from this edge non-linearity. Edge-leading strokes generally increase the rate of burr breaking, and in many cases this process dominates and a burr is avoided. However, in some cases a burr will form even with edge-leading, alternating strokes – for example as observed with the DMT F (600) diamond plate.
It is easier to avoid a burr than remove one. This direction of stroke usually reduces the probability of burr formation – in some cases it is effective, in others it is not.
(sometimes) A burr is the result of steel being pushed/moved/drawn out past the edge.
It is true that metal can be pulled or drawn out of position in the direction of grinding during sharpening, but the scale at which this happens when hand sharpening is typically measured in nanometers, not microns. A sharpening burr (typically a few microns to a few tens of microns in size) results from incomplete grinding across the edge, which occurs when the apex/burr bends away (in the perpendicular direction) from the grinding media.
This is more of a semantic issue than a myth, but still important to understand.
(sometimes) A burred edge will fail quickly
A two micron thick burr that is standing up and has no significant microstructural damage is surprisingly strong, and in principle, could outperform a burr-free apex, as shown in the dual grit sharpening article. In the absence of microscopic damage, a 25 degree burr at the end of a 35 degree bevel is not weaker than a burr-free 25 degree bevel and will cut better than a burr-free 35 degree bevel. As always, the sharpening procedure should be matched to the cutting task.
(sometimes) Burrs are bad
I am confident that many people are deliberately but unwittingly forming burrs with their sharpening process, and they are happy with the results. Most so-called “toothy” edges formed by coarse stones are burrs, and there is no question that these edges can perform better in certain tasks than a refined, burr-free razor-type edge.
Final Thoughts
The performance of a cutting edge is largely determined by the last few microns of the edge, at a scale too small to visualize without electron microscopy. Burrs that are visible with modest optical magnification and bright light are typically (relatively) large with dimensions of ten microns or more. Burrs can be created in different forms and sizes and their presence can dramatically reduce or improve the cutting performance of the blade. Many so-called de-burring procedures are only effective for some types of burrs and may refine the burr rather than remove it.

43 responses to “Seven Misconceptions About Knife Burrs”
Yet again, another good article. Always interesting reading. Thank you, Todd.
LikeLike
Great article! This did confirm my thought that when flipping the knife over after burr formation, to start with leading strokes to abrade the burr away. You mention leading strokes, what about edge trailing strokes in regards to burr formation… better, worse, used only for finishing passes?
You mentioned a stone that releases abrasives will be beneficial in removing a burr. What about creating a slurry to start, would that minimize formation of a burr?
As a side note, I was very impressed with how fine the DMT F plate edge looks VS the Atoma 400.
LikeLike
Generally, when abrading the bevel, the apex tends to bend away from the stone. This can lead to a burr, but more importantly protects the apex from damage during grinding. This why ceramic knives are difficult to sharpen, the apex cannot bend away to shield itself from direct impact. This process is random or stochastic along the edge – leading edge increased the rate of apex removal or micro-chipping vs edge trailing and slurry introduces 3-body effects that increase the rate of apex damage. Generally, mud or slurry prevents burr formation. Edge leading can still produce a burr, see the DMT F, for example.
LikeLike
Great work Todd! Thank you for the experimental work and write up.
LikeLike
Hello Todd,
Greetings from Germany, and a lot of thanks for another eye-opening article. I am always wondering, how you are making these cross sections with such perfect edges. No melting, no abrasives, no nothing! How is that possible at that scale?
Thanks again,
Niko
LikeLike
He’s using a Focused Ion Beam to cut the metal, if I recall correctly.
LikeLike
I use a focused ion beam (gallium ions) to mill the cross-section.
LikeLike
It feels funny to note that your ion beam creates keener edges than the actual apex you’re often imaging. If only it wasn’t incredibly impractical to sharpen almost anything this way.
LikeLike
EXCELLENT !!! (again . . .)
LikeLike
[like] Thomas Magnac reacted to your message:
LikeLike
Glad to see you posting again! Thank you for your thorough and interesting articles.
LikeLike
So how do I ensure that I have eliminated any burr on Magnatcut steel? I usually sharpen to 6000 and then hone to 38000.
LikeLike
With any steel the burr formation is occurring during the coarse grinding. A substantial burr could require hundreds of strokes to remove at 6000 grit…
LikeLike
This is really eye opening and confirms my suspicion that I’m (probably) never fully removing a burr. I have no evidence either way, other than relative sharpness. But as you show here, even that is not an indicator of burr removal.
I am now thinking I really have no idea what’s going on with my edges. I just rub them on stones until they seem sharp. At this point I’m not quite sure what I need to do differently, if anything, to ensure burr removal.
Thanks much for the great article.
LikeLiked by 1 person
The message is that burr removal is not necessary, just burr refinement.
LikeLike
a message like this helps a lot for some beginers like me. Cause I was like
“yeah the science is awesome and seeing the evidence is great, love it as a science lover better than word of mouth, but what is the message here? That everything is up to chance and just hit the stone and pray for sharpness as not method is consistent unless you have an expensive microscope and discover whats happening with each blade?” lol
Great work and thank you for sharing all this awesome data! I just suggest adding a good message at the end of the article so as not to bombard people with data that they don’t know what to do with haha
LikeLike
Awesome SEM pics of burrs. Shows what’s really there vs. our simplified assumptions.
LikeLike
Could you share how you microbewel? You use it effectively a lot. Thanks for your extraordinary work
LikeLike
As a rule, I increase the angle slightly (about 1 degree) at each step. Microbevelling can be problematic if there is a burr or if the prior sharpening angle was too low (sub 25 degrees inclusive).
LikeLike
I agree with davidrpdx2. But I don’t feel good about this… And I haven’t yet been convinced that “a 25 degree burr at the end of a 35 degree bevel is not weaker than a burr-free 25 degree bevel”. I must have missed the evidence for that claim. And what counts as “microscopic damage”? Doesn’t the process of being bent into a burr count as damage?
I vaguely recall Vadim Kraichuck’s work suggesting that a long lasting edge can only be obtained when the burr (and the root of the burr) is completely removed. In other words, even if burrs can cut well (and they clearly can), they don’t hold up as well (no matter the cutting task) as a clean apex with the same included angle. His evidence for this was that he had some way of testing the force required to crush the apex on burred and deburred edges.
Interesting article as always.
LikeLike
Just noticed this: “To avoid duplication and making this article unreasonably long, I won’t provide individual evidence for each of the “7 myths” but instead I will give a few examples that demonstrate the phenomenon of burr formation and attempted removal. I do plan to discuss these further in future articles.” Fair enough.
LikeLike
Hi Todd,
Have you tried deburring by sweeping the knife perpendicularly to the newspaper or denim? I saw a lot of Japanese sharpeners did that on Youtube. I’ve tried it and it seems to give me quite a good result, but only if I don’t over do it especially on denim. However I need to strop the edge back at the sharpening angle to make the knife sharper. I wonder how it would look under a microscope? Do you think it’s basically like a more aggressive way of hanging denim strop?
LikeLike
Dear Todd,
Thank you for sharing your great work💪 Greetings from Denmark in Scandinavia.
You state that there is no doubt that a toothy edge sometimes are surperior to a silky smooth final finish.
If you could please elaborate on what the working situations are, that will benefit from a moore toothy edge, that would be highly appreciated.
Best regards
Jan😊
LikeLike
E.g. slicing a tomato (or anything else that is cut with a “swipe” rather than push). Small “teeth” will more easily cut through the skin (especially a softer one) than a smooth edge. I never bother to sharpen tomato knives beyond 1000 grit + strop = quick 2-3 minute job.
Using higher grit(s) as required for meat and fish knives, wood working knives etc. easily become 10+ minute jobs per knife.
LikeLike
There are no “teeth” – what you are experiencing is the geometrical power of a burr (very thin, low angle) penetrating the skin. This effect vanishes with higher grit because the burr is removed, increasing the apex angle back to the (higher) sharpening angle.
LikeLike
That is the correct way of describing it, thanks for clarifying.
My point was to give an example of a situation where a “toothy edge” (words used in the question) may be preferrable, thus the use of “teeth” in quotation marks.
English is my third language and I don’t yet know all the specific and correct terms when it comes to sharpening, but I’m learning. My interest in sharpening is fairly new. For most of my life it was just a necessary evil, as boring as washing dishes.
Looking forward to learn more from future articles
LikeLike
Thanks for the article, I feel like I understand what happens but as that happens I feel like I have zero idea on how to hone and sharpen knives. Hopefully it’ll make sense one day. I am almost exclusively sharpening chef knives though, I recall you said at some point that it’s a bit different than razors.
LikeLike
My favorite Agnostic article 😀
LikeLike
I had this article in my draft folder for many years while I confirmed the contents.
LikeLiked by 1 person
Hello Todd, great work as always. The simple straight razor honing method works great for me on all types of knives. So thank you very much.Can you please clarify something for me?In a comment on this article you said that the message is that refining the burr is often better than trying to remove it. I get that message.Now my question is, how to achieve that?Do you think the following approach will work?Grinding on a fine or extra fine hone until a burr can just be felt, then doing light edge leading strokes on the side of the burr until it cannot be felt on either side of the blade. Then stropping on leather with 0.25 micron diamond spray for 10 to 30 laps. (Or is the hanging denim with metal polish better?) I would be happy to hear from you.Greetings, Ludwig.
LikeLike
The thickness of the burr generally decreases with increasing grit. To first produce a meaty burr that won’t roll with use you need to use a relatively coarse grit like 320. That burr can aligned on the same stone with light strokes at the sharpening angle. From there a fine stone and/or a strop can be used to refine the burr. The 1/4 micron diamond on leather likely won’t remove enough steel to refine the burr on it’s own – I would use a few strokes on either a fine stone or metal polish on cardboard first.
LikeLiked by 1 person
[…] the article 7 Misconceptions About Knife Burrs I showed that knife burrs are more easily created than removed. Here, I will show that burr […]
LikeLike
Great article. Fits experience. Dave Martell, a professional sharpener (retired, I think) talked about how burs often masquerade as a real edge.
This was how he explained knives that feel very sharp right off the stones, slice paper like there’s nothing there, slice food under their own weight … and then 5 minutes later don’t cut well anymore. I’ve had this experience many times, especially with knives that are tough to deburr.
It seems that a sharp, aligned burr just isn’t as durable as a real edge. Unfortunately it’s hard to know the difference—my electron microscope’s in the shop!
LikeLike
It depends on the dimensions of the burr. In the 7 myths article I mention that a 30 degree burr on the end of a 40 degree edge is just as robust as a cleanly formed 30 degree edge.
LikeLiked by 1 person
LikeLike
This should work, I normally increase by just 0.5 degrees though. A small standing burr is not a negative, provided the burr angle is at least 20 degrees (triangular not plate).
LikeLike
Huge respect and admiration for producing such astonishing images. My mind is blown away by the level of detail. This gives so much insight and food for thought. You are so generous for sharing this information with all of us and I am deeply thankful for what you have been doing.
Myself, I’ve been troubled by the burr and its successful removal for many years now. As a knife sharpener enthusiast that started on sandpaper decades ago, went through whetstones and hand sharpening, then self-made sharpening systems followed by Tormek T8 with all the diamond stones + Japanese waterstone, and finally arriving at the TSPROF K03 with Venev’s resin bonded diamond stones from F80 to F2500, I am still struggling at the last step – burr removal and edge longevity. Once finishing on the diamond stones (usually at higher than #3000, most often to #11000), going to the strop, I’ve had so much trouble with either producing very sharp burr that would whittle hair in both directions but fail to cut tomato skin or apple skin easily after just one slice or over-stropping and rounding off the apex so it does not want to shave hair at all.
I’ve tried many different stropping mediums (paper, cardboard, wood, copper, glass, and of course tons of leather on both sides, with or without stropping compounds. The stropping compounds – I have a few of them, like 32 different ones, incl. DBK 1 u, 0,25 u, Hapstone 12, 9, 6, 3, 1, 0,5 0.25, 0.1 u, Venev 7/5, 3/2, 1/0 u, Tormek PA-70, Poltava 40/28, 14/10, 7/5, 3/2, 1/0 u, Luxor (the whole set, Dialux (the whole set), some regular green compounds and probably more that I forget about. Regardless of this, I am still not satisfied with the results that I get. So, to me, the topic of the burr removal is crucial to my mental health as a knife sharpener.
You have shared so much vital information that I need time to absorb and I most likely will comment on after some time.
Thank you for your amazing work!
LikeLike
Greetings, Todd.
I have a simple question:
If, following the popular trend, to sharpen my knife made with Shirogami 2 steel (which is pretty fragile steel as far as i know) i will sharpen it on Atoma 400 plate first, then after a light alternating edge leading strokes i will continue with Atoma 1200 plate by refining the scratch pattern and doing some light pressure edge leading stokes as well, and only after it ill strop it on 6 micron and 1 micrond diamond (non-hanging) stropes (10 passes per side for example on each strop) will it actually remove the burr, or this trend is a lie and burr will still remain in most cases?
Thank you for the answer in advance.
Artem.
LikeLiked by 1 person
Correct me if I am wrong, but it appears that honing is just straightening out the “fingertip undetectable”” burr and that sharpening is needed when this “fingertip undetectable” burr, and possibly more, is worn away.
LikeLike
If the burr is the cause of toothiness, why should I refine the burr to the point that it becomes a ” fingertip undetectable” burr? If I did not refine the bur, then i could use the “fingertip detectable” burr to indicate a need for honing.
LikeLike
For cutting tools where the traditional sharpness of the tool is of minor importance, it sounds like we would not even need to be concerned about the burr, humanly detectable or not.
LikeLike
I meant to say we shouldn’t care about the burr’s existence except to tell that we have hit the apex while sharpening one of the sides.
LikeLike
I’m assuming 10:10 should be 10:1. Are you milling reference marks with the ion beam that is also used to cut the sample pieces and notches from them? Thank you for the article.
LikeLike