

A few months ago, a video was posted by Pete Colligan on his Cedric & Ada YouTube channel demonstrating the enhancement in edge retention of a knife sharpened by a novel technique, where one side was sharpened with a coarse diamond plate and the other side with a fine grit aluminum oxide hone.
Gabe Kirkwood, the man who provided the knife to Pete, later posted a video demonstrating his sharpening technique.
At the time, I watched Gabe’s video and it was apparent to me that his technique would produce a large burr, but it wasn’t at all clear why this burred edge would perform so well. After all, burrs are known to be bad, the veritable Bogeyman that keeps young sharpeners up at night.
Some time later, Gabe contacted me to see if I would be willing to analyze a knife sharpened with his dual-grit technique. Gabe had the idea that sharpening makes scratches or grooves and those grooves create serrations in the edge, and he produced this very nice drawing (below) conceptualizing what he imagined his technique produced.
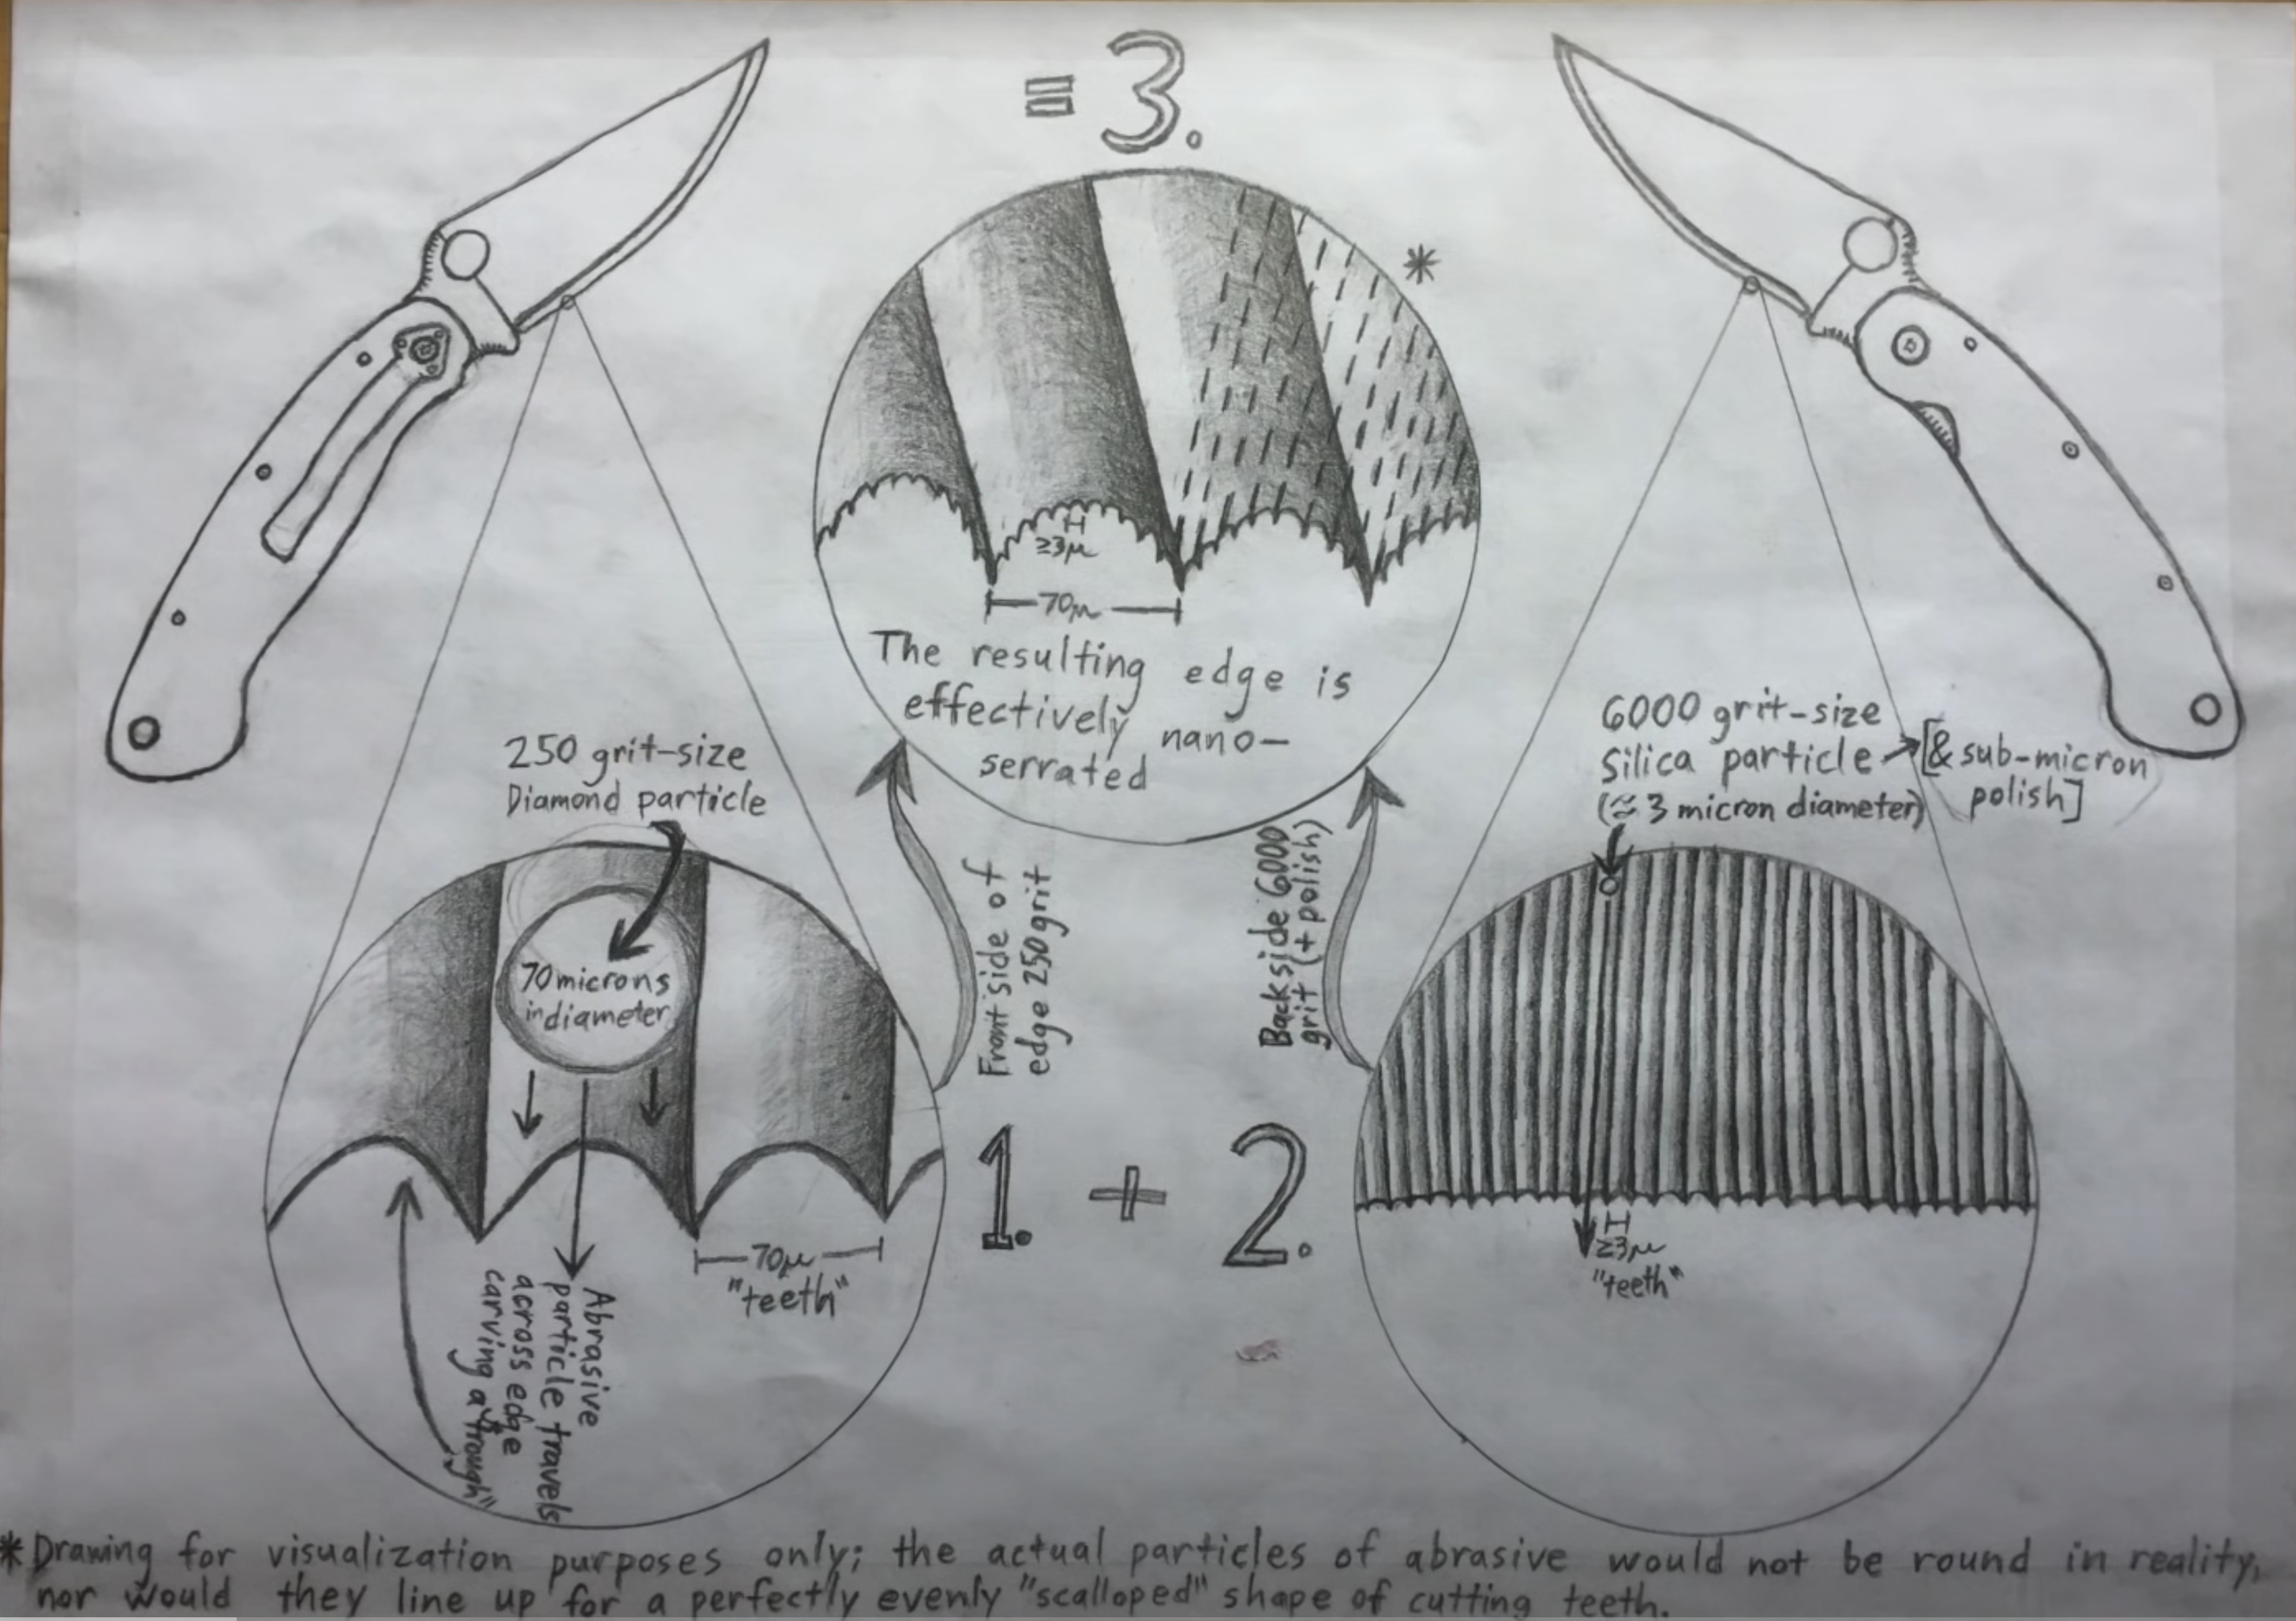
Although I’ve demonstrated repeatedly that this isn’t typically how sharpening occurs; that scratches generally don’t form serrations in the apex, the so-called toothy-knife myth is still widely believed. For this reason, I was happy to have Gabe send me a couple of knives, sharpened with his dual-grit technique.
Gabe sent me three Victorinox paring knives; one where the last stroke was on the coarse diamond plate, one where the last stroke was on the fine hone and one finished blade that had been stropped on a pine board loaded with 0.5 micron diamond.
Following my initial SEM analysis I performed my usual cutting tests and evaluations and found the knife to perform very well. It would easily slice paper, and nearly push-cut with just a small amount of draw or tilting the knife (which is the same as draw cutting). It wouldn’t meet my definition of shaving sharp, but it could easily scrape hair off my arm. I then did some moderate cutting with the knife, 20 end grain and 30 cross-grain slicing cuts into the edge of a maple block and then I cut about 3m of corrugated cardboard. Following this cutting exercise the knife still performed well, easily slicing paper. The blade was analyzed in the SEM again at this point.
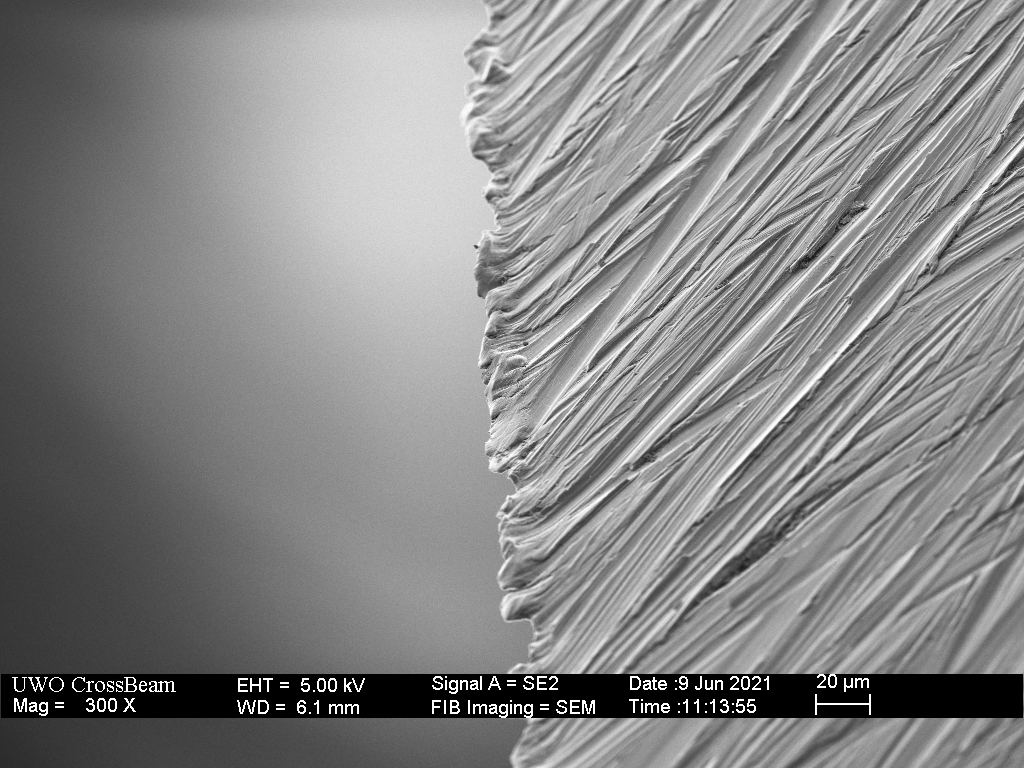
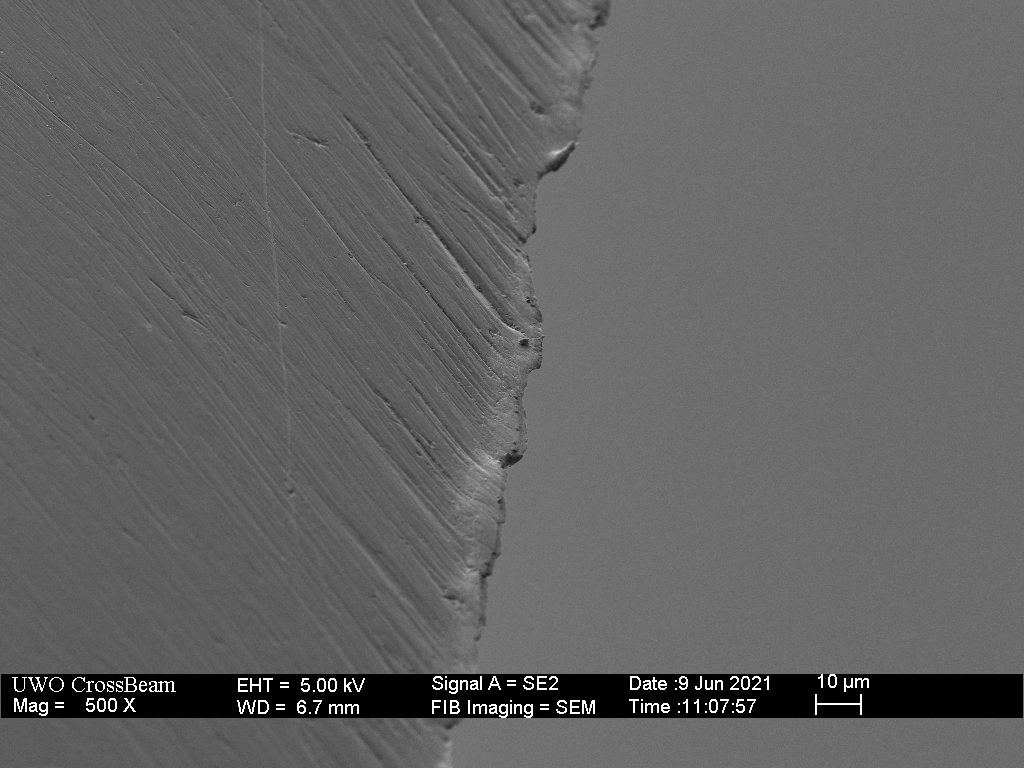
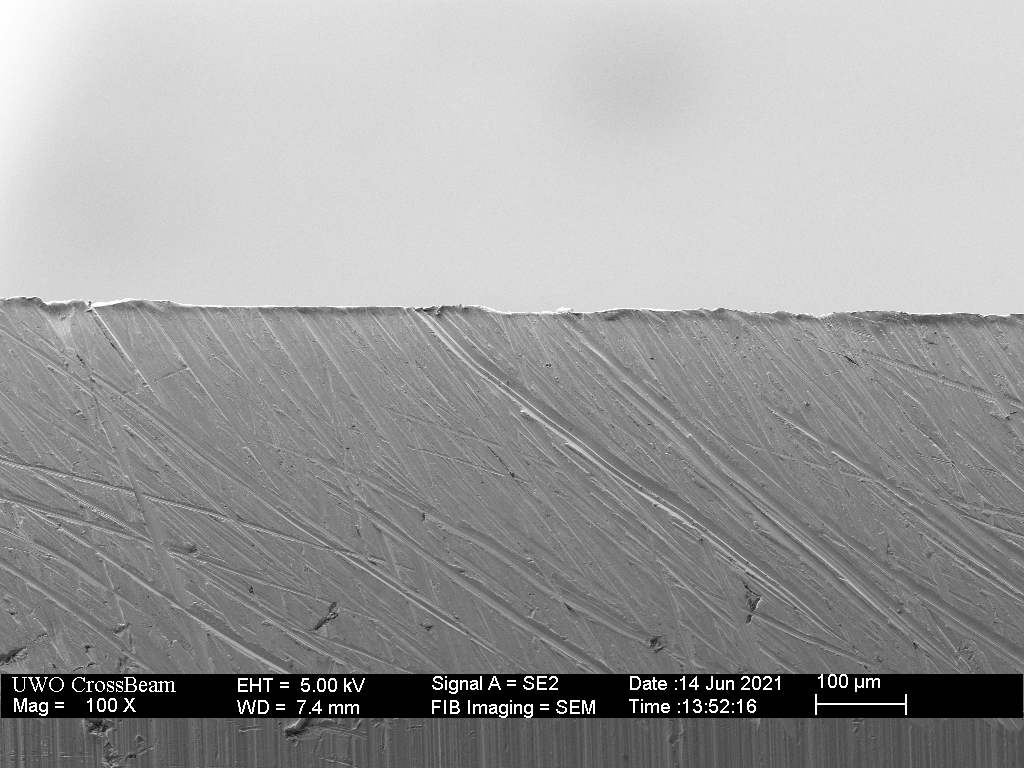
The first image shows the coarse side of the blade prior to stropping. The edge is non-linear with height variations on the order of 10 microns and for the most part the height variation does not correlate to scratches.
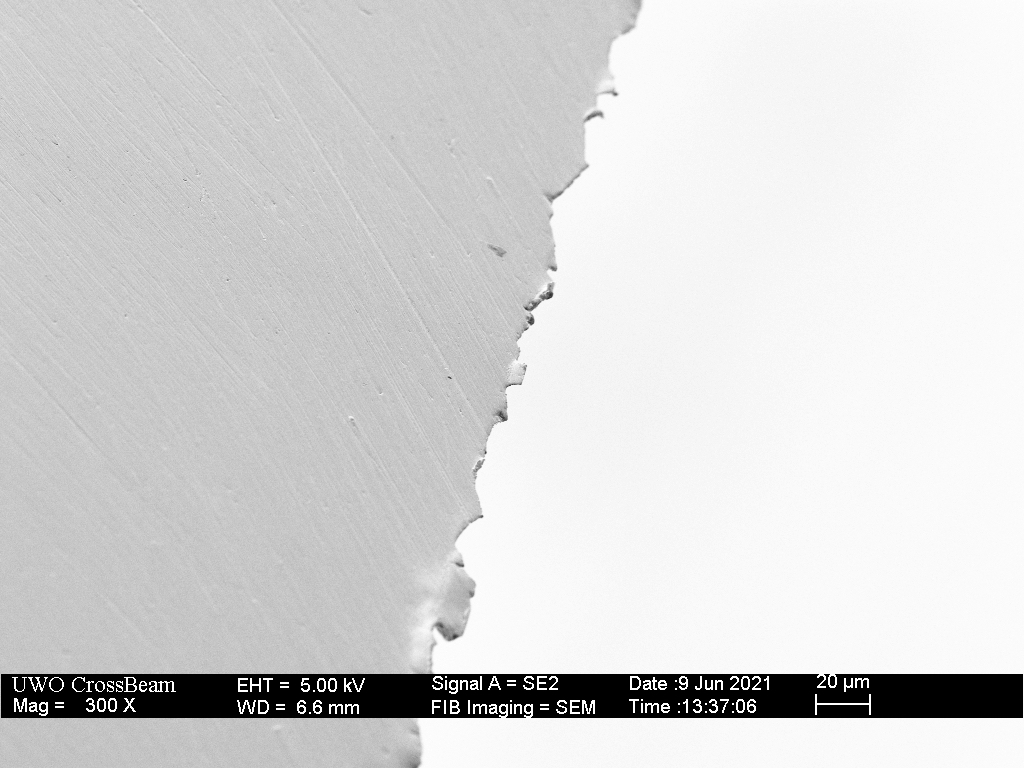
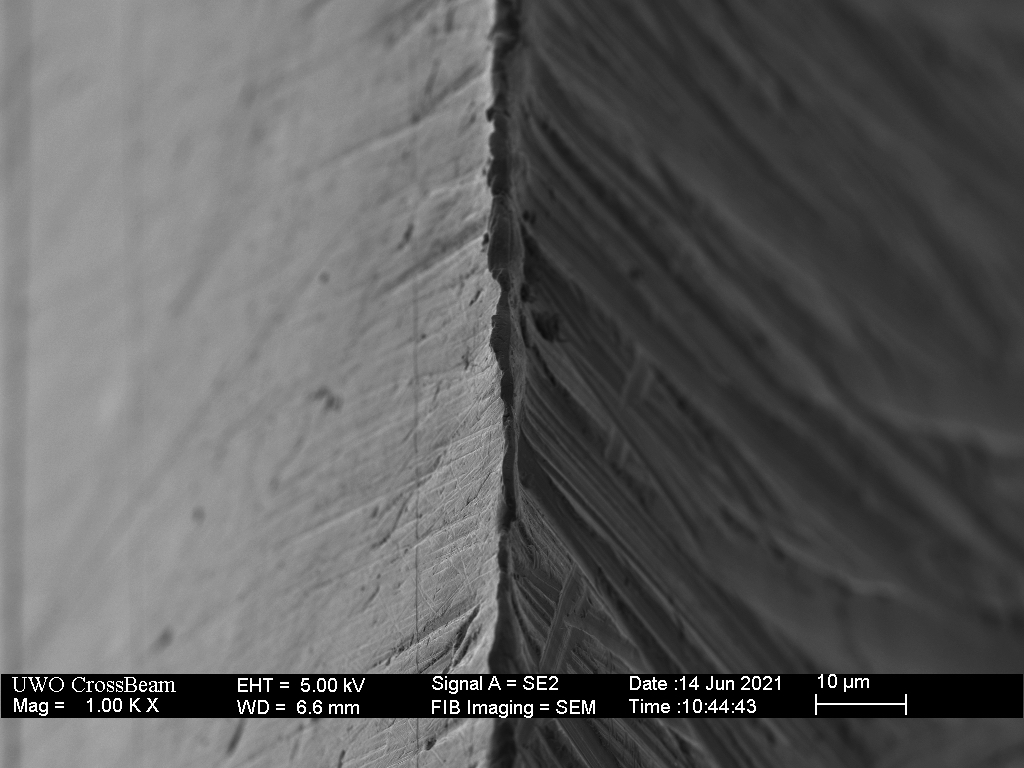
The next image shows the fine side. Again, we can observe the non-linear edge, but we can more easily see that some of that non-linearity is due to the presence of burrs.
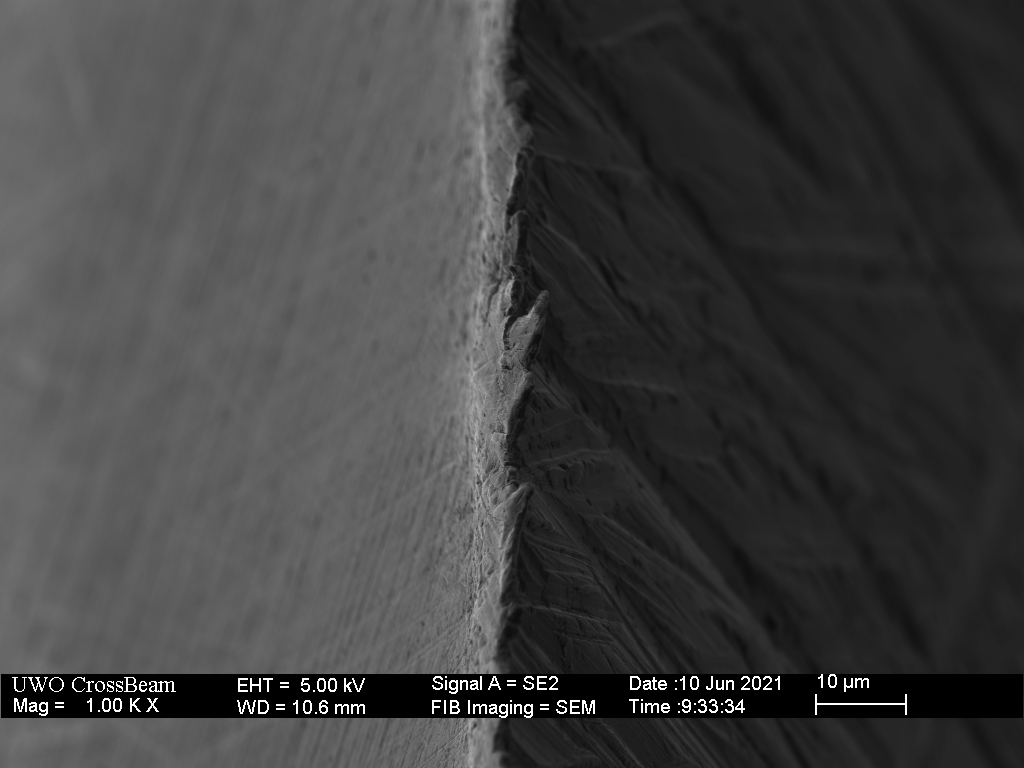
From the edge view direction, we can observe the burr clearly, noting that some areas appear to be partially broken.
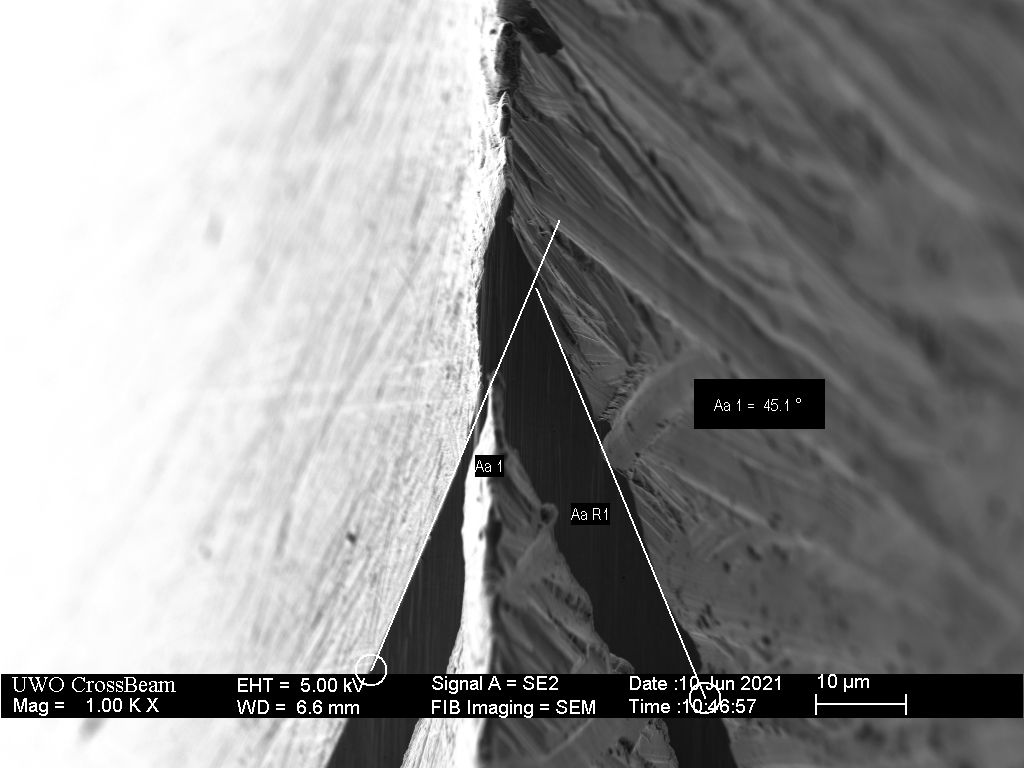
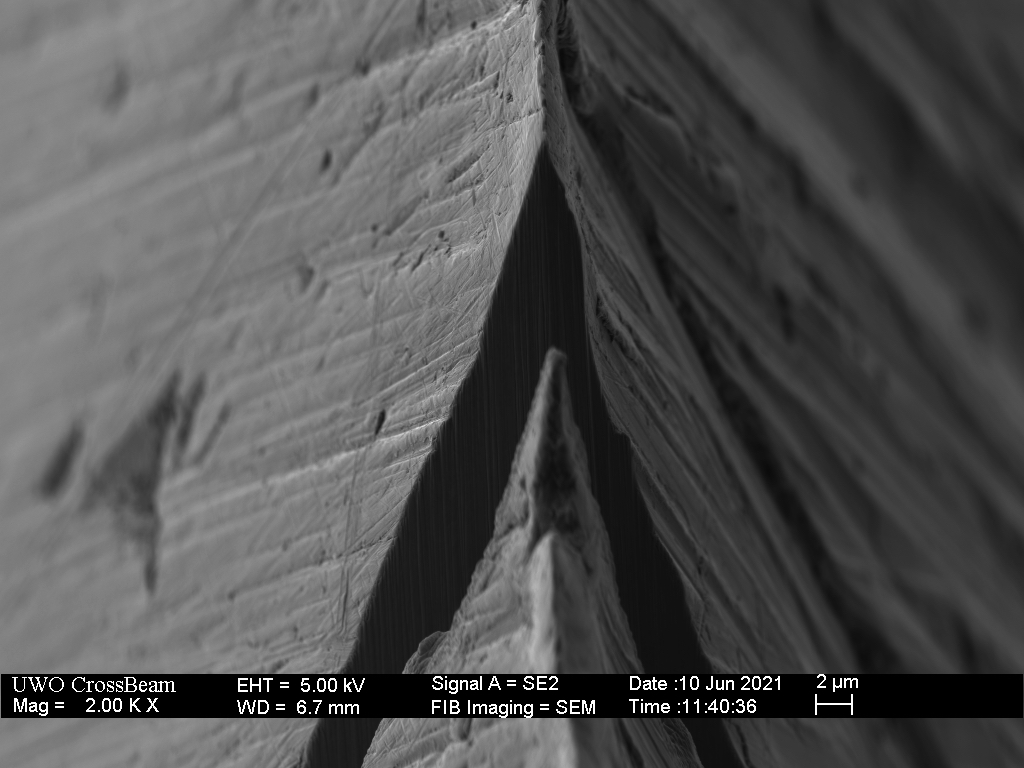
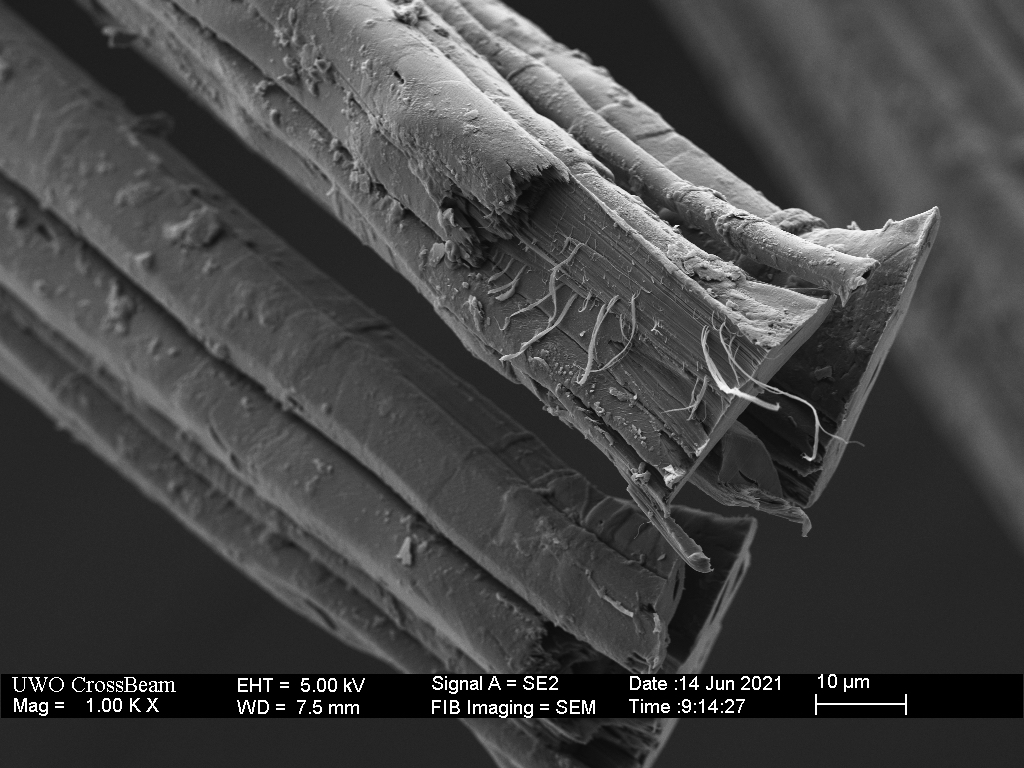
Now for the good part. The cross section view shows that there are actually two burrs, one very large triangular burr, and then a more typical thin, broken burr on top of that.
Stropping the blade on a pine board loaded with 0.5 micron diamond did clean up some of the loose burrs.
At this point I did a moderate amount of cutting with the knife, enough to remove the initial sharpness and allow me to observe the early stages of the dulling process.
To understand why this blade performed particularly well cutting sisal rope, it is important to understand that sisal is formed from bundles of fibre which are on the order of 10 microns diameter individually. It should therefore be expected that the last 10 microns of the apex will contribute the most the cutting of sisal rope.
In the cross-section view, we observe that the smaller edge burr is still partially present but blunted, while the large triangular burr is still intact. There is little change in the 10 microns from the edge that we expect to contribute to sisal rope cutting.
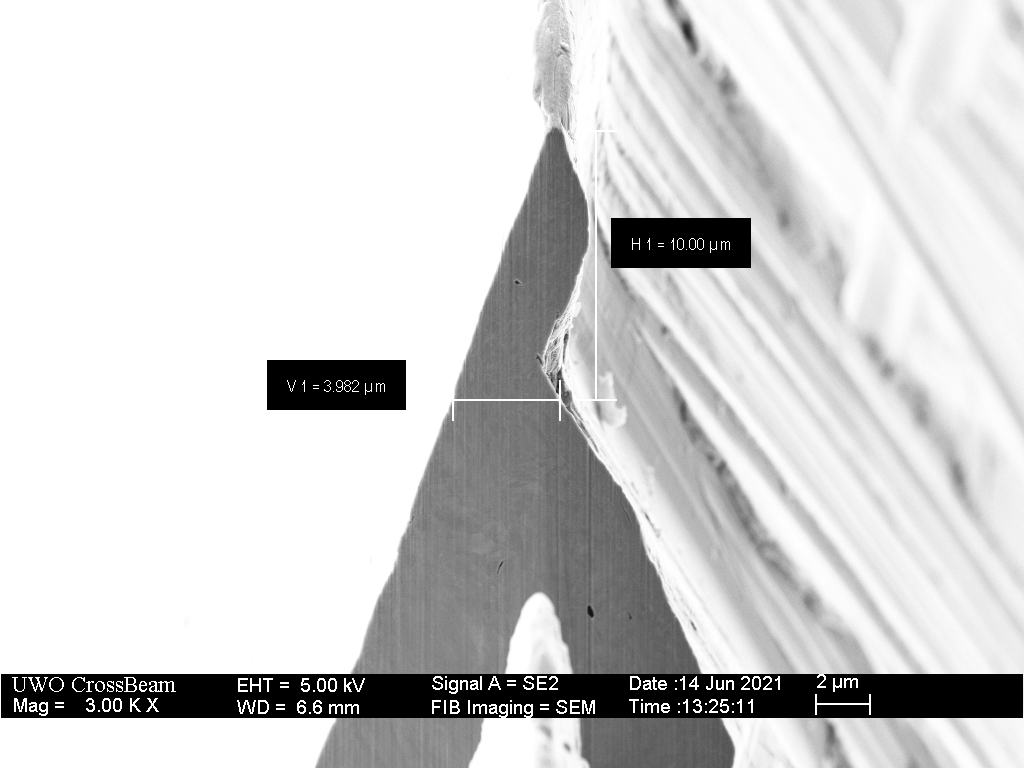
Although blunted, the knife is still has a remarkably sharp geometry with a width of 4 microns at a distance of 10 microns from the apex. At the neck of the burr, 8 microns from the apex the width is only 2.75 microns, which corresponds to an included angle of just under 20 degrees, less than that of a new razor blade or disposable bladed box cutter.
To summarize, the dual grit sharpening produced a burr much like sharpening just one side with the coarse diamond plate would, while the fine (6k King) stone pushed it back towards the center-line without removing it. This produced a low-angle triangular apex which is by definition a burr because it exists outside the triangular sharpening area. However, since this acute triangular “burr” is so thick and its steel undamaged, it does not fold or tear off with use.
There it is. A good burr. Sleep well.

33 responses to “Dual Grit Sharpening”
I wonder how a much harder, higher carbide steel would react to this process? Also, wondering if it really makes any difference what abrasives are used in each of the steps? IOW, I am assuming it’s grit size that really matters between “rough” side and the “smooth” side. Very interesting. Must go play with my steak knives now 😉
LikeLike
@keyresults I have sent Pete another test blade made of Maxamet, that ought to shed a little bit of light on the effects of this technique on harder, higher carbide steels. I also have sent him some 4V where I used 3M lapping film instead of the aluminum oxide hone, so that ought to begin to show whether the effect still functions using other types of abrasive. Hopefully that’s helpful.
LikeLiked by 1 person
I think it’s also probably key that Home Slice sharpens edge trailing only. If you when edge leading or did both I don’t think it would work as well. I think the burr would end up getting removed.
LikeLike
I mostly agree, but there are stones (like the DMT coarse and fine) that readily make burrs edge leading as well.
LikeLike
dual grit nonsense is a your going to get the burr of the last stone you used but it will have a collapsible nature to it even after stropping because you didn’t clear the burr…. But in the US case pieces of the burr will be held in place by the graig like pattern on the corse side. The Homeslice guy on YouTube can’t even get a somewhat consistent scratch pattern and he has zero clue about when to go to the next stone. Guy leaves scratch marks from 3 sharpening ago on his edge going in every witch way… Like the talking 80 i.q. points above you intelegence is annoying enuf, using terms for sharpness like “aggression” and “the level of quality cut aggression” makes me feel like I’m being patronized. Before you break the Internet with your super sharpening method, learn to remove scratch marks and get uniform grit patterns. Those BESS machines are easily cheated and when you use the same stone yet get BESS scores over 50 points apart, that means your sharpening is shit and the beast is only going to accuratly measure YOUR ability to be consistant with your sharpenings. the dude is dead wrong ever time he talks about japaneese whetstones, as an owner of the King, suprer stone, Chosera, shapton, and Pride usa stones. home slice don’t kniw how to do anything but delete unfavorable comments. The dude said the Shapton 8000 left one of the most aggressive edges he’s ever seen….. WTF is he talking about. Dual Grit is Bullshit. Like, you forgot the other side dude. O ya… One 180 stone and a 240 stone dual grit does amazing, LMFAO…. Ok me I have 4 facets in my edge and scratches from 3 prior sharpenings. What a tool. Poor advice is all you’ll get.
LikeLike
Great work Todd – while I had learned (since the first test) that the performance was not due to actual “teeth” and moved beyond the theories present in my early drawing, I definitely was not expecting THIS, my mind is blown. Thanks so much for doing the analysis and research! I am so stoked to see some SEM images of my own work. So cool.
A good burr. Who would have thought… Ha!
LikeLiked by 2 people
Thank you, much appreciated.
How is steel of the burr undamaged, doesn’t deformation make it weaker?
Is it possible to make a “wire edge” out of undamaged steel and whittle hair with it after some use?
LikeLiked by 1 person
Cold working essentially “damages” the steel to make it harder – not that there is any evidence that this is what happens in this case, but it is a possibility.
LikeLiked by 1 person
Todd, there is a theoretical debate going on for ages that microchipping during edge-leading hand sharpening is essentially nanoscale cold working which makes it preferrable motion compared to the edge-trailing.
What do you think about it?
LikeLike
Hello again – I’m trying to work this new information into my paradigm. I think I now understand some of Pete’s and my observations, and the reason that it holds slicing ability for a slightly extended period of time regardless of blunting is clearer to me.
If you don’t mind I’d love a response on:
(In your scientific opinion…)
1) Do you think the microscopic uneven-ness (being careful not to call them “teeth” for clarity) of the apex have
a) Some effect on cutting character/aggressiveness/edge holding
b) Little effect on the above
c) No effect at all on the above
I truly have no preconceived notion I’m committed to for the answer, just wondering.
2) Do you think that this extra burr which contributes to wear resistance (or maybe better said – maintains a thin geometry) in some slicing mediums would also reduce edge durability?
Looking at it, it seems like it would handle abrasion better, but perhaps be susceptible to breaking off if it encountered lateral force perpendicular to the edge angle? (Such as, maybe, whittling out a wood joint of some kind, then prying wood chips out with the edge – is that likely to break the burr off my edge?) Hopefully that’s clear.
I just want to give an accurate picture of the likely pro’s and con’s in my sharpening videos. Thanks.
LikeLiked by 1 person
The short answer is that I don’t fully understand what is the “best” edge for cutting materials like rope.
It seems that a very uniform blade with a razor-like edge does lose slicing aggression quickly, if it has any at all, which would lead us to believe that non-uniformity is beneficial. But this doesn’t mean that the more non-uniform the better – try cutting rope with a hacksaw blade for example. Considering the scale of the thickness of a sisal fibre, a few microns height variation may be all that is needed.
There are many (if not most) processes in nature where tiny fluctuations are a driving force. Any (impatient) person who has put a beer in the freezer has probably experienced the rapid freeze that occurs when they touch the bottle to provide that one fluctuation that nucleates the crystallization process.
Cutting (or separating) seems to generally be a two-step process – initiating the cut and propagating the cut. I would suggest that the apex keenness and/or non-uniformity determines the ease of initiating the cut while the sharpness/angle/geometry of the blade determines the ease of propagation. For many materials this is complicated by friction and wedging effects, which is why fibrous rope is a good choice for cut testing as the blade essentially cuts fibre-by-fibre.
So, intuitively, your knife has the two required elements – a bit of non-uniformity to help initiate the separation of the individual fibres and also a very sharp, low angle edge over the first 10 microns which is all that matters for cutting a sisal fibre.
My suggestion for an initial investigation would be to perform edge retention experiments with a single set of identical (simple steel) knives and compare various sharpening techniques, angles, stones/strops/honing rods… before trying to compare different steels.
In the background, I do wonder whether your burr has been work hardened.
LikeLiked by 1 person
Wow, thanks SO much for the insight. Out of a desire to not clutter your blog site with long responses I’ll refrain from responding to every point but a few main thoughts:
A) Thanks for clarifying that unevenness seems to contribute to the first of the 2 steps of cutting. That’s very helpful for me conceptually.
B) I had already planned to buy and begin testing dual grit edges on different sharpening media, angles, grits, etc… with a set of 420HC knives I’m ordering. This article and your insight are good confirmation.
Do you recommend any particular test for people without a powerful microscope? Is paper slicing reliable, or should I buy a sharpness testing device or other means?
C) Work hardening, that’s an interesting thought. Is there any way to test whether a piece of metal 8 microns tall is work hardened? Makes me want to sharpen some austenitic steel like H1 and see what happens.
LikeLiked by 1 person
I think the most important takeaway from your experience is that sharpening plays a significant role in edge retention. This has always been my criticism with these type of tests because we know that different steels respond differently to various sharpening techniques. For this reason, comparing two knife steels sharpened in the way may not be a “fair” comparison.
As an example, we know that edge retention varies with sharpening angle with lower angles being superior up to a point where they become unstable – in other words there is an optimal sharpening angle for a particular edge retention test. BUT that angle almost certainly varies between steels. Vadim Kraichuk (knifegrinders.com.au) has done some nice work on this, and I would suggest you start by reviewing his results. Your knife somewhat optimizes this by having a low angle where it counts, but a higher angle where it is required for stability.
So, to make a fair comparison between two knife steels, we should first find the optimum sharpening approach for each and put those two head-to-head.
LikeLiked by 1 person
Awesome – thank you for your insight, clarifying comments, and for doing some testing in the first place.
I find it incredibly valuable.
I will ponder the cost and variables of testing before I begin any new edge tests, but I’ve taken quite enough space here.
Thanks!
LikeLiked by 1 person
Dear SOS (Science of Sharp): This is my first response to your blog(s), since I became a “Sharp Nerd” only two months ago, and so have no deep understanding of the processes of sharpening.
In the last two weeks, however, I have brought three(3) different knives “down” to 34,34 and 36, as tested on a BESS PT250A.
The concept of the “two phases” of parting – initiating and propagating – is very powerful for me, and it’s like when I appreciated the difference between static friction and sliding friction in my high school physics class!.
My current project is to see “how sharp” – as measured by BESS – I can get a Maxamet blade, which I have chosen because of the high tungsten content, and the hardness of the blade.
My initial thought was that, by using the 3M diamond lapping films, the blade edge could be made very ” pointy” by abrading the carbides to make them very acute, and less “knobby.”
Beyond making a very “thin” cutting edge, what thoughts have you ?
Is the fiber used in the BESS testing understood to be homogeneous, or does it have a “skin” that resists cutting more than the interior?
Thanks, Scott
LikeLike
I looked at some BESS media when the device was still in pre-production and it did have a cladding. However, it appears they have changed the media since then (it appears to be black now).
LikeLiked by 1 person
Thanks for the note on the BESS test filament material.
This morning, I was in the usual muddle of trying new sharpening techniques and products, while taking notes, photo’s and doing tests with my PT250A. In the middle of that, I had to install another supply of the test media (filament).
The NEW spool container is black, and the prior container was white. The two filaments appeared of different colors, the newer being darker.
I hope they test the same !
LikeLike
fascinating!
LikeLike
We often measure cutting by the number of successful passes that can be made in parting Sisal rope.
Given that a single sisal fiber – as shown above – is only about ten microns, the question might be how many “initiations and prorogations” does it take to complete each cut.
LikeLike
Dear Todd,
I have engaged in a very long discussion in the wicked-edge subreddit regarding straight razor honing. More specifically, the difference on convex vs. flat stones. Now, the person that tried to make an argument for convex hones has told me that he already tried to ask you about it and that you simply discarded the idea without trying. As you seem like a reasonable person and firm beliver in the scientific method, I have trouble believing his side of the story, as I doubt you would discard an idea without thinking about it.
However, I myself, while not convinced of his theory, also couldn’t find enough evidence to disprove it right away. I have my suspicion that a concave edge would simply be to fragile to hold up long. But it’s just a theory and I can’t really check what’s actually happening even if I were to try his method. Maybe I could confirm wheter it works better for me, but I wouldn’t be able to judge why.
So I simply wanted to ask you humbly, if you could explain to an inexperienced person like me, trying to learn more, why you discarded the idea without trying, if you did?
And if not, wheter you have tried it/ would be willing to try and share the results?
Once again, I don’t think he’s neccessarily right, but I also can’t prove he’s wrong, so I would simply like to hear your thoughts on the topic.
Because if the concave bevel is not too fragile, it would make sense that a thinner bevel would result in a sharper razor that’s just as keen. I simply can’t test which hyopthesis is correct.
LikeLike
I haven’t had contact with Jarrod since I purchased a couple of Coticules from The Superior Shave in 2012 or 2013. He most certainly has not approached me about researching his convex hone theories.
I am always happy to apply my skills, knowledge, experience and the instruments at my disposal to this sort of research project. However, I expect to be paid.
So if someone asked me to perform free research to help them sell their product, I would absolutely reject that request.
P.S. I’m assuming you do know that it was Jarrod=TSS=MichaelBLennon you were arguing with. https://www.reddit.com/r/wicked_edge/comments/p8fzmu/just_got_my_first_straight_razor_i_have_a_couple/
LikeLike
Sorry for the late reply, somehow I didn’t get the notification for your answer.
Yes I assumed it was the same person on another account I was arguing with.
Thank you for the kind and reasonable response. This seems to be in line with what I expected.
I’m neither in the position to spend money on this, nor to invest the time and effort to try it out myself, but maybe someone else will take you on that. Or maybe I will, further down the line. For now, it sparked my curiosity and I’ll keep it in the back of mind mind as something to eventually experiment with.
Until then, I’ll happily await what you discover next.
Have a great day 🙂
LikeLike
I’m wondering if anyone has tried this on a japanese gyuto, both stainless and high carbon? Does the low (12 – 15 degree) angle change anything?
LikeLike
Hi Todd, Gabe, Thanx much for the passion, effort and for sharing. Good stuff. If you guys ever want to experiment with odd steels or serrated edges, let me know.
sal
LikeLike
Sal: Thanks so much for this comment. I would like to work on finding an optimized sharpening protocol for your new 15V, am interested in serrated blades, and would be very keen to talk about collaborating with you.
Not sure what the best way to contact you would be? PS I hope you saw Pete’s (Cedric & Ada YouTube Channel) latest test of dual grit MagnaCut. Longest lasting steel edge to date! Thanks for your work on the metallurgy/design side!
LikeLike
Sorry, on the heat-treatment and design side that is.
I’ve sent you an email Sal, thank you for reaching out.
LikeLike
Amazing results with the MAGNACUT formula!
Loren has done a fantastic job (knifesteelnerds) creating Magnacut and figuring out its best iterations and how to achieve those incredible results.
LikeLike
https://www.bladeforums.com/threads/dual-grit-testing.1930100/
3 Knives tested with dual grit sharpening ( 240/800 ) .
Edge retention increased across the board . ( 3 different steels )
I don’t think how the dual grit edge is formed matters , but rather that you made a dual grit edge .
LikeLike
i think your all trying to sell BESS machines. Anyone that has been straight shaving forever or knows sharpening has to just laugh at this nonsence. For a bess machine to even work somewhat accurately it needs an honest person to run the test for everyone. All those you tube tests need to be taken with a grain of salt. Lol, the home slice thinks he’s going to find this dual grit unicorn that lasts forever when literally a leather strop is the tool for that. the guy literally says he wants his knife steel to be highly ductile!! No dude. You want to walk your edge, it’s called convex. You want long lasting sharpenings, you bring it to a grit that your strop can revive fast. This magical dual grit requires you to not strop, to use stropping strokes when removing steel on a stone, and a bunch of other malarkey. How about I use one stone and use back and forth, then forward cutting progressively lighter, then a few stroping strokes until the prior scratch pattern is gone or im satisfied. Or you can be fancy and use a Belgian cuticle stone that can leave a multitude of finishes and grits depending on how i use the stone. Don’t encourage bad advise. It would never work straight shaving because you’ll never get into the top 3% of sharpness needed for a smooth buttery shave. The shave doesn’t lie like the bess test does. You will not convince me otherwise. Dual grit is inferior in every way even for a unicorn edc edge. Try dual grit on the pig test. That will say a lot.
LikeLike
It’s amusing that your “one stone and use back and forth, then forward cutting progressively lighter, then a few stroping strokes” actually produces the same refined burr as the dual grit approach.
LikeLiked by 1 person
i see how this place works…. All logical negative comments that do not kiss their crappy sharpening method… I think your all just trying to sell snake oil and bull crap. Go see if you get a clean buttery straight razor shave with your dual stupid method. You people see what you want and those BESS yeste are misleading AT THEIR VERY BEST!!!! I read about one poor guy that got a PM2 and now regrets it cause it’s in cruwere and the dual grit authority said it was a bad choice….. It’s sad…. I personally can make a buck 129 in 420hc out perform cut length over time then ANY dualngrit edge. While your over there fingering a dual grit edge for 20 minutes, 14 licks on the strop with some gunny juice brings back the keen razor… But you dual grit people aren’t allowed to strop of something??? Don’t want to remove any work hardened junk on your edge, cause thats how dual grit saws thru stuff i guess. This would be one funny joke if not so smart people spend cash on bess testing machines and magnacut knives. When you devote a YouTube channel to dual grit BS, and throw your imagination into it, yest results are skewed in their best form. ”Precipitation hardening” means work hardened, “aggression” means sharpness, qmd a whole skewer full of incorrect wacky terminology to get you to buy into this BS. All from a guy that can’t put down a uniform scratch pattern or remove scratches from prior stones.
they will delete this because any voice of altering opinions makes these liberals crumble apart.
LikeLike
it’s still up. Your comment is still up. Try a new argument.
LikeLike
Not shure why but this reminds me of the old German two grind knifes and the traditional chinese cookings knifes. You habe one cutting tool but two or more sections on the blade with task specific grinds/shapes.
LikeLike