

I will describe four methods which lead to different outcomes for sharpening this S110V knife. Many other approaches exist, but there are a finite number of final outcomes for microstructure and geometry of the cutting edge. Beyond geometry, the amount of damage to the steel below the apex will also be determined by sharpening technique. One mode of failure (or dulling) is the build-up of defects to the steel below the apex leading to micro-chipping. Minimizing the damage caused by sharpening may significantly improve initial edge retention. One of the attractions of this type of steel is that even after the initial edge fails, the blade usually transitions via micro-chipping to a long-lasting ceramic-knife geometry. Unlike traditional cutlery steels, the geometrically dull blade maintains slicing aggression for an extended period due to the micro-texture of the carbide surface. The goal here is to analyze the initial sharpened edge.
Ragged Burr Edge
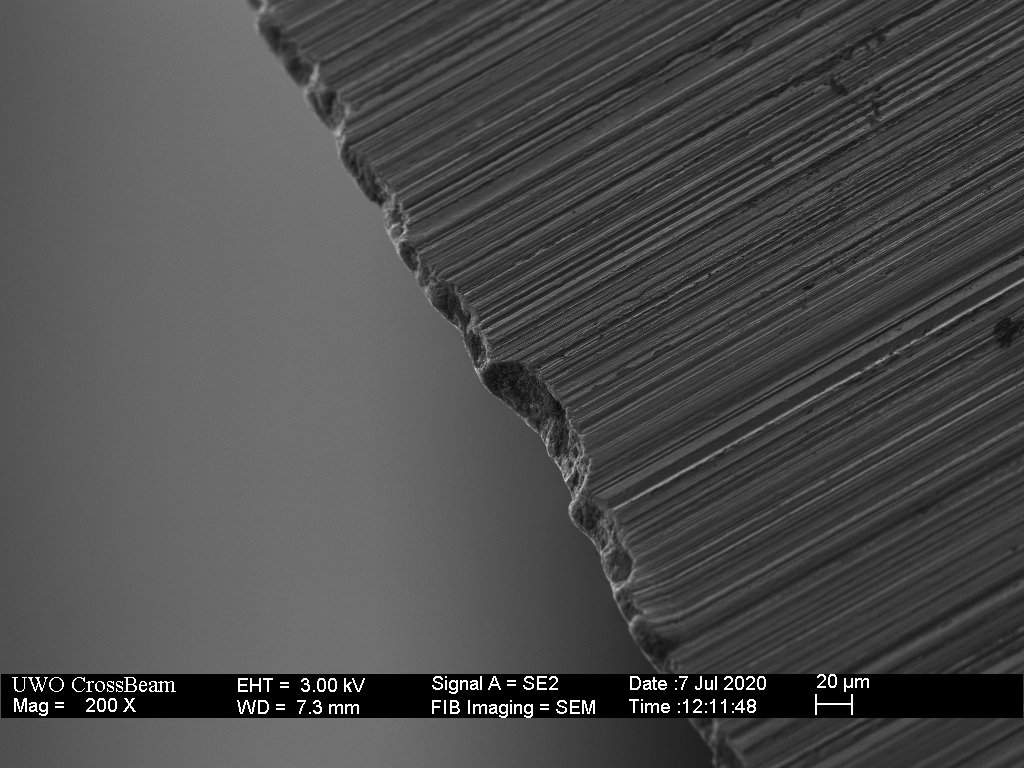
The simplest and least effort is to sharpen at a single angle (in the vicinity of 30 degrees per side) with a single diamond plate or coarse silicon carbide stone. No effective deburring is performed, but instead increasingly lighter strokes at the sharpening angle are used to stand up the burr and apply a keen, burnished edge to the apex of that burr. This typically produces a 10-micron sized burr weakened by cracking of carbides that occurs in the flex-region near the apex. The very weakest regions will chip away with use but the slicing aggression of the ragged burr will remain. Despite the carbide damage, this is a sturdy burr and not one that can be removed by simply cutting into wood or stropping on anything other than diamond (or CBN) loaded material.

Another variation of this first method is to strop “ineffectively” to add keenness to the longest regions of the burr and break off some of the weakest regions. This will produce a good working edge with more than acceptable edge retention.
Exposed Carbide Edge
The second method is to sharpen as in the first method, but successfully remove the burr with some form of stropping or buffing, replicating the Spyderco factory edge. Alternatively, a very fine, muddy stone (eg 8k with slurry) can produce similar microstructure at the apex. This should allow the blade to be sharpened at a more aggressive (included) angle of 25-30 degrees and remove much of the sharpening-damaged steel from the apex in the follow-up step. This approach won’t produce push-cutting keenness, but should provide more than acceptable slicing aggression in many materials. The challenge with this approach is that the final result can vary strongly with the amount of matrix removal. Exposing more carbides, as does the factory edge, leads to a broad apex. A finer result, as shown below, can potentially be achieved by minimizing burr formation followed by careful carbide exposure.
Keen and Burr-Free Edge
The third method is to again sharpen as in the first method but remove the burr and damaged sub-apex material by sharpening at higher than the sharpening angle to create a micro-bevel or micro-convexing with a smooth diamond loaded strop. The goal is to remove not only the burr, but the damaged steel below the burr (the burr root). This is also the geometry produced by honing on the 40 degree Sharpmaker ceramic rods, albeit much cleaner results are produced by stropping on charged leather.

Obtuse Edge
The fourth method is to try to avoid forming a problematic (flexing) burr altogether by sharpening at a relatively high angle of 40+ degrees inclusive. At these high angles, the burr can be typically removed by simply moving to higher grits and alternating sides frequently at the sharpening angle. This approach can produce good results at the apex, although the resulting geometry is likely too thick to perform well in cutting more rigid materials where wedging plays a role. In the longer term, as the edge chips away, leaving a ceramic knife type of edge, the thicker geometry will also hold back performance. This choice is often motivated by the unsubstantiated belief that the steel “can’t support” lower angles.

Each of these sharpening methods will have their proponents, and it is not my intention to rate or rank them. The purpose of the above information is to show that there is more to sharpening techniques than “finishing grit” or the non-physical “toothy” vs “polished” moniker. With long-term use and dulling, the evidence suggests that all of these starting points can transition to a long lasting ceramic-knife type geometry.
Dulling of the Keen-Edged Blade
It is an open question as to whether it makes sense to apply a keen edge to these high-carbide steels. As small as the carbides are, they are still large compared to the scale of a keen edge. And while carbides at the very apex can be shaped with diamond-loaded strops, a keen edge is primarily formed in the matrix steel. As a starting point, the following experiment explores the mechanism by which a keen edge in this very high carbide steel deteriorates with use.
Starting with the keen-edged blade described above, 1/4 inch sisal rope was slice cut using a single point on the blade and the deterioration monitored with occasional SEM imaging. After 500 cuts, the blade was honed on a Spyderco white ceramic to restore the edge, and that edge was dulled by the same 1/4 inch sisal rope cutting method.


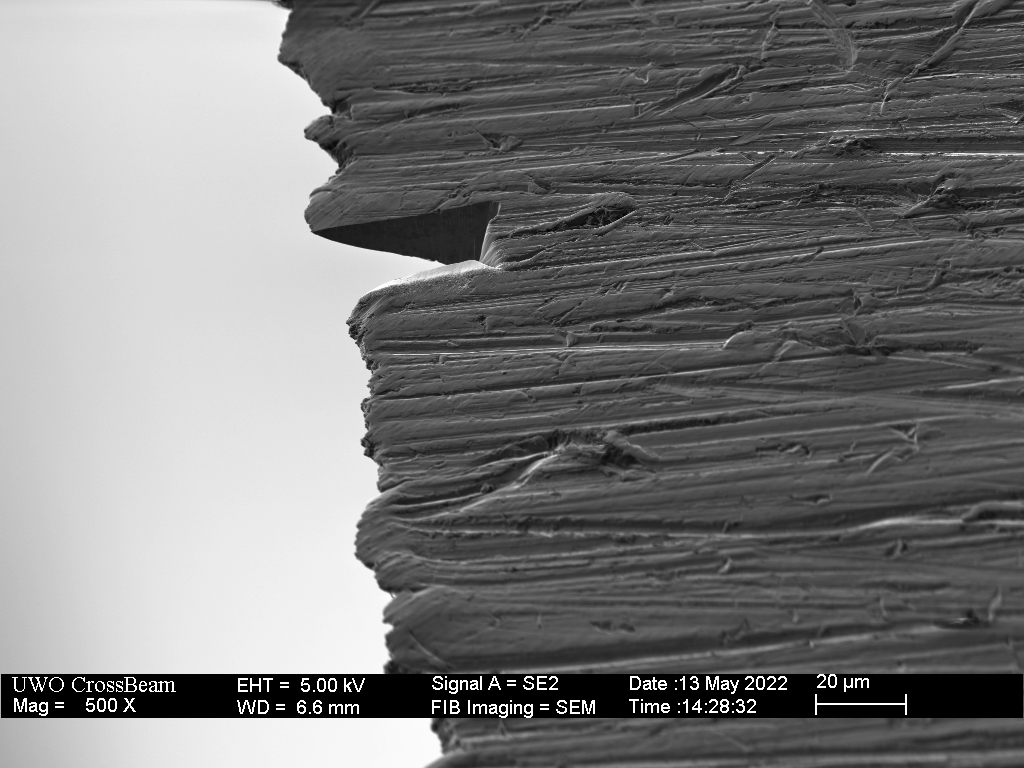
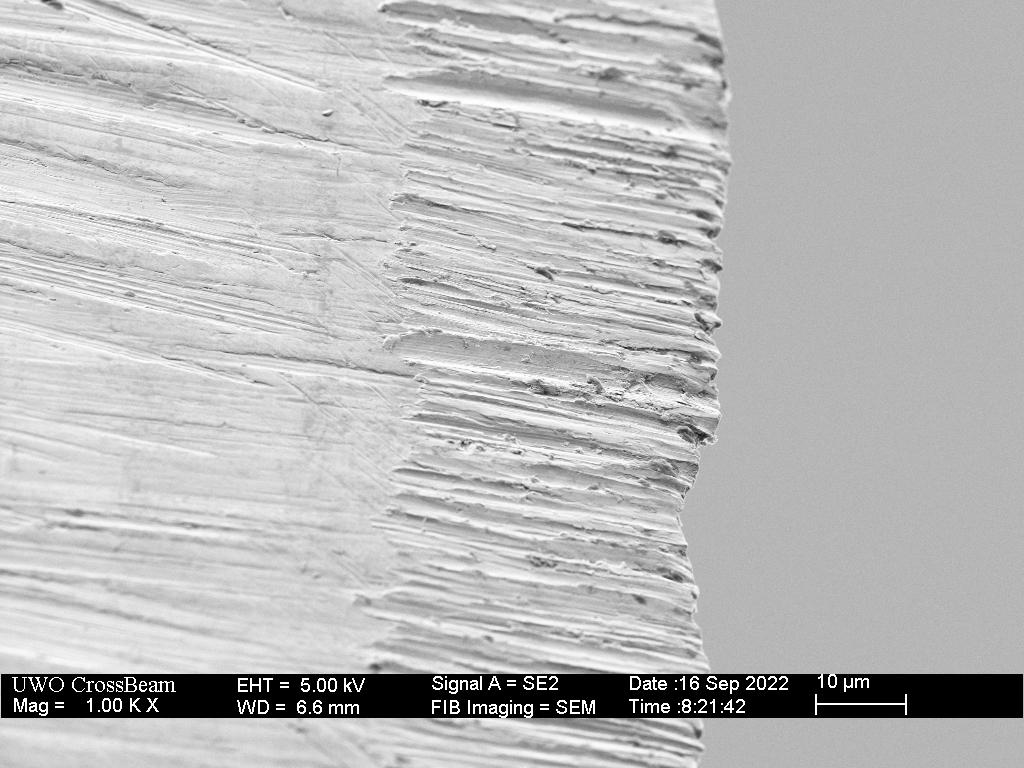
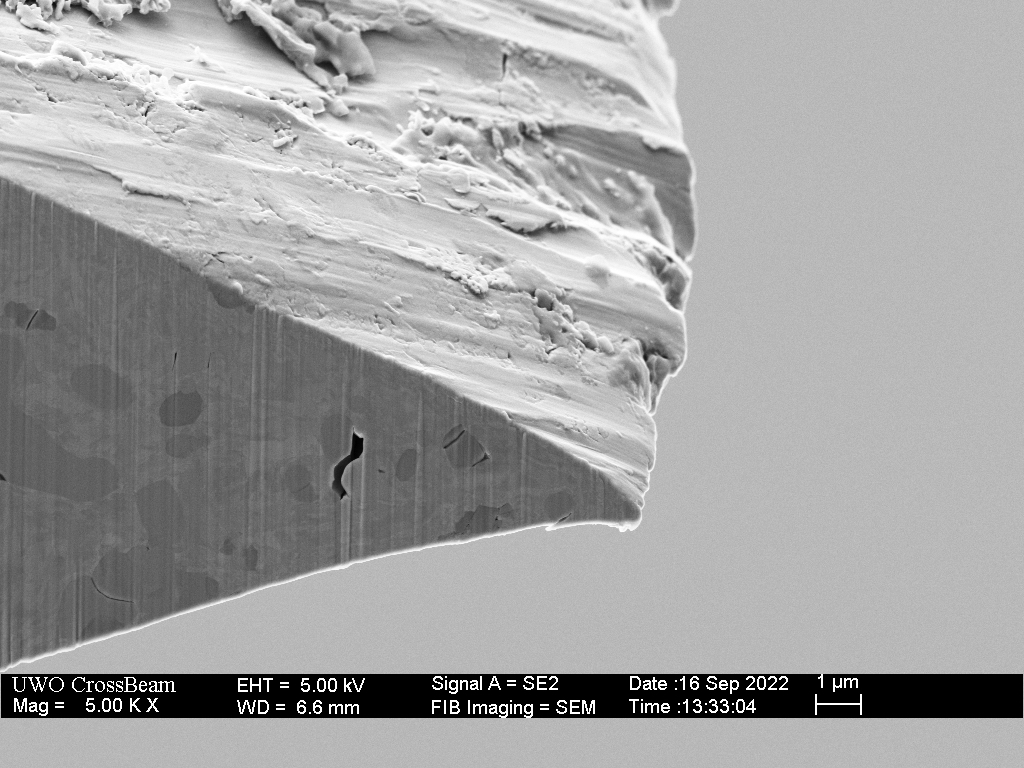
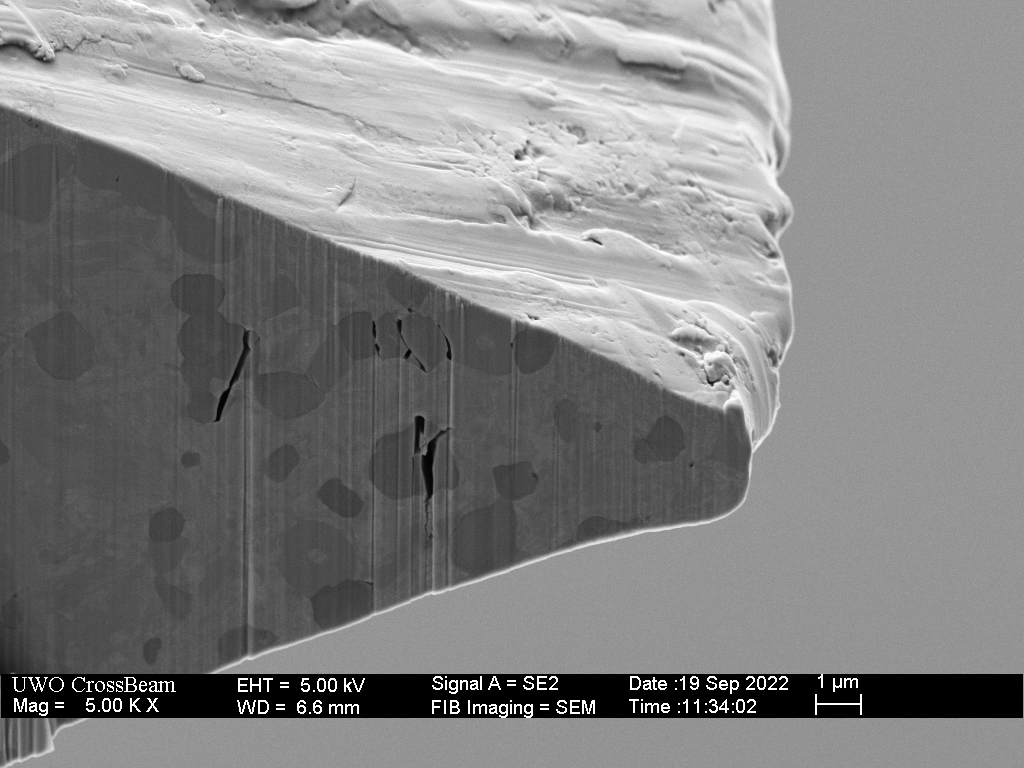
The series of images below show cross-sections through multiple locations of the blade (in the cutting region) after 100, 300 and 500 slice cuts. Anecdotally, the performance was more than satisfactory for about the first 200 cuts and became unacceptable by the end of 500 cuts. Note that I was performing this test with the blade removed from the scales which would otherwise provide additional leverage. Dulling does not occur uniformly across the edge, and several locations were examined. Note that the image magnification is lower where the duller edges are imaged – comparison of the scale bar in the bottom right of each image with the apex dimension is required to appreciate the scale of dulling that has occurred.


Despite the blade being blunted after 500 cuts, microchipping was still minimal although the build-up of carbide fatigue and cracking is evident. This is likely due to the minimal flexing of the 40 degree (inclusive) microbevel. Also, the task (careful rope cutting) presumably doesn’t involve enough lateral deflection to produce microchipping before the apex is blunted. Again, wear to the apex does not occur uniformly along the edge.
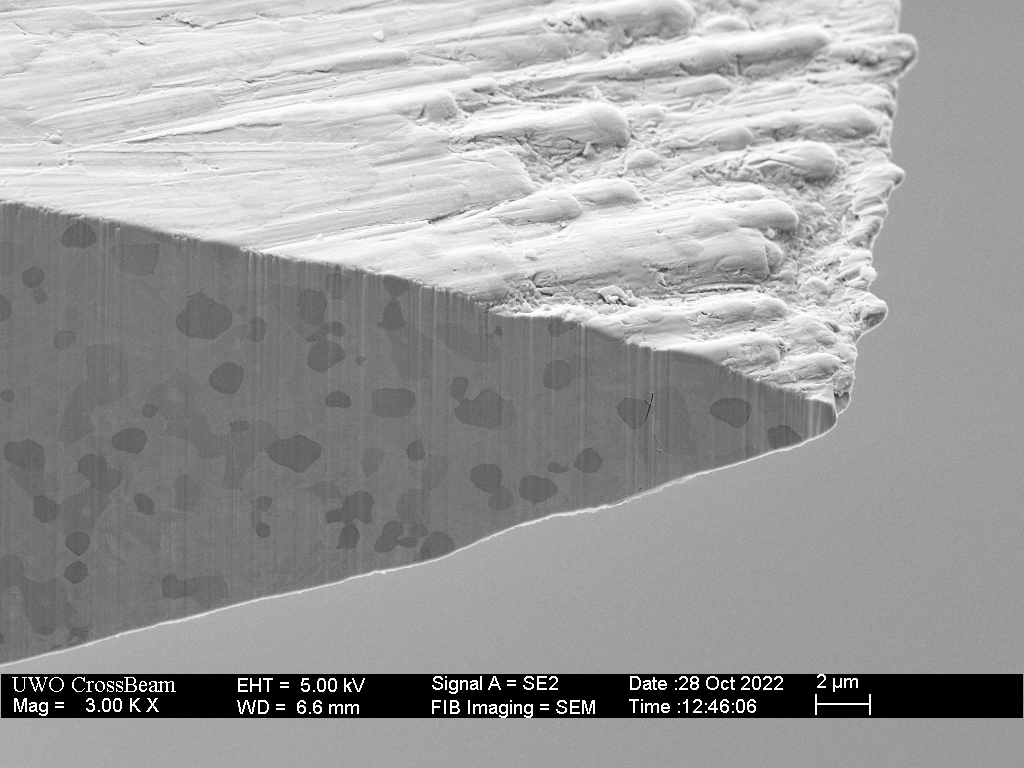
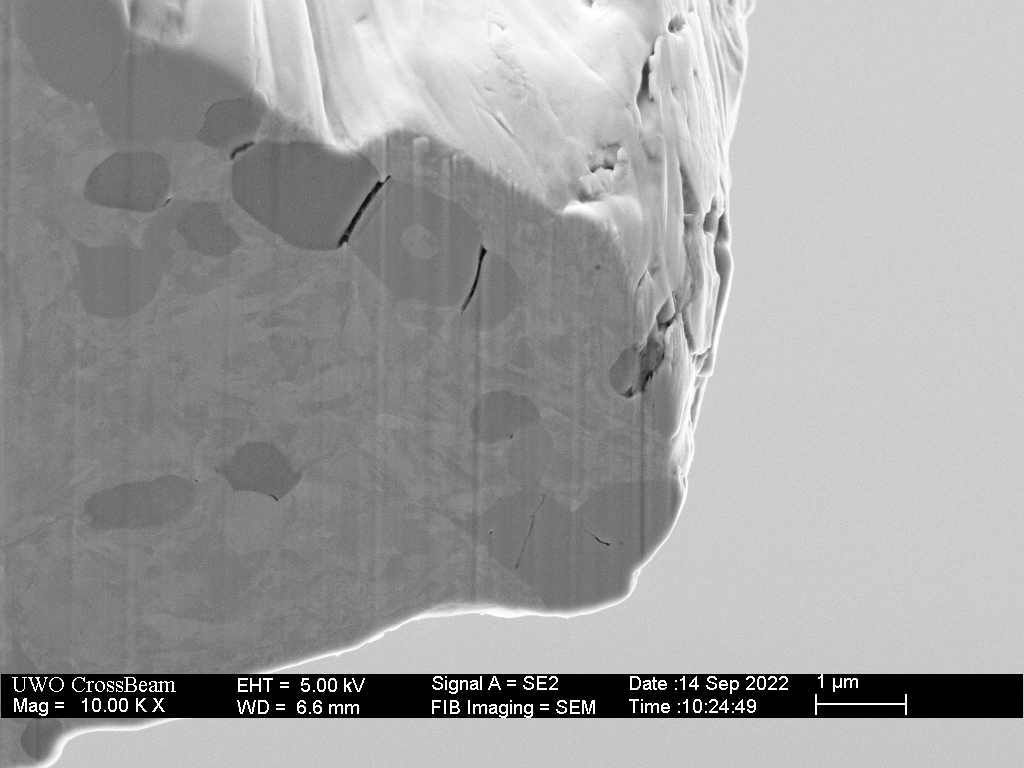
The “shaving” level of keenness (sub 0.1 micron edge) at the apex was lost early within the first 100 cuts as wear and deformation to the matrix steel occurred. This is not at all surprising considering our experience with how delicate the edge of a razor blade or new utility knife blade are. It is remarkable that a sub-micron level of keenness was maintained in the matrix steel at the apex at 300 cuts. It appears that the carbides provide structure to the near-apex steel, slowing down deformation-type blunting until the carbides are severely damaged, softening the apex to allow blunting. Keeping in mind that this is a preliminary result, it does not appear that the wear-resistance of the hard carbides contributes directly to the performance and edge retention of the keen edge. If this is generally the case in this class of steels, it suggests that there is likely an optimal carbide concentration rather than “more is better” for keen edge retention. More specifically, we want the carbides to be isolated rather than clustered. Carbide damage consistently occurs more readily in clusters where two or more carbides impact one another with flexing of the steel, suggesting that a steel with better dispersed carbides (not clustered) would perform better in this application.
At this point the knife was “refreshed” by honing on the flat surface of the white ceramic rods of a Spyderco Sharpmaker, 10 light passes per side. This new microbevel is observed to have a remarkably keen edge considering the coarseness of the ceramic.


The refreshed edge was then used to slice the same 1/4 inch sisal rope at one point. Cross-sectioning shows that the particularly keen edge produced by the ceramic hone was shorter-lived compared to the initial sharpening. There was noticeable deterioration in cutting performance by the end of the first 100 cuts and cutting become difficult by the end of the second 100 cuts. This edge is more difficult to characterize by single point cross-sections as it is less uniform.

For final comparison, the knife was sharpened with a DMT Fine plate with minimal burr, followed by “burr removal” and carbide exposure using a Shapton Glass 8k stone with a small amount of slurry. The result is a moderately aggressive 30 degree bevel with minimal rounding or micro-beveling. Somewhat surprisingly, this particular edge deteriorated very quickly during the rope cutting; performing well for about 20 cuts but unable to cut cleanly through the rope by around 80 cuts. Anecdotally, this is consistent with the mixed results I have experience when experimenting with this approach.


The rapid deterioration in the above example may have two causes. First the micro-bevelling step likely introduced flex damage. This damage was not evident at the one location I analyzed. There is always a concern with micro-bevelling in that increasing the sharpening angle results in very high lateral pressure at the apex due to the very small contact area that exists before the new bevel is formed. Second, the micro-textured apex is not ideal for initiating the separation of fibers in the rope, demanding higher force to be applied to the blade with the increased force accelerating damage to the edge.
The results shown above are preliminary; however, they do highlight the importance of appropriate sharpening technique. More work is needed to determine the most efficient and appropriate approach. In summary, in this particular case, we cannot predict edge retention from geometry and steel type alone.
Although the carbides do not play a direct role in the performance of a keen edge, this steel has shown that when created with minimal burr-root sharpening damage, that keen edge can have excellent edge retention. The challenge is to form such an edge while minimizing carbide damage that leads to premature failure. Ideally, we want the knife to blunt through other processes at around the same rate that damage build-up leads to micro-chipping and the transition to the long-lasting ceramic edge geometry. These results also highlight the importance of the matrix hardness – it appears that the softer and more deformable the matrix, the faster the carbides crack.


24 responses to “Carbides in S110V – Part 3/3”
I was reading the first part of this thinking “now I wonder what the edges will look like after use,” and BAM. Todd comes through again… Great write-up, as usual.
LikeLike
Very interesting!
The Sharpmaker apex is side biased (Part 2 also shows Sharpmaker burrs). Presumably due to considerable resistance to adhesive wear in this class of steel (the internet says that “microwelds cannot form between the carbides and the work material; therefore, a high carbide volume in the tool steel will reduce adhesive wear”). That probably contributed to its failure.
Perhaps that also happened with DMT Fine / SG 8000 edge? I’d expect a fine alumina stone is similarly not very efficient at abrading S110V. Admittedly, s110v_dmtf_sh8k_02.jpg (“Cross-section of the S110V blade sharpened around 30 degrees with a DMT Fine plate followed by burr removal on a Shapton Glass 8k stone with light slurry to just remove the burr and lightly expose carbides near the apex”) doesn’t show anything like that, but this is just one spot on the edge… s110v_sh8k_100sisal_04.jpg (“Cross-section view SEM image of the S110V knife with exposed carbide edge after 100 rope cuts. An area that did not microchip shows no obvious carbide damage below the apex”) seems to show some evidence of deformation.
LikeLike
The ceramic removes steel through a two-step process. First the carbides are crushed in the near the surface layer, then the combined matrix and broken bits are removed as the (adhesive) transfer layer.
The fine alumina stone doesn’t do much of anything without some mud/slurry. You could create this first (as I did) with a diamond plate, or let the stone auto-slurry with use. The slurry bites into the matrix between the carbides through a 3-body wear process.
LikeLike
I just found it curious that Shapton Glass edge failed so quickly. It didn’t look like it should – the Sharpmaker edge looked a lot more fragile. So my hypotheses is that SG has reduced “metal removal power” (with this steel), but still full “deformation power”, resulting in excessive flexing of the apex, burrs/biases and build up of damage. If so, the alternative – stropping or buffing (with, say, alumina metal polish) – should work better. Would you say that’s the case?
LikeLike
There is no way to know without repeating this a few times, cross-sectioning more than one location.
I suspect that edge transitioned early because it had poor rope cutting ability, which caused me to use more force, accelerating the chipping.
Alumina metal polish has no effect on this steel.
LikeLike
> I suspect that edge transitioned early because it had poor rope cutting ability, which caused me to use more force, accelerating the chipping.
We know that bluting happens non-linearly, such that the higher levels of sharpness are lost quicker, and the more blunt an edge becomes, the more work it takes to blunt it futher. That’s because sharpness depends on the width of the apex (assuming blade’s length doesn’t change) and that grows linearly with the amount of metal lost (which grows quadratically – again, ignoring the length).
Of course, that’s a fairly simplistic view and in practice we can expect at least some non-linearities. One example would be a “sharpened burr” collapsing. Another was what you described in “The Honing Prograssion”: “Probably the most surprising result here is that the improvement beyond the 4k level is so visually underwhelming. At the same time, a dramatic improvement in performance, as measured by shave-testing, is typically observed over the same 4k-8k-16k refinement levels. The simplest explanation is that there is a keenness threshold required for comfortable shaving; an edge width in the range of 100nm.”
So you seem to think that some threshold of stress was surpassed, that caused rapid degradation of the edge. However, the 4k diamond edge didn’t show such drastic microchipping, even when it was in a pretty blunt state? Well, maybe it being more obtuse (40 dps vs 30) did help.
> Alumina metal polish has no effect on this steel.
Not even for exposing the carbides? How were those factory edges you demonstrated were done then. I don’t see why they would do anything other than buffing it on a standard buffing wheel, and whatever abrasive they used, it obviously wasn’t very good at abrading VC.
LikeLike
I would really like a segment on super detailed sharpening techniques, here are some questions I’ve been losing sleep over when sharpening and would love to see you analyze at the microscopic level:
– should the burr be completely removed before changing grits
– does working from heel to tip or the inverse affect sharpening
– does work from edge to heel or the inverse affect sharpening
– is there a certain combination of the 4 options above that produces the best results
– does changing pressure at certain grits change performance
– best way to get toothy edge that’s durable with max edge retention
– does leaving some scratches from each grit in a full progression make for a more complex edge that allows toothiness of low grits and refinement durability of high grits
– same blade sharpened at multiple angles to show rolling/chipping/weakening
– jumping from 240/400 grit to different micron diamond emulsions
– doing a full sequence from 80 grit to .25 micron stropping showing each grit progression under microscope
LikeLike
– also, a comparison of popular diamond stones!
LikeLike
I’m a little confused, what was the sharpening method in your first rope test that appeared to be most successful? Also, it seems that abrasives generally don’t matter, and sharping approach is more important, correct?
LikeLike
The keen edge produced by micro-bevelling with the Resin-bond 4k diamond followed by stropping was the best.
At the coarse sharpening level, abrasives don’t matter so long as they cut; coarse silicon carbide stones like the Sigma Power and the Shapton Pro that continually refresh themselves are very effective.
LikeLiked by 1 person
What angle do you suggest creating the micro bevel? Say I sharpen the primary bevel to 17 degrees per side, what angle would you create the the microbevel? 17.5? 18? 20? 25?
LikeLike
I think you need to keep the sharpening angle below 15 dps so that the increase in angle near the apes from micro-bevelling and stropping stays below 20 dps.
I’m currently experimenting with 15V by sharpening just below 15 dps, micro-bevelling at 16dps and then using the diamond/leather strop to bring the apex up to 20dps.
LikeLiked by 1 person
At what grit would you start you micro bevel? My diamond stones include 80, 150, 240, 400, 800, 1200 and 3M microfinishing films from 1200-60k and gunny juice 6, 3, and 1 micron. Thanks so much for all your work on the subject, hope you get involved in making videos/tutorials.
LikeLike
That interesting. Thanks for the reply. Why is there such a push to use diamond and vitrified stones than on hard/high carbide steel, when other stones work fine?
LikeLike
Obviously data is limited by a small sample size, and the limited number of steels tested, but do you have an intuition of how this same technique would work on steels with fewer carbides?
It would be interesting to see the same type of carbide exposure through micro-beveling on steels with fewer large carbides, but better resistance to micro chipping. Steels like magnacut, and S35VN.
Perhaps even on a steel like 14C28N, or Nitro-V which have a fine microstructure and low carbide volume. 14C28N is probably the best candidate in this category because (according to Larrin Thomas) it has the largest carbides among this category of steels. While there likely wouldn’t be any significant improvement, a way to improve the wear resistance of these otherwise excellent steels would be very useful.
LikeLike
Love your work! Lacking your tools and precision, I’ve developed my own way of producing marvelous edges with S110V. I use KME diamond hones to produce a clean 34 degree inclusive edge – 100 grit through 600 grit. I keep the burr small. Starting with the 300 grit hone, after the burr has been formed properly, I switch to horizontal polishing strokes (no vertical movement of the hone) on each side until I have removed all “vertical” scratches – and, after the 600 degree hone using this method, I’m left with a very clean bevel – quite sharp – and a very small burr. I finish the edge using a Dota Creek black Arkansas stone in the KME making clockwise and counter-clockwise circular strokes. I do this to get rid of the burr, polish the matrix steel, and expose the hard carbides – but not too much. The resulting edge looks like a 10k edge but is mildly aggressive. I think the horizontal strokes help with edge deflection. Your thoughts?
LikeLike
It would be more interesting if you provided some rationale for your unorthodox technique. What’s the purpose of “horizontal” strokes (are these strokes in the direction parallel to the edge?). And why do you use inferior abrasive like silicon dioxide for grinding s110v.
LikeLike
I have found no difference between edge parallel (or horizontal) strokes and edge trailing strokes.
LikeLike
I am so glad you’re still working on these projects, the images you produce are such a breath of fresh air compared to the wd-40 soaked romantic tales of sharpening. Not that old wisdom isn’t valuable, but the modern perspective has clarified a lot of my own thinking.
LikeLike
Thankyou for your work it has been outstanding. I have a few questions to this topic.
1. Can you use edge leading strokes to deburr?
2. Does microbeveling after edge trailing leave a keener finish than just going with edge leading strokes?
LikeLike
It depends on the stone – You generally won’t remove a burr at the sharpening angle (the same angle you created it) unless there are loose abrasives (mud) to break up the burr.
There is no way to generalize the effect of micro-bevelling – the apex will experience extreme lateral pressure which can have wide range of outcomes – an abrasive-loaded strop will give more consistent results.
LikeLike
Do you always dull the edge before microbeweling? What should I do to get more consistent results with microbeweling?
LikeLike
Hello Todd,
I have admired her work for many years. Since my English is miserable, I only dare to write now. Please excuse my bad english too. I hope I can express myself clearly.
I also keep coming back to some of their pages to check or improve my own thoughts and experiences. Learning processes will never come to an end.
it hasn’t been very difficult for me to create more or less sharp blades for some time now. I’m even more interested in the fact that this sharpness lasts for a long time.
in my deliberations, i came across material damage from grinding early on. This is also confirmed by their recordings in “Grit, Scratches and Sub-Surface Damage – Part 1”
btw. I’m still eagerly awaiting part 2 😉 I still have a lot of unanswered questions here.
Now everyone knows that rocking metal back and forth fatigues it. and if you repeat this many times, eventually breaks.
Your pictures here in “Carbides in S110V” now give me a little idea and guesswork. You mentioned the bending forces when grinding the cutting edge. (Consider how easily a metal that is maybe 1 µm thick or even thicker bends).
if you now consider that a normal metal with a relatively constant structure fatigues when bent… but steel and hard metal have different yield strengths, elasticity and breaking strength… it seems obvious to me that when bending (even if it wasn’t plastic but only elastic deformation) through the different bending and elongation properties of carbide and steel matrix exactly these gaps shown (especially in the border area between carbide and matrix or the fracture of the harder material.
I’ll probably change my sharpening process now. On angle controlled with system and pressure control. I’m curious to see if the edge retention of cpm steels will change.
LikeLike
Dear Todd,
thanks a lot for your extensive postings.
i have read your S110V work and cannot come to an other conclusion that the S110V Spyderco knives I bought worked with during the past year are behaving differently than the S110V blades from Spyderco I bought in 2019 and 2020. ( same year as your bought your test knive) . The stability/ keen edge and toughness of more recent S110V blades do differ from the 2020 blades for one reason or the other. I am not a technical specialist but just a user but I do experience the difference and just wanted to tell here, so maybe a reason for my experience can be found or confirmed by comments from others. If somehow the heat treat has been improved and just implemented as a part of the continious improvements Spyderco packs into their lineup it is highly appreciated. Many companies do blow their horns for every single minor change in a process. Maybe Spyderco just “gives” it to us as part of their philosphy how to deal with their processes and customers. Maybe someone can chim in here and confirm or deny.
LikeLike