

When I first became seriously interested in this topic about four years ago, consistently honing a straight razor to the level of keenness required for a close, comfortable shave challenged me. Having earned my living for the past 25 years solving problems like these, I began by searching for relevant scientific literature as well as reading the opinion-based resources of internet forums. I was surprised to find almost no published scientific work, although likely there is a wealth of information in unpublished reports in the research libraries at the Gillette and Schick corporations. The internet forums proved to be a dead-end, although for different reasons. Over the past 4 years, I have learned a great deal about sharpening, honing and stropping and have shared some of that knowledge here.
When I started this blog, just over two years ago, I chose to concentrate on demonstrating what happens at the apex of a blade, particularly since the relevant length scales are much smaller most people can comprehend (or see with even the best optical microscope). When writing these articles, I have made a concerted effort to avoid drawing conclusions, instead just showing what actually happens at the sub-micron scale during the various sharpening processes. I have chosen not to use this a forum to explain how to sharpen, but rather to provide a resource for people with sufficient interest and comprehension to improve their own understanding. In this article, I will break with the trend and share a simple and reliable technique for honing a straight razor.
It is usually claimed that honing a straight razor is more difficult than sharpening a knife or other bladed tool. While it is certainly true that some people make it more complicated, it is not necessary to do so. It is also commonly asserted that honing a straight razor requires a set of fine and expensive hones – this is also not true. I demonstrate here that only two hones are required, one coarse hone for expeditiously setting the bevel and one fine hone for polishing away the apex damage created by the coarse hone. The second hone does not need to be any finer than 4k grit. It is also important to understand that scratches in the bevel are of no consequence when the bevel is micro-convex as the scratches do not reach the apex.
I have personally used the approach described below for approximately two years, and have shave-tested well over 100 razors prepared by this approach. I have recommended this technique to people having difficulty honing their own straight razor and have not yet had anyone tell me they were unsuccessful. To be clear, there are many other ways to accomplish this result; however, this is the simplest and most consistent approach that I have found.
This approach is quick and easy if you are honing a straight razor that has been shave-ready (not a restoration or a factory edge, for example) and not been damaged (no chips that you can feel with your thumbnail) and is not warped. A smiling blade is not a problem, provided you use a rolling stroke to shift pressure along the length of the blade.
If you are unsure of the condition of the blade, raising a burr that you can feel using a 1k stone, as you would when sharpening a knife, is a helpful diagnostic. However, I would only do this once, as it is a waste of steel. It is important to remove this large burr with edge-leading strokes as the steel near the base off the burr will be damaged from the burr flipping side to side.
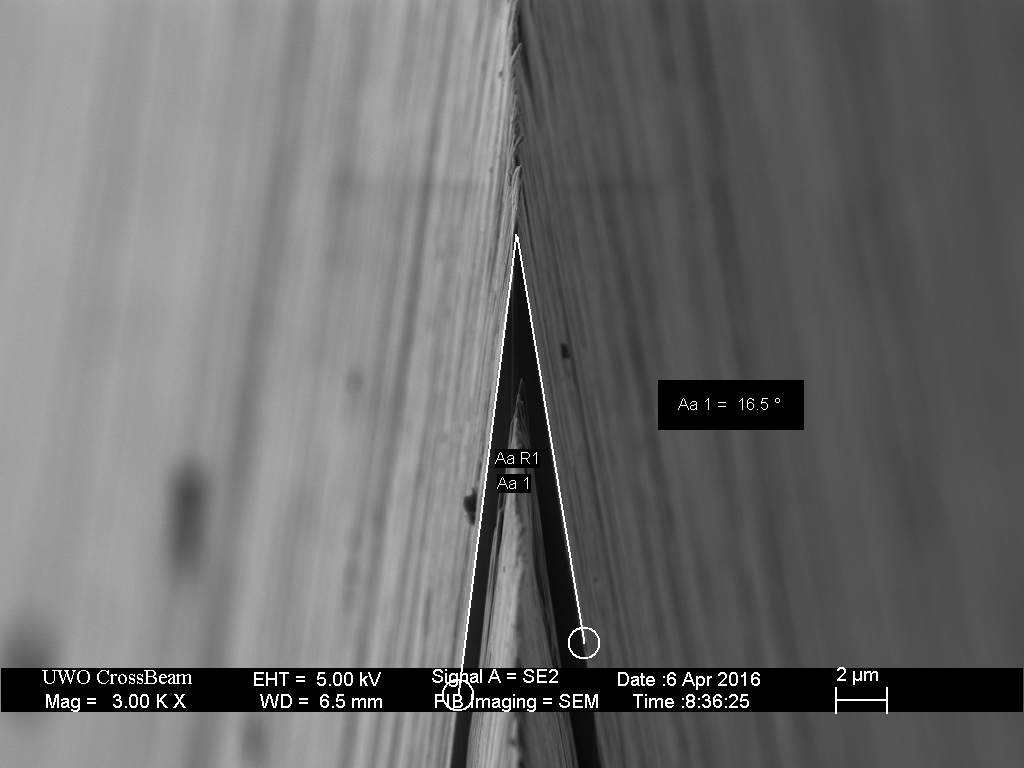
The goal of the first step is to remove enough steel from the bevel faces to ensure that they meet and form an apex (usually called “setting the bevel”). Up to this point, the approach for sharpening a knife and a straight razor is essentially the same. Although with a straight razor we want to avoid introducing chips in the edge, something we are less concerned about when sharpening a knife. A straight razor has a narrow bevel angle (commonly 16-17 degrees, inclusive) and is more susceptible to micro-chipping than blades with included angles of 25 degrees or more.
My preference is to set the bevel with high quality 1k stone such as a Naniwa or Shapton to achieve a good trade-off between abrasion rate and the size of the micro-chips in the apex. Lower quality stones will also work if edge-leading strokes are avoided. As a rule of thumb, using the 1k stone long enough to make black swarf, then ending with about 20 edge trailing strokes is sufficient. The reason for the edge trailing strokes is explained in the series of images that follow.
To show how robust this technique is, for this demonstration I use two of the worst choices for hones that I own, the DMT extra fine (1200) and the 6k side of a King 1k/6k combination stone. The DMT is problematic because it produces micro-convexity and substantial damage and distortion to the apex. The King 6k, although a good polisher, causes significant micro-chipping to the apex when used edge leading.
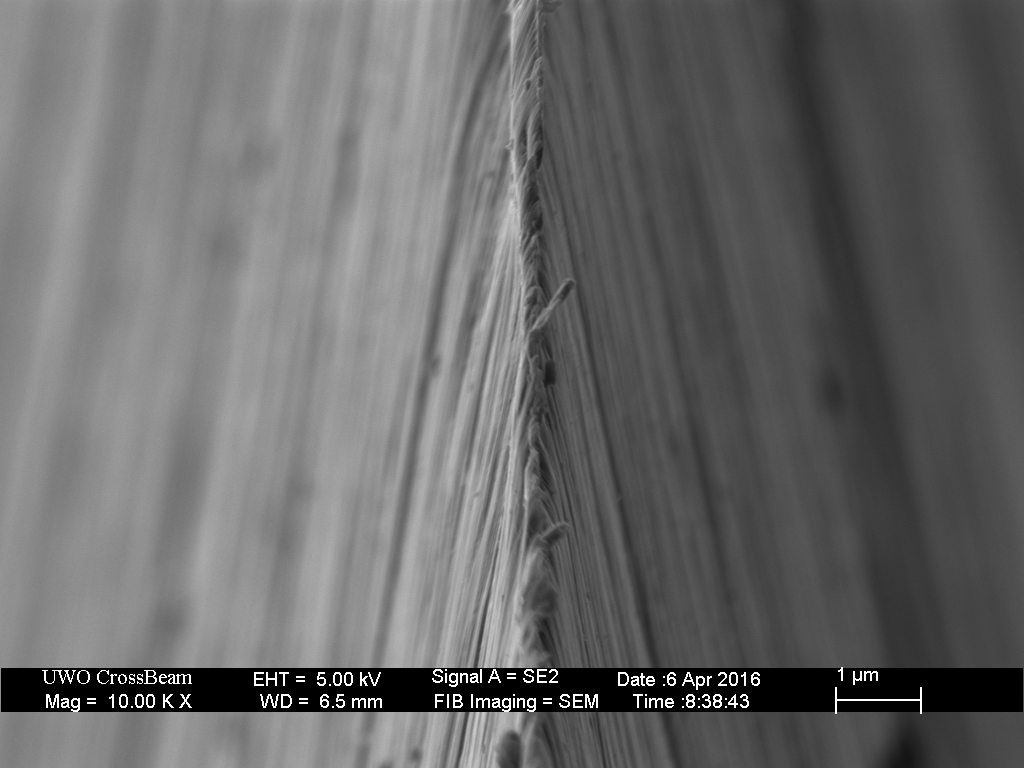
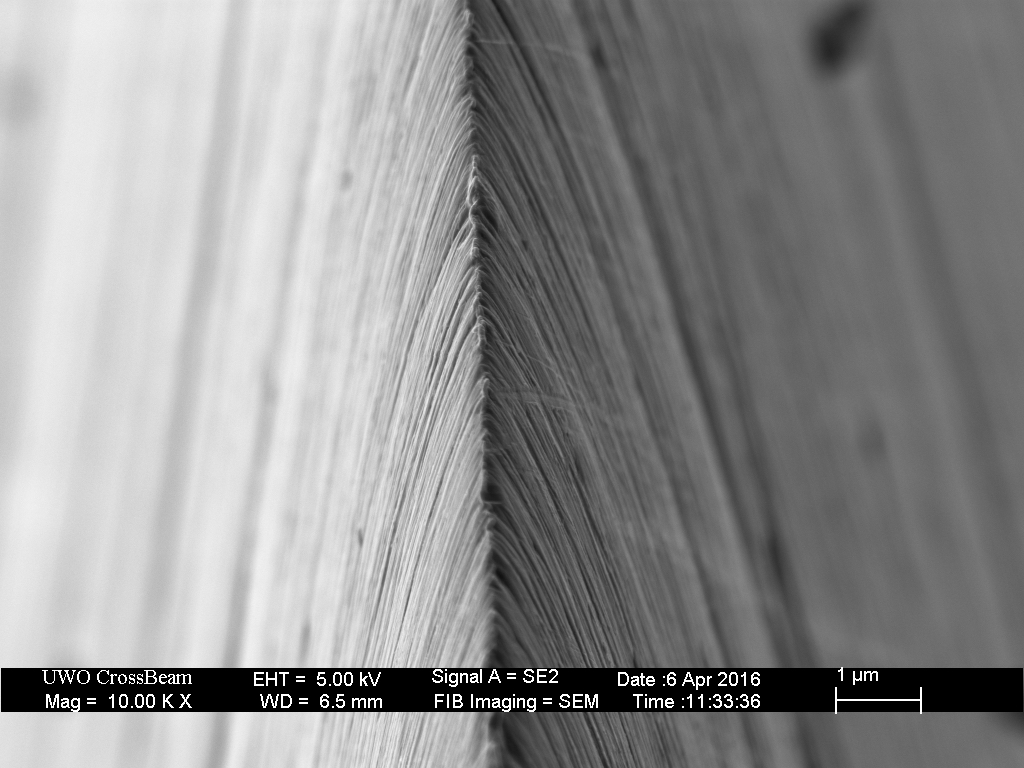
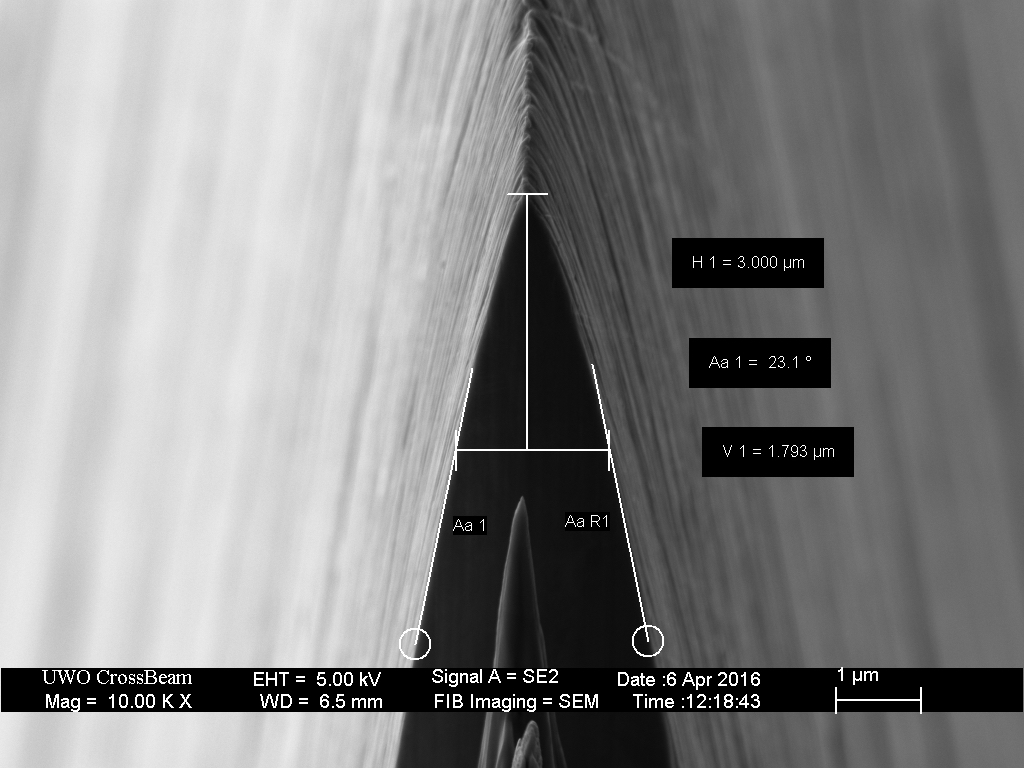
The first step, here shown with the DMT extra fine (1200) diamond plate, produces a near-triangular bevel but with damaged and distorted steel at the apex. This is all that is required at this step – it is of no consequence whether the blade can “shave” at this point.


The second step is to polish the bevel and remove the damaged steel near the apex with a 4k to 8k level hone with about 20 edge-trailing strokes. There is no need for a feather light touch, but the edge trailing strokes should not flex the blade either. The goal is to produce a foil edge – more steel than we want at the apex. After this step, the blade is in similar condition as it would be when using the Murray Carter 1k/6k method prior to folding the burr by cutting into a piece of wood. In the example here, the blade received 20 edge-trailing laps on the King 6k to produce a micron-sized foil burr.

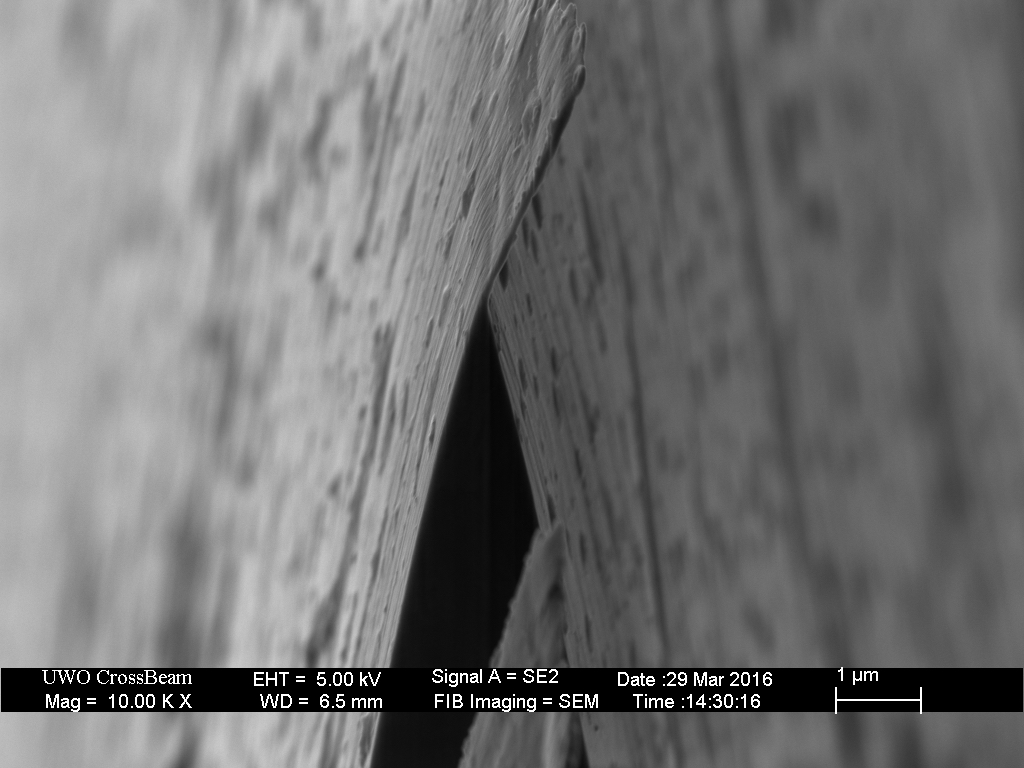
In the low magnification cross-section view (below) a micron-sized foil-burr is observed at the apex beyond an otherwise triangular bevel. The goal of this step is to have the apex “longer” than we require so that there will be no damaged or chipped regions remaining after the strop-based burr-removal step. Again, it is of no consequence whether the blade can “shave” at this point.
The third step is to remove the burr using the hanging denim strop with metal polish. This burr-removal technique was detailed in Burr Removal – part 1. I normally use a strip about 4cm wide and 25cm long, but you can make it larger if you prefer. As a rule, I do 30 laps. Again, there is no need for feather light strokes – on a weigh scale I would expect to see between 100g and 150g. I tape the denim strip to the edge of the bench with duct tape, and do not pull nearly hard enough to pull it loose. This will micro-convex the blade, removing all traces of the foil-burr. I replace the denim strop when it becomes dark and glazed, after ten to twenty uses. I have analyzed and tested a variety of metal polishes and all performed similarly.
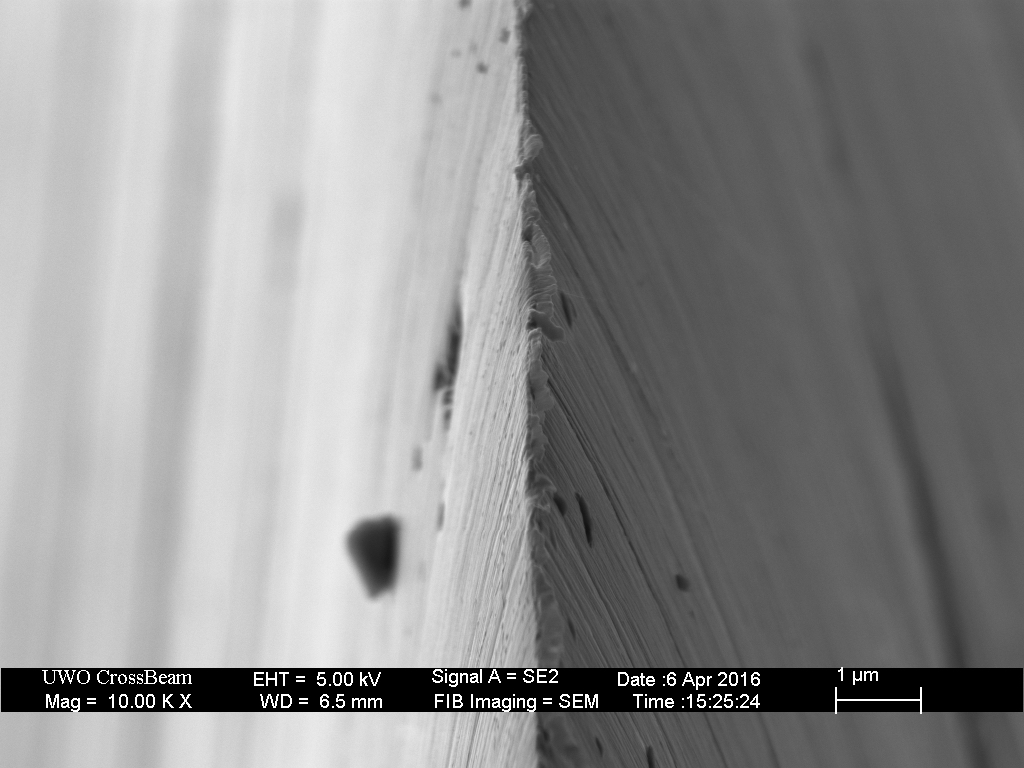
The purpose of this third step is to micro-convex the apex and remove the foil-burr in preparation for the diamond on leather strop which will then shape the apex for shaving level keenness. As I have shown previously, diamond on leather will convex the apex but not remove the burr which forms as a consequence. A typical example of a foil burr that results when transitioning directly from a hone to a diamond on leather strop is shown in the two images below.

The denim stropping step not only removes the burr formed by edge-trailing strokes on the hones, but the “pre-existing” micro-convexity that it imparts will prevent the formation of the foil-burr that typically forms when stropping on diamond-loaded leather (shown above). The foil-burr (above) results from incomplete (micro) convexing of the apex. The result of the loaded denim stropping step is shown below.

With the denim strop, there is some care required to ensure that suitable downward pressure is used. With too little force, the apex will not be sufficiently convex to avoid the formation of a foil-burr with the diamond on leather strop. I typically use the same force on all strops, both loaded and clean.

With too much force, the apex will convex too much and not contact the surface of the diamond on leather strop. Too much pressure will also turn the strop black more quickly as the entire bevel is convexed (and more metal is removed).

Typically, the blade will shave reasonably at this point in the procedure, although it is not likely to tree-top fine arm hair or pass the hanging hair test with any great success without additional stropping on clean or loaded leather.
The fourth step is to clean up the apex and maximize keenness after the denim. This is easily accomplished by stropping on smooth leather loaded with diamond spray . Again, as a rule, I do 30 laps. In this example, a hanging kangaroo leather strop loaded with 0.25 micron poly-diamond spray was used. I typically use a latigo leather strop for this step – there is no need for exotic leathers.


Depending on the pressure applied during the stropping steps, a very small (but inconsequential) burr may remain on some parts of the blade. The foil-burr shown below is not typical, but even in the event one of this magnitude is formed it is not a problem.
This inconsequential burr can easily be removed by stropping on clean denim. Any clean linen strop component will suffice.

Finally, prior to shaving, I strop on clean leather, 30-50 laps. This will deposit a thin layer of organic “lubricant” on the surface of the blade, as well as ensure that the apex is aligned. At this point, the blade should easily “tree-top” the finest arm hair and score HHT-5 on the hanging hair test.

176 responses to “Simple Straight Razor Honing”
I have a big question for you!
I purchased a Thiers Issard just honed from the factory! I asked to verify if it will have come honed properly!
But it has verified what I feared!
The razor is honed and pass the test of cutting beard on arm or single beard hanging but can’t shave properly neither I have done 200 passes on the short paddle strop I have!
So the big question what king of sharpeness has this razor?
What work of honing have I to do???
To me this razor going by intuition it seems like if has stopped to a 5000 K stone!
But there is the risk I would go back if is not this!
So I should probably starting from the 12 k superstone Naniwa but I’m not sure about that!
Because I don’t know what have done in the factory for honing!!! I will contact the factory but for the moment the razor is completely out of order for not being sharp for a normal shaving! without pulling skin and beard!!! Please tell what you think I should do! Obviousily I will contact the reseller but I think he will not help me to solve the problem! because I had the same problem with other razor I had to throw in the garbage! Thanks very much for your help
LikeLike
I have a few Thiers Issard razors, but I haven’t bought one for about 5 years. That last one was severely warped and I returned it. I don’t have any experience with their current honing quality, but I did find all of them required a fair amount of work to get them to a geometry where the could be honed on a flat stone.
If your razor can nearly pass the HHT then it is definitely within stropping range of shaving. A pasted strop followed by a good clean strop should get you there. If you want to shave with a straight razor, you really need to invest in a good hanging strop, a paddle strop is ok for maintenance, but it’s no substitute for a proper strop.
LikeLike
Hi! First, I’d like to say that your work is very informative and I appreciate it very much!
Second, in your article on “The diamond plate progression” you showed that a 325 grit DMT plate was able to make a blade quite sharp. Would you recommend using that technique for a kamisori razor short term until I can afford the higher grit whetstone as well as the straps and compounds?
LikeLike
With regular daily shaving and assuming no misuse of the blade, how often do you have to go back and reshape the edge with your sharpening stone. How far back in the progression do you have to go? Do you have a daily maintenance stropping routine? Do you ever steel a shaving blade and when?
LikeLike
Personally, I usually get 5-7 good shaves before I do maintenance on a the hone – about the same as I get from a Feather Artist Club blade. Someone with softer whiskers than me could potentially go for months with only linen/leather. I have used the method described here with only a Shapton 4k GS for almost 7 years and not once gone to a coarser stone with one of the razors in my standard rotation.
I typically use the linen sparingly, always after shaving to clean the blade but rarely before – usually just 60-ish laps on the leather before shaving.
Steeling IS micro-beveling and you cannot micro-bevel a straight razor or even a knife with similar geometry without applying catastrophic lateral force to the blade, resulting in chipping. Instead, we use a strop to gently micro-convex the apex.
LikeLike
after a few months learning with the shapton GS 4000 HR I got a nanawa 8000 SS. I noticed the edge after honing is more chippy using the shapton HR than the nanawa 8k using a cheep USB microscope. I also felt more tics using the shapton. I suspect the HR shapton is a bit aggressive for learning to hone vintage high carbon razors Maybe the shapton GS 4000 HC stone – the gray one would be mellow but I did not want to spend the money to find out. The shapton HR is ment to cut fast through modern hard to sharpen steels.
LikeLike
my above observations were made on a old and rotten edge, it was chippy no mater what ,till after 4 long honing sessions i bread knifed it and started again, it no longer had the chippy look after shapton gs 4k hr.
LikeLike
What you are describing is almost certainly a large burr. Bread-knifing or cutting into the stone is a good way to consistently remove that type of burr.
LikeLike
I would wager that 9 out of 10 times when an edge looks “chippy” there is a burr and it is the burr that is chipping.
LikeLike
Todd, thank you for all the work you have done.
This past week, I have been devouring your blog, article after article. Your writing style is very clear and understandable, yet you explain topics in depth, providing evidence instead of relying on opinions. Great work 🙂
I have a few questions regarding stropping. I already own a tensionable paddle strop by böker (“Schraubspannriemen”).
1. Do you think this will work similar enough to a hanging strop, provided I keep the tension rather low?
2. The backside is leather loaded with green compound. Do you think this has any use in SR stropping, or is the open fabric (Linen/denim etc.) needed with coarse compounds like this?
I plan on making a denim strop. Do you think just using a clean denim strop and a clean leather strop could work in a honing progression coming off a shapton 8k/12K or a coticule? If I understand correctly, the compound mainly speeds up the micro-convexing, so with enough laps, using clean strops could still work?
LikeLike
Based on my testing, this approach is not very sensitive to the (diamond loaded) leather strop. So I would expect that a paddle strop would work just fine.
I don’t see any value to using pure chromium oxide as a stropping compound; however, “green compound” is often a mixture of aluminum oxide and chromium oxide, where the aluminum oxide dominates the performance – these type of compounds would work just fine on denim. I would not expect anything positive coming from coarse compound on smooth leather at straight-razor geometry.
It is true that the compound mainly just speeds up what the bare substrate would accomplish, but it can be a thousand-fold increase.
Bare linen and leather do work for many people, it just requires greater skill with the stones. The technique I describe here is meant to remove the need for that effort/skill on the stones.
LikeLike
Thank you for all of the time and effort you put into this website—it’s a tremendous wealth of information.
I’m wondering whether you might have any suggestions for a next-best alternative to a leather strop, as I don’t use animal products.
Any help would be greatly appreciated!
LikeLike
I know Tony Miller makes a vegan razor strop, but I have no experience with it.
Leather is particularly effective because of the nano-scale fibrous nature of the surface – I don’t think this is something that can be duplicated with a synthetic material – the palm of your hand is likely the best non-animal strop you will find.
LikeLike
three years after i read your research for the first time, now it’s still the most and maybe the only scientific guide to my honing and stropping skills. thanks for keeping it still approachable.
LikeLike
Todd,
After an inordinate amount of time spent studying your posts and comments, I now do the following to sharpen and maintain my kitchen knives:
1) Use the DMT EF stone to set the bevel (alternating more often as I finish), then remove the burr (with alternating edge leading strokes), then refine the edge (alternating edge trailing strokes)
2) Daily maintenance with a smooth steel rod at a high angle
3) Occasional touch ups with the DMT EF (edge leading strokes followed by some edge trailing strokes)
Very simple, but am I missing anything important?
LikeLike
Would love to see one of these but for chisels and handplane blades on wood of various densities 🙇♂️
LikeLike
After step 1 is finished with 1k stone, step 2 is directly to alternating edge trailing laps on 4-8k stone. There are no edge leading strokes in step 2, correct?
LikeLike
I would call the 1k stone step 0, as it isn’t necessary for normal maintenance.
My procedure on the 4k stone is to lap it with a diamond plate, then do back-and-forth scrubbing type strokes, alternating sides after about 50 strokes, then after 30 , 20 , 10 , 5 strokes. Next I do alternating edge leading strokes until the water on the stone is easily running up the bevel all along the edge – maybe 50 laps. Then I do 20-30 edge trailing strokes. After the 3 strops I tree-top some arm hair and if there is any sound or resistance, I repeat the entire procedure.
LikeLike
Excellent, thanks for clarifying. Ready to give this a go.
LikeLike
First go around with the process. Not a bad result at all. Only substituted Alox non-psa lapping film in place of stones as I wanted to see approximate results bf sinking money into actual stones.
Still some tugging with ATG passes, but wouldve been a very nice WTG/XTG only shave. Gonna refresh on 4k equivalent film and redo the demin/diamond/clean strops, paying more attention to apply medium pressure. See how it goes.
LikeLike
I find lapping film produces burrs very easily, it’s not something I would recommend.
LikeLike
Hi there
I noticed there is no mention of the marker test in this website. Have you found that it is useful? With my extra hollow ground razor the it suggests that minimum pressure while honing works the edge of the bevel. Would the maker test tell us when a stage of honing is complete?
Thanks!
LikeLike
Pardon me, I found your recommendation of marker to assess the first bevel set of a razor in the older posts of this page. Would marker be useful assessing if stroping is complete?
Thanks a bunch!
Matt
LikeLike
A marker is very helpful at the early stages of sharpening to help identify warps and bows. For bevel setting, it’s probably easier to dull the edge and watch for the light reflecting from it to disappear. At the scale of a shaving edge, It’s hard to beat testing it by shaving or tree-topping arm hair.
LikeLike
Whoa this is good information that wasn’t in the honing guide article. I thought this whole process was edge trailing
LikeLike
Hey there
I just started experimenting with a kamasori
Any extra considerations come to mind? This one is about 22 degrees.
So far I’ve come up with doing short strokes on the stamp side. Good idea?
How would you approach one?
LikeLike
Thanks for the clear path to follow! I’m gathering materials to sharpen my grandfather’s razor.
How to level fine stones?
Would 3m diamond film on counter top be good enough to level a shrapron glass 4 k stone?
About the leather
I got some thin flexible leather from an couch for strop, it feels stretchy. Do I need leather that is thick, more like a belt or saddle?
LikeLike
Outstanding work. I have a couple of questions. I don’t want to waste fabric unnecessarily or use leather if I don’t have to. Have you had any luck or lack of luck with washing your denim strops for reuse? And barring leather, are there any other products you could recommend for the final stropping? Also, have you noticed any change from using coarser or finer cloth? I’ve been using sail cloth, which is rather bumpy and rough, though uniform. Do you think I should give it up and go denim? Thanks for all your high quality work.
LikeLike
I don’t believe there is any substitute for leather, the nano-scale fibrous network of it’s surface is ideal for stropping.
For fabric, I’ve not found any identifiable difference between different fabrics, provided they don’t stretch. Paper or cardboard produce the same effect as denim or linen.
LikeLike
Do you use denim is the give direction or the non give direction? All the denim I am finding has give one way. Maybe over thinking it.
LikeLike
I have been using canvas for the 2 fabric strops and was surprised to see a chippy looking edge after after honing on nanawa 8k SS then pasted canvas. I used an inexpensive USB microscope. I repeated the honing protocol but sanded the canvas strop beforehand and the edge looks looks more consistent. Also tests better on finest arm hair.
LikeLike
Thanks for this.
5 minutes work and the razor is the best it has ever been.
Honestly, I had my doubts, but was pleasantly suprised.
I certaintly didn’t expect the razor to actually dry shave, but it did!
Absolutely brilliant!
LikeLiked by 1 person
Is it possible to make it too sharp for comfort? This was my first straight razor shave (vintage eBay find for first attempt at honing) and it took hairs off perfectly but damn I had razor burn from hell. It tree topped hairs easily and hanging hair test passed easily. Also would taking it to a 12k stone before denim stropping make the edge more comfortable?
LikeLike
Hey there, I’m newer as well. Nice work on getting the blade sharp enough. I had luck at sharp razor palace forum for couching me through the learning to shave process. They all have found their own way of sharpening the razor and won’t be open to this way but thay are a great responsive and helpful bunch. Have you been using the ink test and a lupe? Shaving technique videos on YouTube are good info but keep in mind these guys all have ryno skin that is adapted to straight. Try with the grain only to start and with the blade flat on your face. Light stroping on the clean leather steps helped me a bunch.
The best advice is caresses your skin with the blade and remember your not trying to get all the hair in on pass. Your aiming for comfortable. The shaves will not be as good as you are used to to start.
In answer to your question a toothy edge from braking off burrs a lot will want to bite into your skin. A uniform shaving edge will resist slicing but push cut easy. I don’t think it can be to sharp. Check sharp and keen on this website.
LikeLike
People often talk about 100 shaves to get used to it. For razor burn; wet face for a few minutes, use noxema as preshave, shave with a feather touch and wash the soap off well after. Cold water helps stop blood but you have to get all the soap off as well.
LikeLike
Awesome man! I have shaved multiple times since this and I was using way too obtuse of an angle and using too much pressure against my face. Also a pre shave oil helped. Question about stropping though. How much pressure are you using? People say weight of the razor but that can’t be correct because a razor blade only weighs a few grams and the strip wouldn’t bow at all with that weight. I keep experimenting but guidance would be great
LikeLike
Hi there,
I’ve seen a range of responses as well. Keep the strop straight at low tension- not like a guitar string. Just enough pressure to keep the blade on the Strop. My long diy strop deflects a couple of inches. the heal makes any bend but leaves a straight line of leather for edge to slide on. Because the leather is compressible it gets the Apex. A sharpie will show you how little pressure gets the Apex. I’ve had success with minimal to 200g pressure on the razor, more has not helped yet.
LikeLike
hay all, correction of following reply; my long strop deflects less than an inch.
LikeLike
I hate to be the one to tell you but most of what “people say” on the internet is nonsense.
I use a downward force in the vicinity of 50 gram weight equivalent. You should see the strop bow slightly as you move over it. It really isn’t that critical in my experience. With experience, you will learn to adjust the downward force and pull on the strop to get the right tactile feedback on the blade.
LikeLike
One of the great advantages to shaving with a straight razor is that it makes your facial skin very smooth and makes you look much younger. Unfortunately, that requires shaving off the bumps.
If you have a well honed blade and use very light pressure at a very low angle, that skin removal occurs slowly enough that you shouldn’t experience significant discomfort.
I don’t think 12k is going to make a difference – when I don’t get great results with this method it’s because I haven’t removed enough steel to reset the bevel – it needs more time on the 4k – I just repeat the procedure from the start.
LikeLike
Very impressive SEM usage!
I have to look at metal under SEM frequently for metallurgy/forensic engineering, it is very challenging to get such a beautiful looking cross-section of such a small object to show up that well.
LikeLike
Is the geometry of the razor ;12-17 degrees likely to impact edge lifespan after the 3 strops? Would you use tape on a razor at the lower end of this range?
LikeLike
My current setup is 1k King, 4k Norton, 8k norton, Pasted canvas strop with 0.5 micron CrOx, then regular cowhide leather strop.
Do you think it is important to have an extra step between the pasted canvas and cowhide leather?
LikeLike
I am reading your blog and your demonstrations with great interest. I also read the „Honing razors and Nihon Kamisori“, 1963 by Kousuke Iwasaki, translated 2011 by Jim Rion. May I ask if you could imagine what happens at the edge by „Section 3, point 5, edge finishing“? After removing the false edge on CrOx linen he is using just the weight of the blade and pulls very very lighly the razor about one or two millimeters in a direction parallel to the razor’s edge for about 10-15 minutes. I cannot understand/imagine the result of this step. Do you have any idea? Best regards
LikeLike
I have read and tried to grok steps as described after reading this and the 3 part stropping series.
Using Shapton Pro 1.5k, SP5k, mother’s mag on denim, and 0.25 micron diamond on leather, I have done the entire process 5 times on 2 razors to refine my skills.
The results are promising in terms of HHT and the entire process remarkably straight forward. I’m still quite new to SR shaving, so my actual shaving results still needs improvement.
One question about the metal polish on denim step:
I have noticed that the apex shows as a shiny line if I twist and turn the razor under a bright light. With 30 laps on denim, the line is quite wide. But with 10 laps, the line is still noticeable. This observation is entirely congruent with how metal polish works. The spine wear gets very polished and shiny, and the apex is getting the same attention and should be shiny as well.
Should I strive to minimixe the width of the shiny line? The micro convexity happens in the last 3 micron, so should the shiny apex even be visible to the naked eye?
I don’t want to create too much convexity and affect the working angles of the razor.
LikeLike
absolutely amazing world class analysis and work
LikeLike
Hi! Can you use Herold Solingen fine black paste instead of diamond paste? Should be around 0.5 micron. Could you use Naniwa 800SS and Coticule instead of King stone? Thanks!
LikeLike