
When sharpening, the choice to apply a multi-step progression from coarse to fine abrasive is predicated on the belief that there is a limitation in keenness or sharpness or uniformity for a particular grit that is overcome by progressing to a finer grit. This belief follows intuitively from the common experience of increasing smoothness of wood sanded with progressively finer (or higher grit) papers. This approach generally assumes that scratch depth correlates with edge width (keenness) and that scratch depth is proportional to grit size. Within this model, observations of the increasingly mirror-like quality of a blade bevel during a honing progression are used to predict an improvement in keenness. To be clear, there is no correlation between keenness and the polish of a blade bevel – a keen blade can be muted by drawing the edge across a stone with no effect on the level of polish on blade bevel. Also, keenness can vary dramatically between edge leading and edge trailing honing strokes where identical levels of bevel polish occur.
In context of sanding wood, “too big of a jump” refers to the idea that it should take longer to sand out 60 grit scratches with 320 grit paper than if a 100 grit sanding is performed between the two steps. Unlike hones, fine sandpaper wears out quickly, making “large jumps” uneconomical. A more salient question is whether we achieve the same result, setting aside expediency.
Contrary to the tenets of the honing progression, blades can be made shaving-sharp with relatively coarse abrasives. As was demonstrated in the diamond plate progression an excellent beard-shaving blade can be produced with a 325 grit diamond plate (yes, it was an extremely smooth and comfortable shave). One explanation for low-grit sharpness is the so-called “toothy edge.” Although there is no consensus on the meaning of this term, there is usually an implied analogy to a serrated blade and that the non-uniformity or “teeth” enhance cutting ability and perceived sharpness. In the coarse diamond plate example, the edge was shown to be highly refined with no evidence of “teeth.” To determine whether the diamond plate result was an anomaly, we investigate a different, more traditional coarse hone.
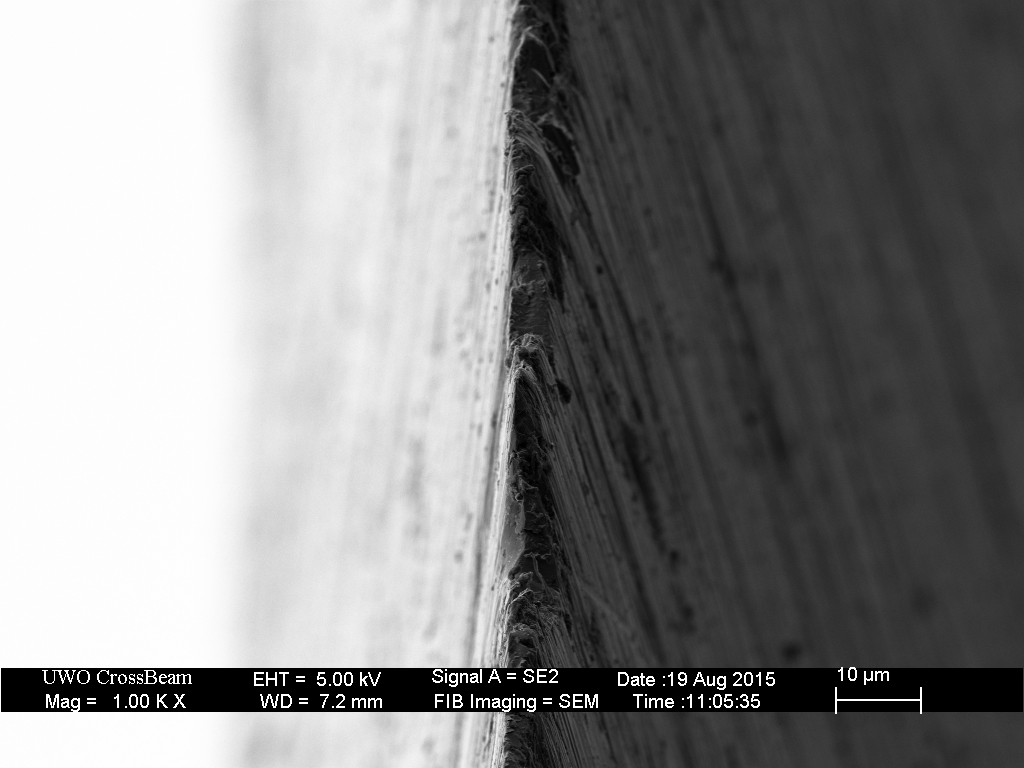
In this article, a series of images are presented from a carbon steel straight razor blade (native bevel angle 16.5 degrees, inclusive) honed on a Shapton Pro 320. The blade was first sharpened with back-and-forth strokes with progressively smaller sets per side and then finished with 10 edge-trailing strokes after rinsing the hone. The blade was maintained perpendicular to the stroke direction to achieve a scratch pattern normal to the edge.
The blade was then honed on a Shapton 16k glass stone with the blade approximately 30 degrees off normal to facilitate the identification of scratches from each hone. The blade was honed with 10 edge-leading laps and imaged, then honed another 90 laps, for a total of 100, and imaged again. In these examples, we follow a particularly large chip in the edge, allowing a comparison of the same area of the blade.


In these images, the deviations in the linearity of the edge are not the result of scratches. Although micro-chips account for some of the observed non-linearity, this effect is also due to variations in the near-apex bevel angle; the edge is longer where foil-burrs are present and shorter where the apex is burr-free.


The depth of the chip was measured at 23 microns prior to Shapton 16k honing. After 100 laps, the depth was 14 microns – 9 microns of the blade was removed with 100 return laps. From the blade geometry, this corresponds to 1.3 microns of steel removed from each bevel face – a removal rate of 13 nanometers per 15 centimeter long lap. At this rate, it would require another 150 laps to reach the bottom of the large chip. Performing 250 alternating strokes is substantial and tedious; however, the same result can be achieved rapidly with back-and-forth strokes, ending with a handful of alternating edge-leading strokes to ensure a keen, burr-free apex.
For reference, edge views of two other blades are shown following honing on the Shapton Pro 320. The first, honed only with edge-leading strokes (alternating sides) displays a coarse, broken edge – essentially continuous, overlapping microchips. The edge width varies from about 1 micron to near flats more than 5 microns wide. The second, honed with only edge-trailing strokes (alternating sides) displays a massive foil edge burr. Beneath the burr, there is a keen, linear and chip-free edge. These two blades, and the one described above, have identical scratch patterns, but wildly different apex geometries. In these blades, there is no correlation between scratch patterns and keenness. The scratches do not typically end in microchips. The scratch pattern does not correlate with the presence of “teeth.” The edge non-linearity is not correlated with stria on the bevel face.


21 responses to “It’s too big of a jump!”
I tried something similar to this on a razor with a narrow bevel on an 800-grit and 8000-grit stone, and the results were very good to my eye. I couldn’t detect much of a difference, if any, from honing with smaller “jumps”. I am going to try a jump from 800 to 20k sometime, just to see how it works.
The 800/8000 jump did not look so great on a more wedge-like razor with serious hone wear and very wide bevels. The deeper scratches from lower grit stones, readily visible without magnification, were much more stubborn. They did get knocked down, but it took a lot longer.
I also polish knives on stones occasionally and trying to “erase” deep scratches, even in softer iron cladding is fairly laborious without stepped progression.
I always presumed this was an issue of surface area and pressure.
LikeLike
The deep scratches are distracting, but under high magnification often don’t reach the edge and have no effect on the apex geometry. I believe they typically result from a higher than normal downward force pass, where the blade flexes and the apex lifts from the stone.
You are correct that surface area is THE critical parameter here. The rate of metal removal increases with pressure and pressure is force / surface area. So the narrower the bevel (for the same downward force) the higher the pressure will be and the faster metal is removed.
A thick grind razor will typically have a bevel that is at least ten times wider than a good hollow ground razor and will therefore require at least ten times the downward force to achieve the same pressure and metal removal rate. Fortunately, heavy-grind razors will not flex under the downward force (lifting the apex) as easily as hollow ground razors.
LikeLiked by 1 person
This is great; this is the evidence I have often wished I had access to.
As it is…when I was trying to understand the relationship between grit size and keenness… I was reduced to (don’t laugh too hard!) sharpening a piece of cheese on a large “grit” cheese grater. OK, cheese isn’t steel, and scale matters, but I just wanted to understand in the most basic way what the relationship was between “grit size” and “keenness.” To my surprise the huge grit size didn’t stop me from getting a very keen edge! So actually I was not surprised by the results of this article LOL.
LikeLike
There is a nice example of cheese grater honing here:
http://www.coticule.be/the-cafeteria/topic/1723.html?page=1
LikeLike
Good stuff once again Todd! Your work is truly amazing to follow and a benefit to the entire knife world.
In regards to the last paragraph… I understand you are saying that edge keenness does not depend on grit size but rather how you use the stone, however, I would be curious to see if you repeated the same experiment on a 16k stone if the results would be the same? I am guessing that the ” overlapping microchips” won’t be as large and these microchips may be what is noticed in “toothy” edges. Personally, I certainly notice a difference in the way a 400 grit diamond edge ‘bites’ into soft material over how a 10k waterstone edge, although it may not be for the reasons I have always believed.
Keep up the great work!
LikeLike
With these hones, I have consistently observed the micro-chipping effect with edge-leading strokes. This is what prevents the formation of a burr. You are correct, the micro-chips are shallower with finer stones and this is why the apex becomes keener with higher grit (for edge leading strokes).
Typically, the 10k water stone edge will be more uniform than the 400 grit diamond plate – but technique will determine which cuts better of “bites” more.
LikeLike
So ideally on a straight razor would you be inclined to believe that finishing with your last stone w/ edge trailing strokes would be beneficial to “clean up” the micro chips yet stop before you develop a wire edge?
LikeLike
I would suggest that edge trailing strokes are most useful on the coarse hones where chipping is a problem.
In general, I suggest removing metal by whatever stroke is comfortable and finish with a handful of edge leading strokes to remove any burr and then finish with a handful of edge trailing strokes to improve keenness.
The challenge with finishing edge-trailing is to remove just enough metal and do that uniformly along the length of the blade.
My experience has been that finishing with a pasted-strop is simply a more reliable and repeatable approach.
LikeLike
I’m a little unclear as to you conclusion, given the title of the post. Obviously jumping from a 1000 to a 6000 is going to mean many strokes on the 6000 to remove all the preceding scratch marks. You suggested something like 250 strokes. Would it not be more efficient to use a grit somewhere in the middle, say 3000, and do (say) 50 strokes on that to remove the 1000 grit scratches, then move on to the 6000, where fewer strokes (likely <150) will be required to clean up the 3000 grit scratches?
It seems like it is either going to be a large jump between stones (I would say a 1000 to 6000 jump is a large jump) resulting in many strokes required on the finish stone, or a smaller jump involving an additional stone, and potentially fewer total strokes as a result.
Where is the sweet spot then in terms of a grit progression in regards to the most efficient way to do it (i.e., fewest strokes to to achieve the desired result)?
LikeLike
When I wrote this article, I decided NOT to draw any conclusions. The title is a glib response to the advice that is too frequently given that, for example, a 1500 grit stone is needed between the 1000 and 2000, because “it’s too big of a jump!” The choice of 320 and 16k grit stones for this demonstration was arbitrary.
I will make the following observations, from which you can draw your own conclusions:
It did take hundreds of strokes (on a freshly lapped 16k and with pressure) to remove the chips from the 320 with the 16k stone. This is arguably excessive, and putting a stone in the middle, say 1k or 2k, would likely reduce the number of strokes required. The key observation is that most of those hundreds of strokes are required to remove the large chips, which only occur when we use edge-leading strokes on the 320. If we use edge-trailing strokes on the 320, and then edge trailing, or back-and-forth strokes on the 16k, it is an easy transition. Second, the end result was the same, directly from 320 to 16k as when we insert 1k,2k,4k,8k stones between them.
I don’t pretend that I normally use these two particular stones in sequence, this is purely a demonstration.
Also note, this demonstration was performed with an 8 degree per side carbon-steel straight razor – I would not generalize these results, but use them as a starting point for your own experimentation.
LikeLike
“The key observation is that most of those hundreds of strokes are required to remove the large chips, which only occur when we use edge-leading strokes on the 320. If we use edge-trailing strokes on the 320, and then edge trailing, or back-and-forth strokes on the 16k, it is an easy transition.”
Ah, that makes good sense. Thanks.
LikeLike
Speaking of Carbide structure:
I’d love to see an image of CPM S30V one day.
LikeLike
If the mechanism behind the microbevel is what you suggested, does that mean that this edge is going to be weaker than a microbevel that is actually formed by removal of material from a straight bevel. The mechanism you describe looks like it requires a more severe bend?
Could it be that instead of the bending mechanism you describe, the particles that stand out on the face of a Shapton 320 are too loosely bound? Thus on an edge leading stroke the edge collides with large particles which stand out like boulders partly buried in a plain, but typically also dislodges them. This would create microconvexity and might also match the chipping which corresponds so well to the size of the large particles?
I’m just throwing out ideas at an odd result.
LikeLike
I know this is an old post, but I’m going to try anyways:
Maybe there is an alternative explanation for the common wisdom of using progressive grit sizes rather than big jumps. You mentioned in the comments that lower surface area means more pressure and more metal removal. I imagine that if you raise the angle at which you sharpen, you lower the effective surface area, and remove more material. It also seems that using a progression of grits (rather than a big jump), takes less total strokes to achieve a fine scratch pattern, even if the end result is similar eventually.
Well, what If we add user error into the discussion? If bad strokes (too high an angle), can cause a disproportionate amount of removal and irregular bevel shape, then perhaps what people experience is a result of not being able to sustain the correct angle for too many strokes, but being able to maintain consistency over a shorter period of time (it demands less focus, after all).
LikeLike
If you sharpen ‘freehand’ then the slight variations in angle will result in small contact areas and faster metal removal. In other words the full bevel width never contacts the abrasive. If you have ever tried to sand a block of wood flat on a sander vs tilting it back and forth you will understand how this works.
I can speculate a number of reasons for the convention of using extensive grit progressions (more than 3 grits), and none of them are the result of wisdom.
LikeLike
The edge trailing strokes you made after rinsing the hone… does the hone need to be dry? On a smooth hone at a high polish the blade does tend to stick some when plain water is used. I wonder how the stop-go motion effects the edge
LikeLike
The purpose of rinsing the hone is to remove loose abrasive particles that may lodge in a position proud of the surface and as a result produce deep scratches or micro-chips. The sticking of a blade to the smooth, wet hone is a vacuum effect – I’ve not looked at the difference between wet and dry honing, although I often use a diamond plate dry with not obvious issues.
I think of sharpening as a two-step process – first we abrade the bevels to form a apex (removing chips or blunting) – second we form the apex to our preference. Back-and-forth strokes are a very quick and efficient to perform the first step. As long as we understand that repeatedly abrading one side produces a burr and we progress to alternating sides near the end to remove the burr, there should be no more damage to the apex material than would occur with pure edge leading strokes.
LikeLike
Have you looked into the new dual grit sharpening method? It’s on Cedric’s youtube channel. Someone else discovered it and he tested it and found that it further improved cutting performance of good steels. It’s basically honing to 300 grit on one side, 6000 grit on the other and stropping. Edge retention is apparently much better with this method vs traditional methods.
Here is the test if you’re interested: https://www.youtube.com/watch?v=jPIJkXfUg5E
Here is the sharpening tutorial, I believe his name is Gabe: https://www.youtube.com/watch?v=FruwVRSmhWA
LikeLike
So if I understand this correctly to get the maximum sharpness and keenness on an edge go with edge trailing strokes on your course stones and when you get to say 1,000 grit go edge leading and stropping combo to pop off the bur? Would this minimize the edge chipping caused by edge leading strokes?
LikeLike
We can’t generalize across all steels/angle/stone combinations. However, when we sharpen, we almost never cut through the apex cleanly. At each point along the edge where a grit particle is contacting we either leave a bit of burr or we cause a microchip – depending on which occurs more frequently, the apex can become mostly burr or mostly chipped and sometimes even a perfect triangle. So it becomes a statistical or stochastic process as to what the apex becomes.
Edge trailing decreases the likelihood of microchipping vs micro-burring as compared to edge leading strokes, so in cases where microchipping dominates, like low angle sharpening on a typical 1k+ Shapton/Naniwa/King hone, (some) edge trailing strokes will improve keenness.
However, some stones/steels/angles seem to always form burrs even edge leading (eg straight razor on DMT Fine plate) and some stones/steel/angle combinations will fully microchip even edge trailing (e.g. Maxamet on a Wicked Edge 200 diamond plate)
LikeLike
I haven’t heard of stochastic processes since debates with evolution vs creation. Hopefully honing a razor isn’t as convoluted as that debate 😂!
I really enjoy your blog, I wish Bart’s site was still live. Why was it closed?
LikeLike