
In part 1 of this discussion, a comparison of leading edge and trailing edge honing strokes was illustrated with examples from the Chosera 1k and the Shapton 16k hones. As described in The Honing Progression, edge leading strokes on those particular hones leads to a stable triangular apex with finite edge width and that geometry is maintained with continued honing. The examples in part 1 demonstrated that edge trailing (stropping) strokes on those hones leads to a reduced edge width (increased keenness) however, continued honing leads to the formation of a foil-edge burr.
The effect of stropping on a compressible substrate such as leather or fabric is illustrated with the following example. A carbon steel straight razor blade was honed edge-leading on a Shapton GS 8k, followed by a stropping progression of 100 laps on a chromium oxide loaded hanging horsehide strop, followed by 100 laps on 250nm cubic boron nitride (CBN) on Nanocloth, and finishing with 30 laps on 100nm CBN on Nanocloth. Blade cross-sections are shown before and after stropping at the same magnification for comparison.


Measurement of the edge geometry shows that the increased keenness (reduced edge width) is achieved by increasing the near-apex angle by approximately 2 degrees (inclusive). A concurrent increase of 200nm in the apex width at 3 microns is observed. In terms of our definitions of keen and sharp, keenness is improved at the expense of sharpness.


This particular stropping progression has achieved three results; the bevel is polished to a mirror finish, the edge width is reduced, and the angle near the apex has increased. Pasted stropping is often disparaged due to the irrational fear of apex convexity. The images below shows how little convexity is introduced by a effective stropping progression.


The example above was chosen to illustrate the goal of pasted stropping; to increase keenness (reduced edge width) by introducing convexity to the the last few microns of the apex. This effect is distinct from producing a convex bevel; in this case the bevel was shown to remain triangular other than those last few microns. I will use the term “micro-convexity” to describe this effect. The progression described here is not unique; a similar effect can be achieved with a variety of substrates and abrasives. Future parts of this discussion will investigate the effect of the substrate, the abrasive type and size.
Compared to stropping on a incompressible hone, where a burr forms readily, a correctly designed stropping progression will avoid the formation of a foil-edge burr through the introduction of micro-convexity.

14 responses to “The Pasted Strop – part 2”
As first part, very nice review.
Thanks a lot.
LikeLike
Thank you for another fascinating set of pictures and an informative demonstration of the effects of stropping. I’m looking forward to the next installment.
Could you also post pictures of the edge at 45° so we can see the degree of polish and the jaggedness of the edge?
LikeLike
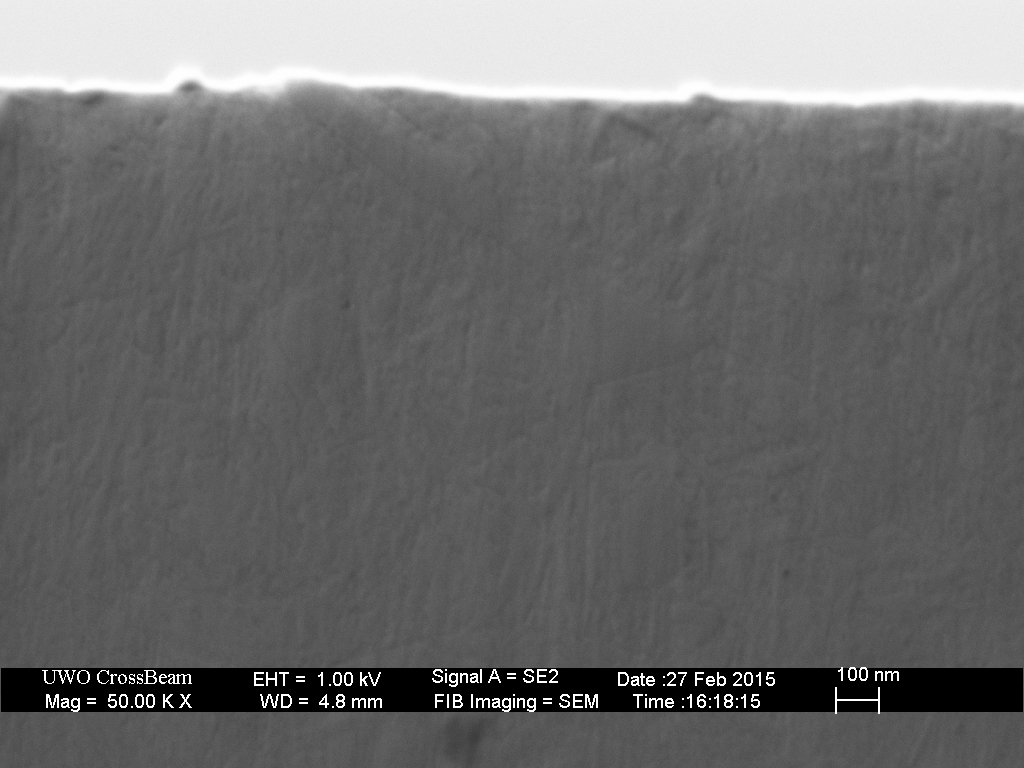
I have added side-view images. There is very little to see as it is a mirror finish; perhaps some grain structure is visible at 50kX.
LikeLike
Todd, you say “The examples in part 1 demonstrated that edge trailing (stropping) strokes on those hones leads to a reduced edge width (increased keenness) however, continued honing leads to the formation of a foil-edge burr.”
Is there an optimal “finishing touch” of edge trailing you would suggest doing w/ your last honing stone prior to stropping to maximize the reduced apex width?
LikeLike
In principle, yes. In practice, it is very difficult to consistently execute along the entire length of the blade. The idea would be to finish with a few edge-leading strokes to remove the burr and then do some finite number of edge trailing strokes to “grow” the edge to ideal keenness.
My current approach is to find a stropping progression that is insensitive to the presence of a burr prior to stropping. Ideally we want to remove any burr and produce the final keenness with the last strop. This does require micro-convexity.
LikeLike
Tanks for this study and presentation!
The edges seems so nice in the pictures. Do you performed any cutting or shaving test with them?
Would you say they are as sharp as in part 3 when a edge was honed up to 16k and then stropped?
The pictures on stropped blade are all after laps with both chromium oxide/hanging horse strop and cubic boron nitride on nano cloths. Were there any burr in between?
What kind of leather fabric is used on the hanging horse strop?
In part 3 “a strop that is both flexible and resilient, latigo (bovine) leather” was partly used and then some burr emerged.
Regards!
LikeLike
Why are we not rounding the apex (as I often observe it with the 3-finger-test on my knives) here in this example even though we stropped 230 laps on 3 different strops?
LikeLike
In fact, this blade would not test especially well with the 3-finger test.
LikeLike
Can you explain? The pictures show a very keen edge after stropping, no “rounding”. However if I strop my knives on denim with white compound, I definitely feel that they get less sticky to the finger. So maybe too much pressure or too high angle?
LikeLike
The 3-finger test does not indicate keenness, but rather how the edge grabs the finger tips. I do like the word “toothy,” but such edges grab more than uniformly keen blades. Try the 3-finger test on an Olfa LBB utility blade for reference.
LikeLike
Could it be the grabbiness of an unstropped edge is that the bevel is flat? Push cutting with a perfectly flat bevel is not as smooth as with a convexed edge. The medium being cut exerts force against the direction it is being dislplaced, and you get resistance. With a convexed edge the medium is being pushed successively outward with the changing angle. The material shears away from a convexed edge and maybe also that sticky feeling is absent
LikeLike
And again, thanks for all this great information!
LikeLike
… honed edge-leading on a Shapton GS 8k, followed by a stropping progression of 100 laps on a chromium oxide loaded hanging horsehide strop, followed by 100 laps on 250nm cubic boron nitride (CBN) on Nanocloth, and finishing with 30 laps on 100nm CBN on Nanocloth. …
Could you write more details about this progression?
In “simple” razor honing, you have recommended using metal polish on a roughly 9×2 inch denim strop instead of chromium oxide on hanging leather used in this part 2. Is that because the loaded denim strop is more aggressive than this loaded leather in creating a micro-convex edge? Is this a full sized strop, roughly 2 ½ x 20 inches?
Are the Nanocloth strops full sized hanging strops? In “simple” honing you suggest a diamond pasted hanging leather strop which I presume is full sized — or is it 9×2 inches? Strokes on one or the other make a big difference — rounded edge or burr, too weak, or just right.
In this part 2, you show a sharp, and keen 50nm edge. I imagine that the polish in denim strop, followed by 0.25µm pasted leather strop makes an equally keen edge, but slightly less sharp due to more micro-convex to the edge. Is the 50nm edge shown here too weak for use on tough whiskers?
Would fewer, lighter strokes on the metal polish denim strop make a similar micro-convex edge to the chromium oxide on leather? I am guessing that the 0.25µm diamond on leather strop is more aggressive than the Nanocloth strops used here, so much faster.
I don’t have chromium oxide, Nanocloth or the microscope to see the differences!
Using the denim and hanging leather strops, I am getting consistently excellent results with thin, full hollow blades (as good as Feather Pro), but not quite as good with modern heavier (wedge) blades. It may be because the steel is harder. I am trying fewer strokes on the denim and more on the loaded leather.
Thanks to you, I no longer use a double edge, multi blade Gillette, or nasty electric razor! My life is much improved.
LikeLike
This “progression” was chosen to help illustrate that the purpose of stropping is to introduce micro-convexity. I’ve looked at countless permutations and chose this one just as one example. I don’t recommend chromium oxide but it can be made to work if you already have some. I don’t recommend “nanocloth” unless your goal is a mirror polish bevel with reduced keenness.
The key to the “simple” technique is that the hanging denim produces just the right amount of micro-convexity and removes any burr. The resulting keenness is not quite sufficient (in my opinion) without additional stropping on leather.
You can control the amount of micro-convexity by the force applied. The number of laps is of no consequence. I do 30 as a habit to ensure uniformity (I use 1.5 or 2.0 inch wide strops) but not much changes after the first 3 laps.
The problem with heavy grind razors is that they typically have wide bevels. Because the rate of metal removal (on the hone) depends on pressure, wide bevels require proportionally more force to achieve the same pressure (the larger the contact area, the smaller the pressure for a given force). So if the bevel is 5 times wider you need to use 5 times the force (to achieve the same pressure) and you will need to remove 5 times the volume of metal to thin the bevel (5 times the swarf). Also, considering the results of Abrasion rate vs Grit, if you are using a 1k hone with insufficient pressure, you will have an extremely difficulty time setting the bevel. If you haven’t fully set the bevel, the “simple” technique may still get you shaving but it will not be ideal.
LikeLike